Description
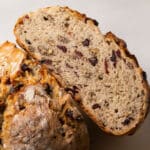
This easy cranberry pecan loaf is perfect for holidays and cozy weather!
Ingredients
- 9 grams active dry yeast (about 2 1/4 teaspoons)
- 6 grams honey (about 1 teaspoon) (use sugar if you prefer)
- 300 grams warm water (about 1 1/4 cups; see recipe notes)
- 400 grams All Purpose Flour (2 1/2 - 3 1/2 cups) plus extra for dusting (see recipe notes)
- 1 cup dried cranberries
- 1 cup toasted pecans, roughly chopped (toasting is optional but recommended)
- 8 grams kosher salt (1-2 teaspoons, depending on the brand)
Instructions
Proof the yeast:
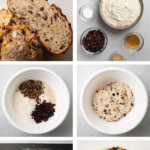
- Add yeast, honey, and warm water to a large mixing bowl (you can also use a stand mixer fitted with a dough hook). Let the yeast proof for 5-10 minutes, until the mixture is foamy. Note: If your yeast mixture doesn’t foam up, that’s a sign that your yeast is dead or expired, and your bread won’t rise.
Mix the dough and first rise (1 hour):
- Add flour, dried cranberries, and toasted pecans to yeast mixture. Mix with a sturdy spatula until nearly all of the flour is incorporated. Note: If you have time, let the bread rest here for 15 minutes or so before moving on to the next step - it will make it easier to mix everything together and give you a slightly taller loaf!
- Add salt to bread dough. Use a sturdy spatula or clean hands to mix everything into the dough until ingredients are evenly distributed and no dry flour remains. The dough should be slightly shaggy and sticky.
- Cover bowl with a clean tea towel and let rise on the counter for about 1 hour, until dough has doubled in size.
Shape the dough and final rise (30 minutes):
- When dough has risen, place an empty dutch oven (with the lid on) in your oven and heat to 460° Fahrenheit.
- Lightly flour a large cutting board.
- Tip the dough out of the bowl and onto the cutting board. DO NOT PUNCH THE DOUGH DOWN - you want to keep all those nice air bubbles intact so you have an airy, delicious loaf of bread. Note: If the dough is sticking to the bowl a little bit, wet your hand with a bit of cold water and gently separate the dough from the bowl to get it all out.
- Shape the dough into a round loaf: Pull each corner of the dough in towards the center (like you're folding an envelope) and repeat until the dough feels tight and begins to resist your folds. Add more flour to the cutting board as you go if needed. Flip the dough over and pull it into a round loaf.
- Flour a proofing basket or a medium-sized mixing bowl and place your loaf into it seam-side down. Cover with a tea towel and let rise another 30 minutes or so while you preheat the oven. Note: I like to line my proofing basket or mixing bowl with a clean linen napkin to distribute the flour more evenly and help with cleanup.
Bake (30 minutes)
- When the oven is hot, you're ready to go! Lay a piece of parchment paper down on your counter or a cutting board (optional - it makes transferring the bread easier!)
- Tip your bread dough gently out of the proofing basket onto the parchment paper.
- Use oven mitts to pull the hot dutch oven out and remove the lid.
- VERY CAREFULLY (without burning yourself!) use the sides of the parchment to lift the bread up and place it into the hot Dutch oven.
- Put your oven mitts back on, place the dutch oven lid back on the pot, and slide the whole thing back into your hot oven.
- Cook bread for 30 minutes.
Remove the lid and finish baking (5-15 minutes)
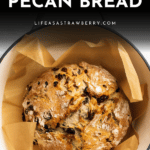
- After 30 minutes, remove the lid from your dutch oven. The bread should be taller, crusty, and very lightly browned. Continue cooking the bread, uncovered, for 5-15 minutes more until the bread has deepened in color and you have a beautiful brown crust.
- When bread is done, use oven mitts to pull the pot out of your oven.
- Use a long spatula or the corners of your parchment paper to carefully lift the bread out of the dutch oven and onto a cooling rack. Let cool for at least 1 hour before cutting into it.
Notes
Additions and Substitutions. Use raisins or another soft dried fruit (cherries, apricots, figs, etc) in place of dried cranberries here if you like. Swap the pecans for walnuts, almonds, or pistachios. Use bread flour in place of all purpose if you like. Replace up to 100 grams of all purpose flour with whole wheat flour (we don’t recommend using more wheat flour than that as it can alter the texture of the final loaf).
Toast the pecans for extra flavor. If you’re short on time, you can skip this step. But if you have a minute or two to spare, giving your pecans a quick toast in a skillet brings out a TON of flavor! To toast pecans, place the nuts in a small skillet over medium-low heat. Cook them for just a few minutes, stirring constantly, until they're fragrant and have just barely darkened in color. Let them cool completely, then give them a rough chop and add them to your bread dough.
If you have a kitchen scale, please use it! Measuring by weight is much more accurate than measuring by volume (with cups) and will give you more consistent bread. That being said, you can certainly make great bread without a kitchen scale! To measure flour in cups: If you measure flour by dipping your cup straight into the bag or bin and shaking off the excess, plan to use about 2 ½ cups of flour. If you measure by stirring the flour with a spoon or scoop before scooping it into a measuring cup and leveling it off (the “scoop and level” method), plan to use about 3 to 3 1/2 cups of flour. You can always add more flour if you need to - just be aware that this is a relatively slack (wet) dough, so it will be a bit shaggy and sticky at first (but it will smooth out and become more elastic as it rises and again as you shape it!)
Equipment notes. We recommend a 4- to 6-quart Dutch oven for best results. Le Creuset, Staub, Marquette Castings, and Lodge are all good choices. As always, please check the care instructions on your equipment: Be sure your Dutch oven is safe at high temperatures and double-check that it has a metal (not plastic) knob on the lid. We use an 8.5-inch proofing basket, but an 8- or 9-inch banneton or medium-sized mixing bowl also work well for the final rise. Be sure to use parchment paper when baking (not waxed paper).
Ingredient notes. For best results, use a high-quality flour for this recipe: We recommend King Arthur Flour and Bob's Red Mill flour. This recipe was developed with Diamond Crystal Kosher Salt, which is colloquially known as the "least salty salt." If you need to use table salt or another fine salt and you are measuring by volume with a teaspoon, reduce the amount of salt by ¼ teaspoon (if you're measuring by weight, don't worry about what brand of salt you're using - just follow the gram measurements!)
How warm should my water be? A good rule of thumb is "warm to the touch." Too-hot water (typically 130 degrees F and above) will kill your yeast, but use too-cold water and your yeast will move verrrrry slowly. We like to use water that's between 95 and 110° Fahrenheit. You should be able to comfortably hold your hand under water running at about 100 degrees - it should feel warm, but not hot. Use a kitchen thermometer for a precise measurement if you like!
No Dutch oven? See this post for alternative baking methods (you can still make great bread without fancy equipment!)
How to store this bread. If you have a full half-loaf left, store it cut-side down on a cutting board on the counter for up to 24 hours (no need to cover it!) Store extra sliced bread in an airtight container on the counter for up to 3 days. This bread also freezes very well - wrap it tightly and store in the freezer for up to 4 months, then defrost on the counter when you’re ready to use it.
Want a taller loaf of bread? The mix-ins can weigh this dough down a bit and make it a little denser than other loaves: it won’t be as tall or airy as, say, a loaf of sourdough. Check out our FREE Bread Bootcamp Webinar for our favorite techniques to make taller, airier loaves (one of our favorite tips: Cover the dough and put it in the fridge overnight for its first rise!)
Still have questions? We cover a ton of other info in the FAQ section in our Easy Crusty Bread recipe, and we walk you through everything you need to know about baking bread at home in our Everyday Artisan Bread online course.