Description
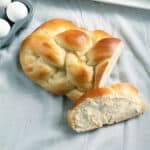
This easy challah recipe is perfect for weekend or holiday baking!
Ingredients
Scale
- 5 tsp. active dry yeast
- 1 3/4 cup warm water
- 2/3 cup sugar
- 1/2 cup olive oil, plus extra to grease a bowl
- 5 eggs, plus 1 extra for an egg wash before baking (6 eggs total)
- 1-2 Tbsp. salt, depending on your taste (I use 1-1/2 Tbsp. or so)
- 8 to 8-1/2 cups flour, plus extra for kneading/dusting
Instructions
- In a large bowl or the bowl of your stand mixer, dissolve the yeast in the warm water. Let sit for 5 minutes or until yeast begins to foam.
- Mix oil, sugar, and salt into yeast.
- Add 5 eggs, one at a time.
- Add 8 cups of flour in 1-cup increments, mixing the dough a bit between each flour addition. (If you're using a stand mixer, use the dough hook attachment here. If you're working without a mixer, stir in as much flour as you can with a wooden spoon and then knead the rest in by hand).
- When you've added 8 cups of flour, take a look at your dough. It should be slightly sticky but should still hold together and pull away from the sides of your bowl as you mix. If the dough is too wet, add more flour in 1/4-cup increments until dough reaches the right consistency.
- If you're working with a stand mixer, add an additional 1 Tbsp. of flour to the mixer and continue to knead the dough with your dough hook attachment until the dough is smooth and holds together. If you're working without a mixer, turn the dough out of the bowl onto a floured surface and knead it by hand until it reaches a smooth consistency.
- Oil a large bowl and place your dough inside. Cover with plastic wrap or a clean towel and let it rise in a warm place for 1-1/2 hours or until it has doubled in size.
- When dough has doubled, punch it down and turn it over in your bowl. At this point, you can either let it rise again on the counter or let it rise slowly in the fridge overnight. I ALWAYS do one rise overnight in the fridge, no matter what kind of bread I'm baking. It gives the flavors more time to develop and makes for a much richer end product. If you're in a hurry, though, re-cover the dough and let it rise again for 45 minutes on the counter. If you have the time to wait, re-cover the dough and place it in the fridge for 7-8 hours or overnight. After the dough has risen in the fridge, take it out and allow it to come back to room temperature before you proceed with the next step (about 3-4 hours).
- Turn the dough out onto a floured surface, punch it down slightly, and cut it into 12 equal pieces. (Each loaf will use 6 of those pieces). Set 6 pieces aside while you form the first loaf.
- Roll each piece of dough out into a long rope, about 12-14", and place the ropes parallel to each other on your floured surface. See this video for great instruction on how to braid the pieces. Braid one loaf, set aside, and repeat the process with your remaining 6 pieces of dough. Transfer the loaves to a large baking sheet.
- At this point, you can freeze one or both loaves for baking later or you can let them rise a final time. If you freeze a loaf, remember to let it come back to room temperature and rise before you bake it. If you're moving straight onto baking, cover each braided loaf and let it rise a final time - in a warm place for 1-1/2 hours or until the loaves have nearly doubled in size (they should be puffed up pretty significantly).
- Beat your remaining 1 egg with 1 Tbsp. of water to make an egg wash. Brush it liberally on each loaf. Place loaves into a 375 degree oven and bake for 20 minutes. After 20 minutes have passed, pull the baking sheet slightly out of your oven and give each loaf another liberal brush of egg wash.
- Return loaves to the oven for 10-20 minutes or until loaves have developed a deep golden color. Fully cooked loaves should make a hollow sound when you tap them and will have a sturdy outer crust. (Don't worry, the inside will be soft!)
- Let loaves cool for 15-20 minutes. This bread tastes UN.BE.LIEVEABLE. when you eat it warm, but it's pretty dang delicious at room temperature, too. Enjoy!
Notes
*Note: I make challah in my stand mixer, a KitchenAid Professional 600 Series 6-quart-er, but even my supercharged motor slows down and pulls a bit with the amount of dough this recipe produces. If you have a smaller, standard mixer, I’d recommend cutting the recipe in half or foregoing technology and kneading this by hand.
Adapted from Smitten Kitchen