Description
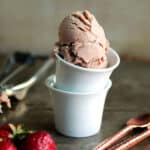
This creamy strawberry ice cream gets rich, concentrated flavor by roasting fresh strawberries with a splash of balsamic vinegar.
Ingredients
For the roasted strawberries:
- 2 pounds fresh strawberries, hulled (cut big berries in half)
- 2 Tablespoons balsamic vinegar
- Pinch of kosher salt
For the ice cream:
- 5 egg yolks
- 1/2 cup sugar
- 2 cups half-and-half
- 1 cup heavy cream
Instructions
Prep Work:
- Check the instructions on your ice cream machine. You may need to place the mixing bowl in the freezer a day or two ahead of time!
- Read through the recipe post above (especially if it's your first time making ice cream!) and gather the equipment you'll need.
Roast the Strawberries:
- Heat oven to 425° F.
- Line a large, rimmed baking sheet with parchment paper (or use a nonstick baking mat). Spread strawberries into a single layer.
- Bake for 10 minutes, until berries have wilted slightly. Use tongs to toss berries with balsamic vinegar and a pinch of kosher salt; return to the oven for 2-3 minutes more until balsamic vinegar begins to caramelize. Remove from oven and set aside. The liquid may appear runny, but will thicken as it cools.
- Let berries cool completely, then transfer to a blender and blend into a purée and set aside. Note: You can do this step up to 3 days in advance - keep the strained purée in the fridge!
DAY 1 - Make the ice cream custard:
- Make the egg mixture - Add egg yolks to a large mixing bowl. Use an electric hand mixer to beat the yolks together for one minute (or whisk vigorously by hand for 3-5 minutes) until they are slightly frothy and have lightened in color. Add sugar to egg yolks a little at a time, beating well between each addition, until you have a thick, pale yellow mixture. Set this egg mixture aside.
- Heat the cream mixture - Add heavy cream and half-and-half to a medium saucepan and place it over medium heat. Cook, stirring frequently, for 8-10 minutes until the mixture reaches a low simmer (about 180° F).
- Temper the egg mixture - Use a small ladle to add a few Tablespoons of the hot cream mixture to the prepared egg mixture. Use a hand whisk to whisk constantly as you stream the hot liquid into the eggs. The goal here is to slowly raise the temperature of the egg mixture, so that the eggs cook without scrambling or curdling. Continue adding hot cream to eggs a little at a time, whisking constantly, until you've incorporated about ⅔ of the liquid. When the eggs are properly tempered, the egg mixture should be warm to the touch and have a very pale yellow color.
- Mix it all together - Slowly pour the tempered egg mixture back into the saucepan with the remaining cream mixture, still whisking constantly. Whisk in the roasted strawberry purée.
- Thicken the custard - Return the saucepan to the stove; turn the heat to low. Cook, stirring frequently, for another 8-15 minutes, until the custard has thickened slightly and reached a temperature of at least 170° F. When the custard is ready, you should be able to run your finger along the widest part of your spoon or spatula and no custard should rush in to fill the path you just made.
- Strain the custard - Set a fine mesh strainer over a clean, large mixing bowl. Carefully pour hot custard through your strainer. Gently stir the custard in the strainer to help coax it through.
- Let custard cool completely, then cover with an airtight lid or a piece of plastic wrap. Refrigerate 8-10 hours, preferably overnight.
DAY 2 - Churn the Ice Cream:
- Remove custard from the fridge and give it a stir. It will have thickened slightly overnight, and should resemble thin yogurt.
- Transfer the custard to your prepared ice cream maker and churn according to your device's instructions. The ice cream will lighten in color and thicken up quite a bit as it churns; when it's ready, it will resemble soft-serve ice cream. With our Cuisinart ice cream maker, the churning process takes about 20 minutes.
- Scoop ice cream into a freezer-safe container with an airtight lid. Attach the lid and transfer the ice cream to the freezer for at least an hour so it can firm up before you scoop it. Ice cream will darken a bit and continue to harden for the first few hours in the freezer.
Notes
Please read the entire post above this recipe - especially if it's your first time making ice cream! - as it's packed with step-by-step photos and notes to help you succeed.
Additions and Substitutions. Use blueberries, blackberries, or raspberries instead of strawberries if you like. Use frozen berries if fresh aren't available (you may need to extend the roasting time to allow them to properly defrost). Add your favorite mix-ins (chocolate chips, nuts, etc.) to the ice cream during the last few minutes of churning. For a richer ice cream, use additional heavy cream in place of the half and half. Whisk a teaspoon of vanilla extract in with the egg yolks and sugar if you like.
Great homemade ice cream takes practice. Homemade ice cream is almost entirely about technique. Plan to spend some time and attention on each step of this recipe, and don't be discouraged if things don't go perfectly on your first try! We have provided approximate times for each recipe step, but cook times may vary depending on your kitchen and equipment. Pay attention to visual cues and use the step-by-step photos in the post above to help you along!