

This creamy old fashioned vanilla ice cream uses a traditional egg yolk custard base. Make the vanilla custard, refrigerate it overnight, then churn with an electric ice cream maker for the perfect scoop.

Nothing hits quite like a perfect scoop of vanilla bean ice cream. Like all of our ice cream recipes, this recipe is made from scratch with a traditional egg yolk custard base and churned in a countertop ice cream maker.
The ice cream base needs to chill overnight before churning, so plan to start this recipe the day before you want to eat it.
If you're new to homemade ice cream, don't worry: We're here to help! Read this post thoroughly before you start, and take your time with each step. (Our homemade chocolate ice cream is also great for beginners!)
And remember: Like many recipes, the most important ingredient in homemade ice cream is practice.
Jump to:
Equipment you'll need
- An ice cream machine! We like the ease of small electric countertop ice cream machines, but any ice cream maker with a minimum 1.5 quart capacity will work. We tested this recipe with the Cuisinart 1.5 quart ICE-20 and 1.5 quart ICE 21-P1.
- Electric hand mixer. To make the custard, you'll first need to whip some egg yolks and sugar together. While you can do this with a whisk and some elbow grease, an electric hand beater makes the process much easier and faster.
- A kitchen thermometer is nice to have, especially if you're new to ice cream making. If you don't have a thermometer handy, don't worry: We'll give you plenty of visual cues to help you along!
Past that, you don't need much specialty equipment (although this recipe will leave you with a few dishes). Plan to use a medium saucepan, a sturdy spoon or spatula, a ladle, a fine mesh strainer, and a few mixing bowls.
Check the instructions on your ice cream maker before you start! We used a Cuisinart 1.5 quart ICE-21 ice cream maker in these photos, which requires you to freeze the bowl for at least 24 hours before churning.
Ingredients
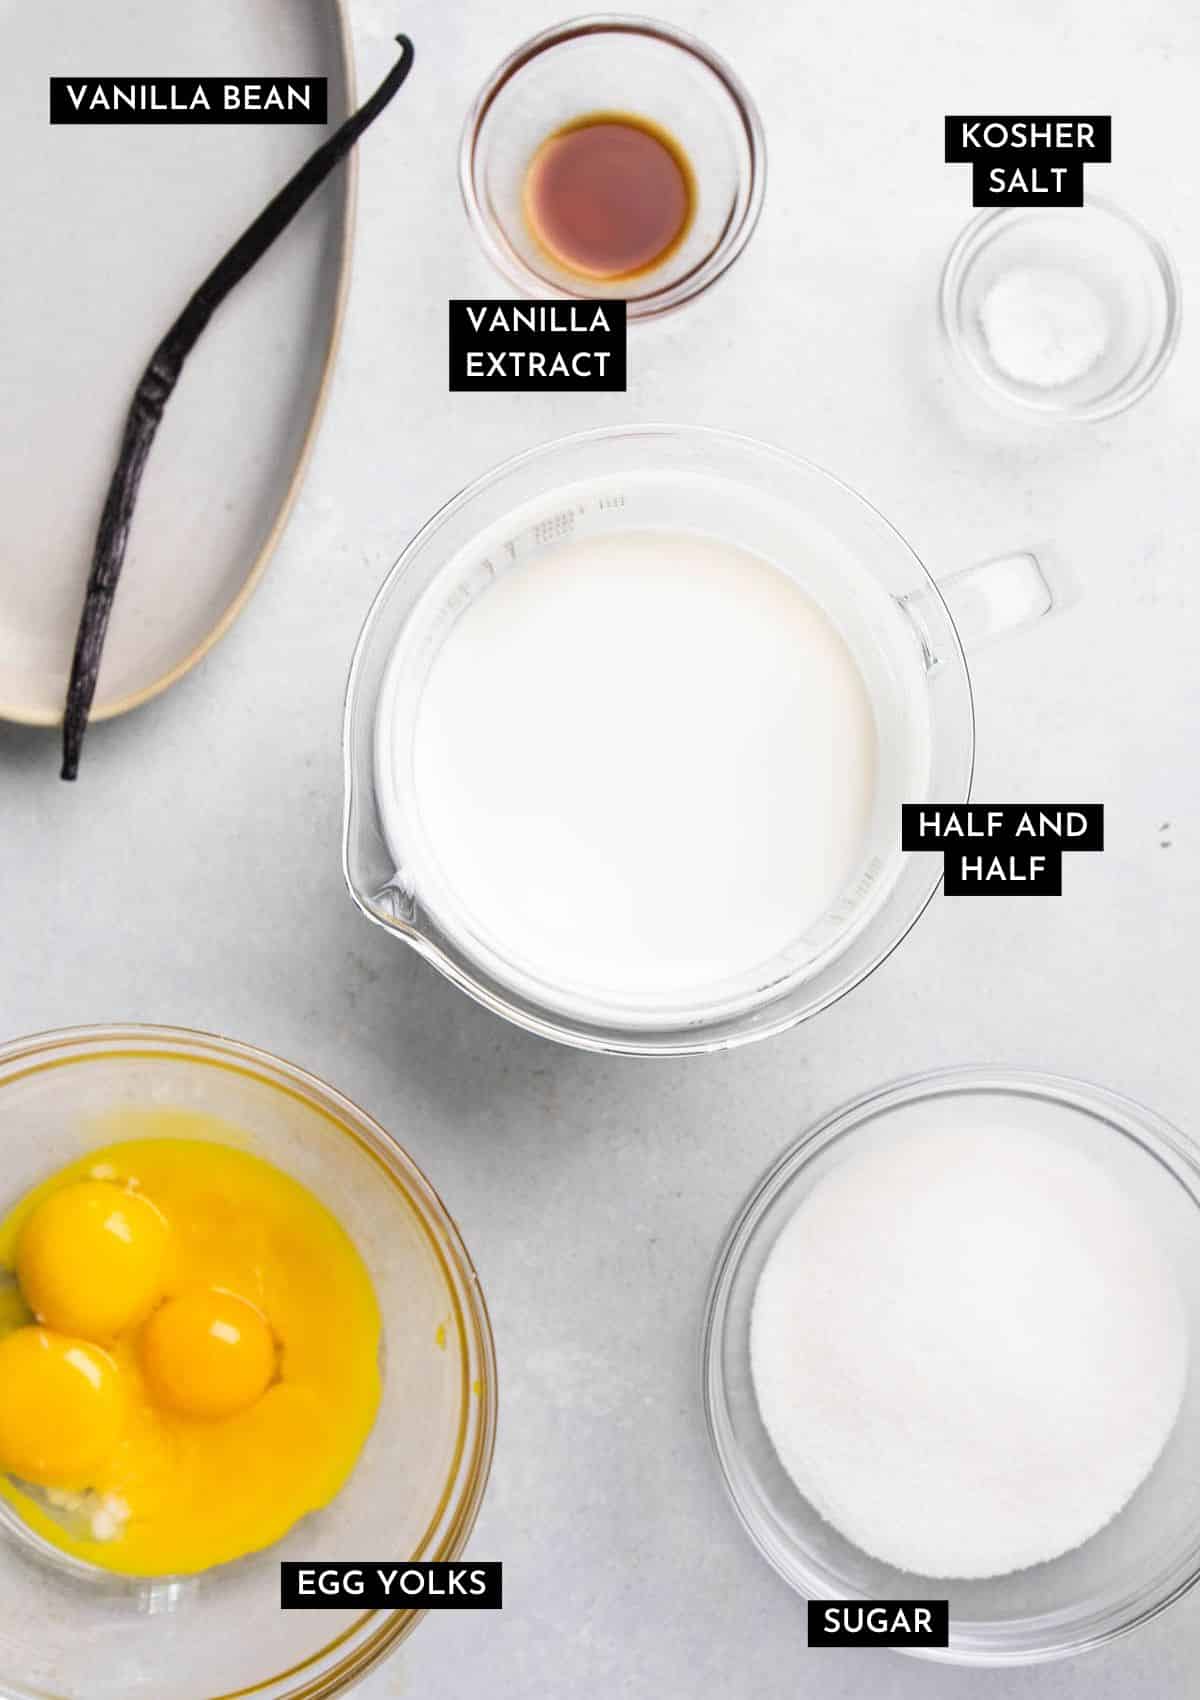
Scroll to the recipe card below for a full ingredients list with exact quantities.
Before you jump in, we want to highlight a few things:
- A vanilla bean pod is our MVP! You'll slice the bean in half and scrape out the paste-like seeds inside: They give this ice cream its distinctive speckles and impart a ton of flavor. We used a Nielsen Massey Madagascar Vanilla Bean in these photos.
- A dash of pure vanilla extract helps round out the vanilla flavor.
- Half-and-half is our go-to dairy product for homemade ice cream. It has enough fat to keep the ice cream creamy without being overly rich.
- Egg yolks form the backbone of our custard. (Save extra egg whites for small batch sugar cookies!)
Day 1: Make the Custard
Whip the egg yolks and sugar

Use a hand mixer to whip egg yolks in a large bowl until they've thickened and just barely lightened in color. The color difference will be subtle! You'll also notice the texture change a bit: After a minute or two, the yolks will start to thicken and look slightly puffy.
No hand mixer? You can use a whisk, but it will take some time and elbow grease. We recommend using a hand mixer for best results.

Slowly add granulated sugar to egg yolks, beating well between each addition, until you have a thick, fluffy mixture with a pale yellow color.
Pro Tip: Don't rush this process! Thorough mixing helps the sugar fully dissolve into our egg yolks, which gives the final ice cream a creamy texture.
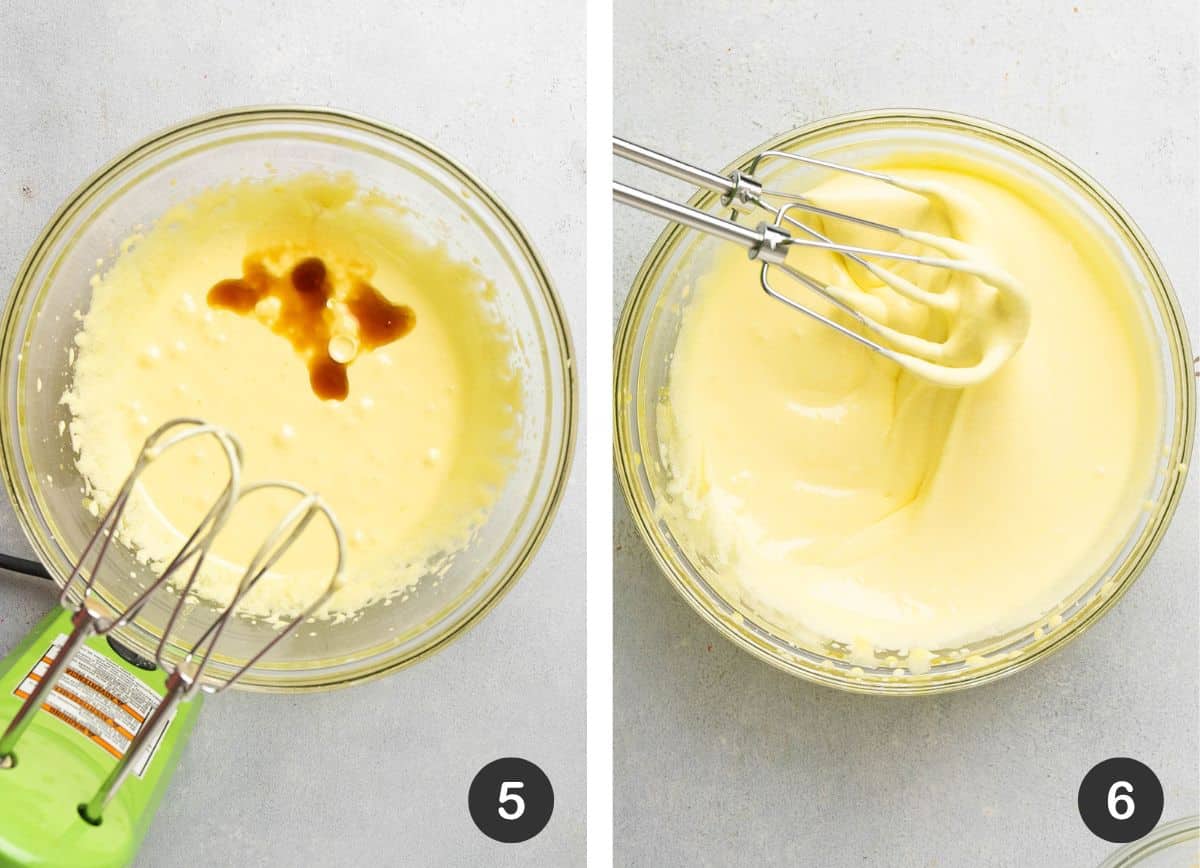
Add vanilla extract and mix well to incorporate.
The eggs should feel like a soft, airy cake batter (but not stiff like whipped cream!) Set the egg mixture aside while you prepare the half and half in the next step.
Temper the egg mixture
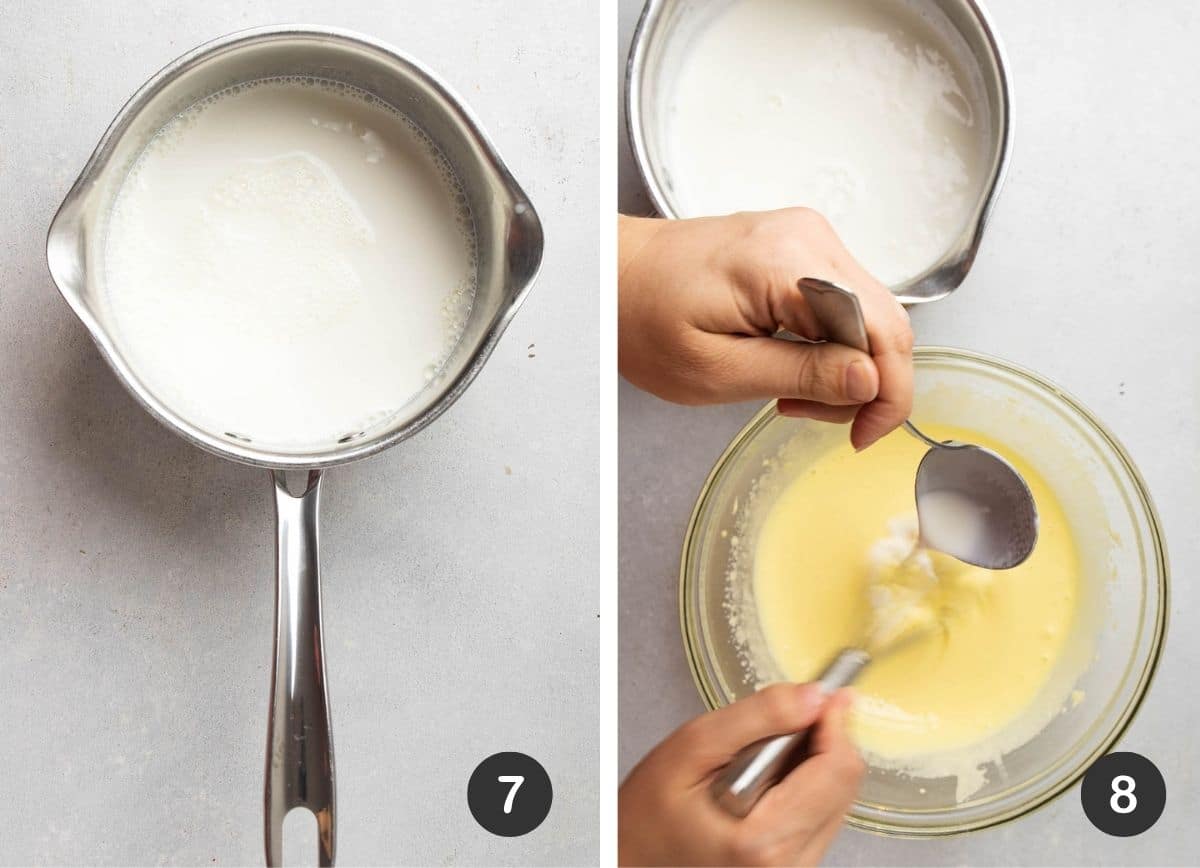
Add half-and-half to a medium saucepan. Place over medium heat, whisking frequently, until it reaches a low simmer.
Use a small ladle to slowly add the hot half and half to the whipped egg mixture, one spoonful at a time. Whisk constantly, and fully incorporate each spoonful of liquid before adding more.
The goal here is to slowly raise the temperature of the eggs - a technique called tempering - in order to prevent the eggs from cooking or curdling in response to the heat. Work slowly here, and be patient: This technique takes practice! If your eggs begin to curdle or scramble, stop adding hot liquid and read through the FAQ section below for some tips to recover.
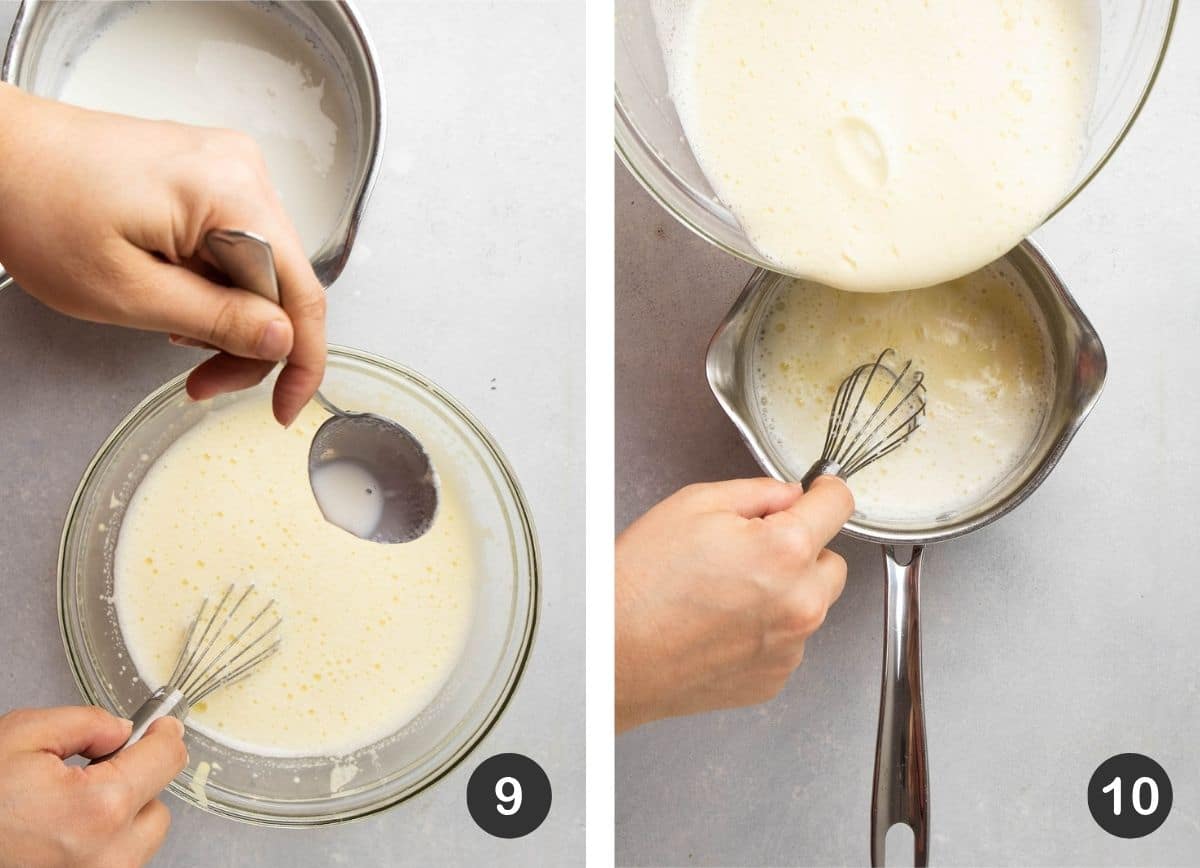
Continue adding hot half and half to the egg mixture, one ladle-full at a time, until you've whisked in about ⅔ of the liquid.
At this point, the egg mixture should be a very pale yellow color - nearly white - and the texture should be quite thin. The mixing bowl should also feel slightly warm to the touch.
Slowly pour the tempered egg mixture back into the saucepan with the remaining half and half. Once again, it's important to pour slowly and whisk constantly.
Prepare the vanilla bean
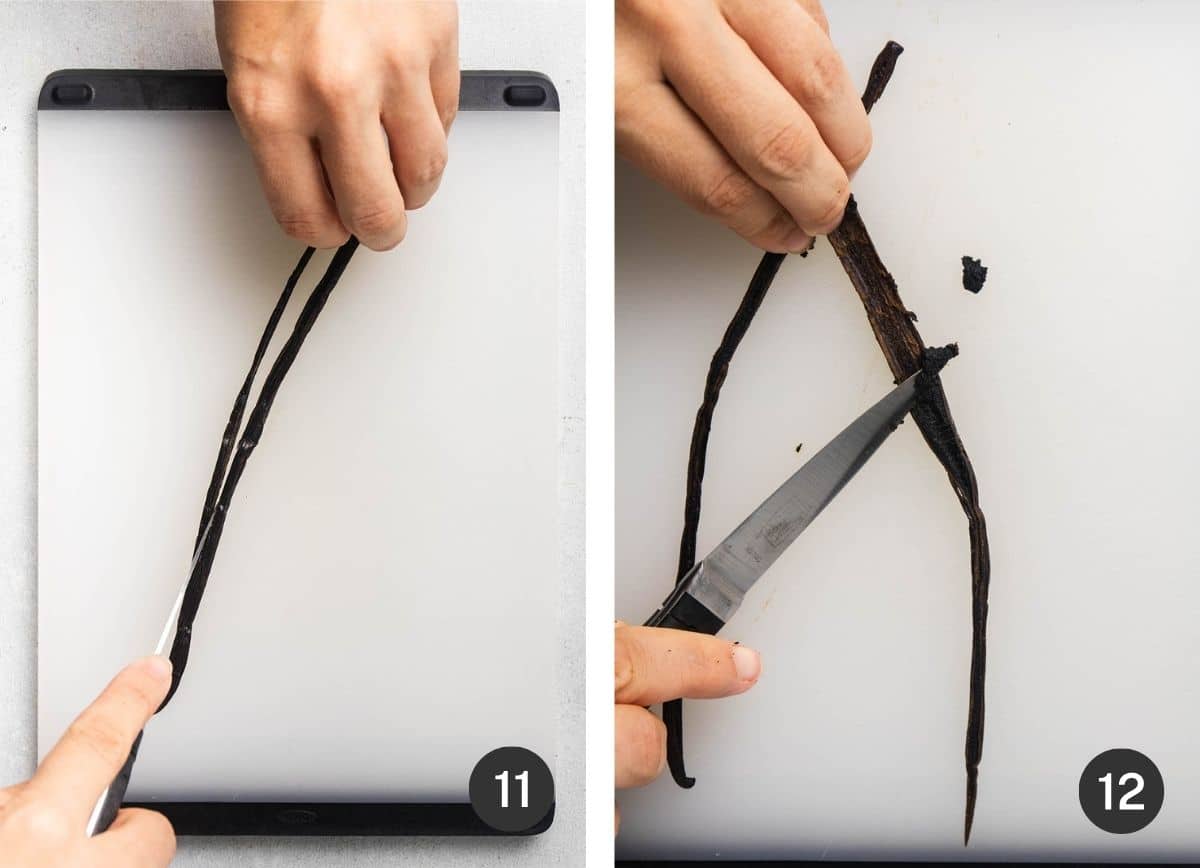
Use a sharp knife to slice the vanilla bean in half lengthwise. Carefully run the dull side of the knife down the center of each vanilla bean half, pressing firmly to scrape out the seeds inside.
Add these vanilla bean seeds and the empty pod halves to the saucepan with your custard, then whisk to evenly distribute the seeds.
Thicken the custard
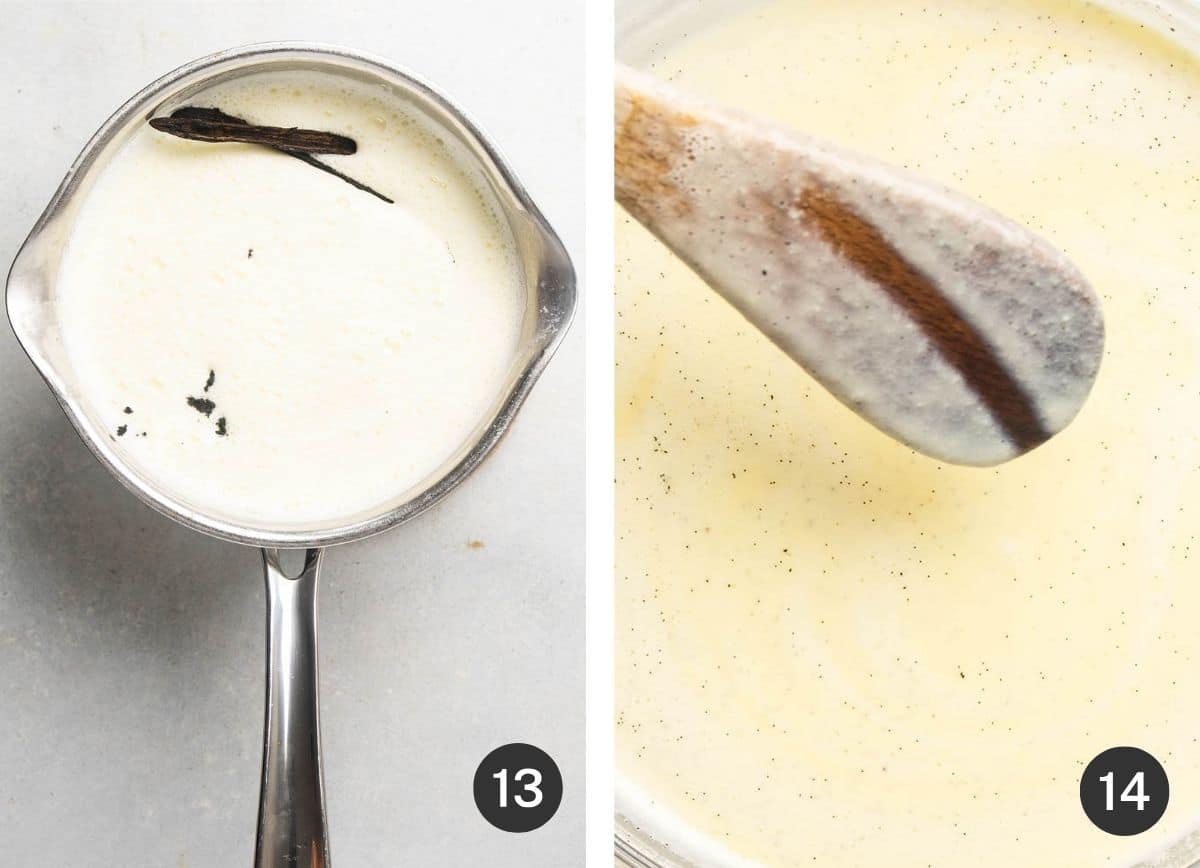
Return the saucepan to the stovetop over low heat. Cook, stirring frequently, until the mixture has thickened slightly and reached a temperature of at least 170° Fahrenheit. This custard won't thicken too dramatically, and it may have a thin layer of bubbles across the surface at first. That's okay!
How to tell when the custard is done: Stir the custard with a wooden spoon or stiff spatula, then carefully run a finger across the widest part of the utensil. If the custard stays put and doesn't rush to fill in the line you created, it's ready! (Image 14, above.)
Strain the ice cream base
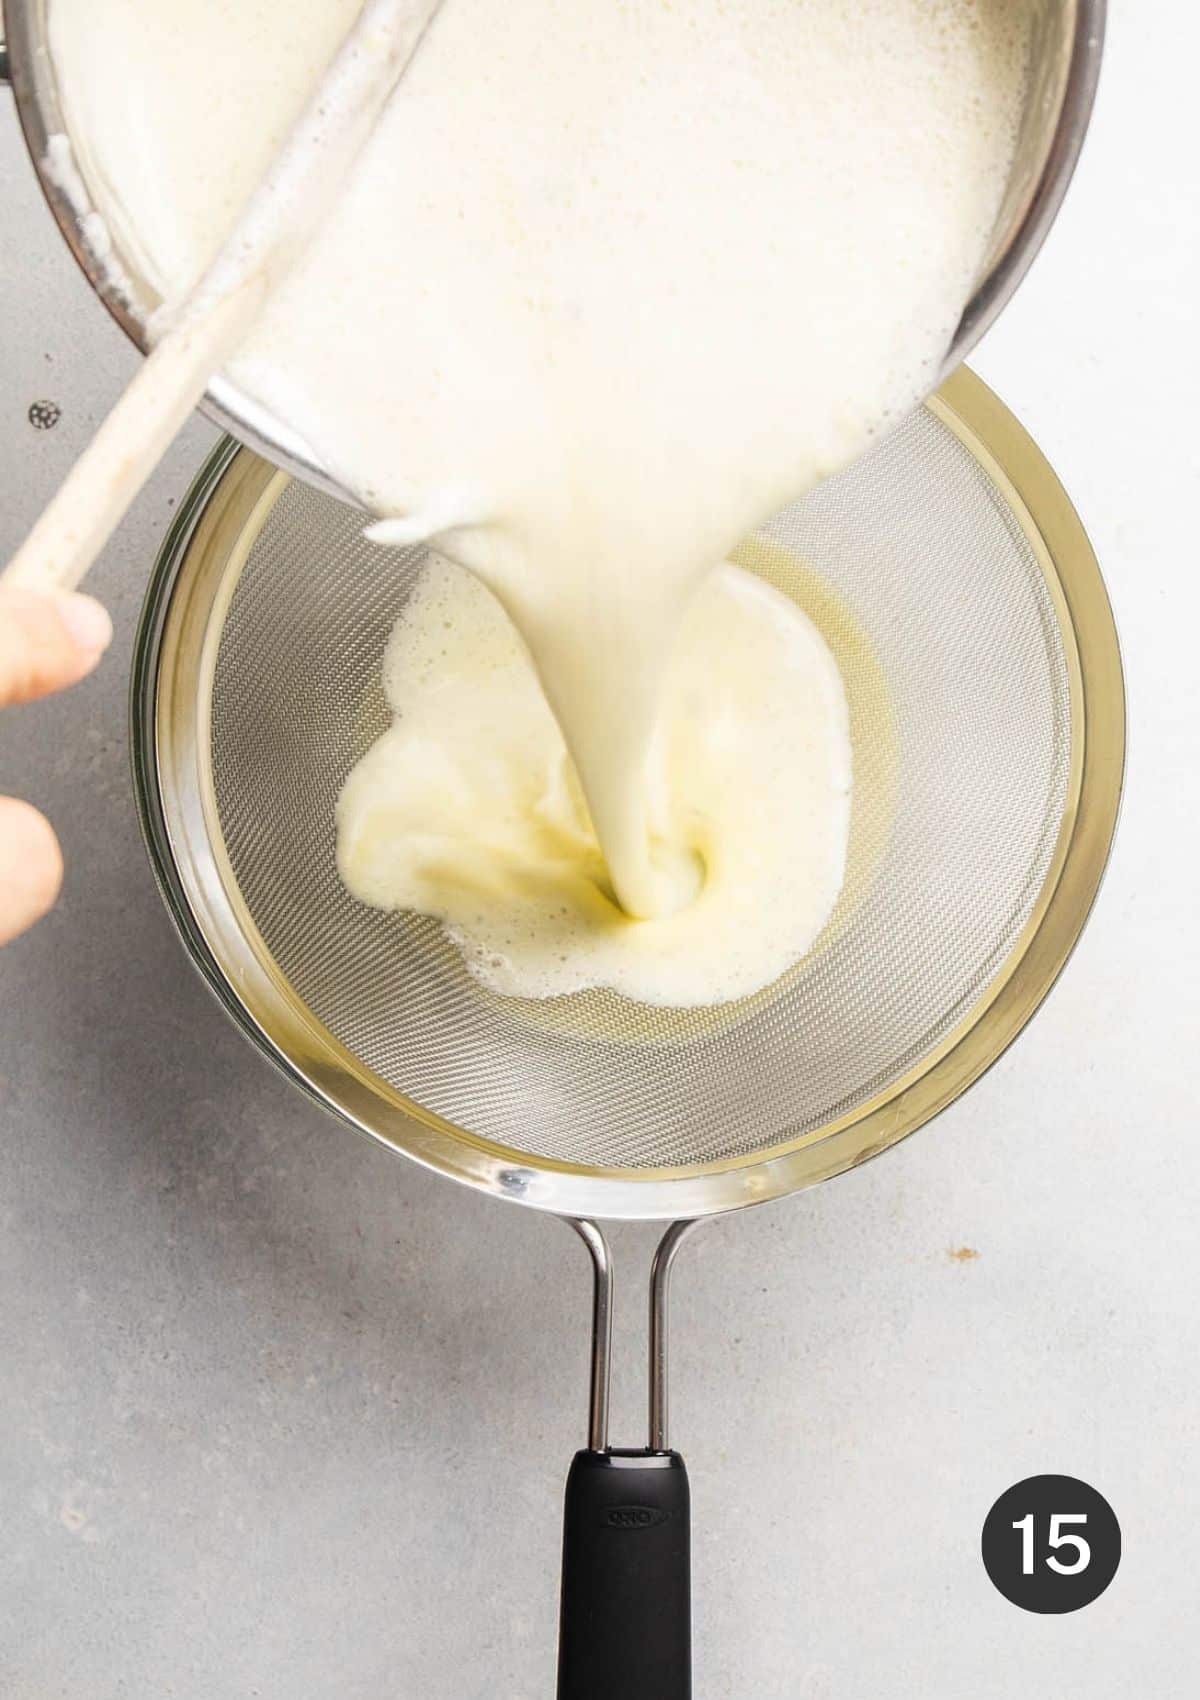
Set a fine mesh sieve over a large mixing bowl. Slowly pour the hot custard through the sieve.
Stir the custard to coax it through the strainer.
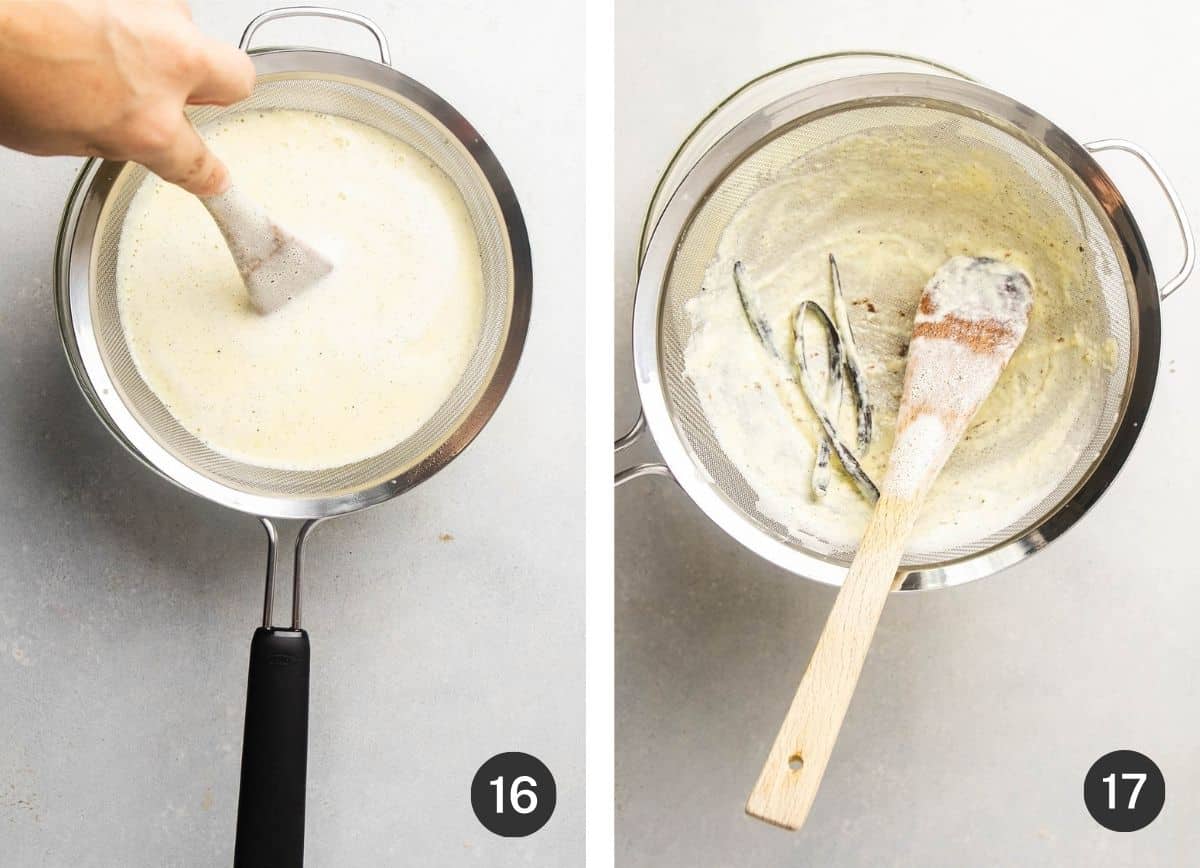
The sieve will catch the empty vanilla bean pods and any curdled egg pieces, leaving you with a smooth vanilla bean ice cream base.
How to Cool Custard: Let custard sit on the counter for an hour, stirring frequently to release extra heat, until it reaches room temperature. To speed the cooling process, place the custard bowl into a larger bowl filled with ice (or use an ice water bath) and stir until completely cooled. Learn more: How to use an ice bath.
Refrigerate overnight
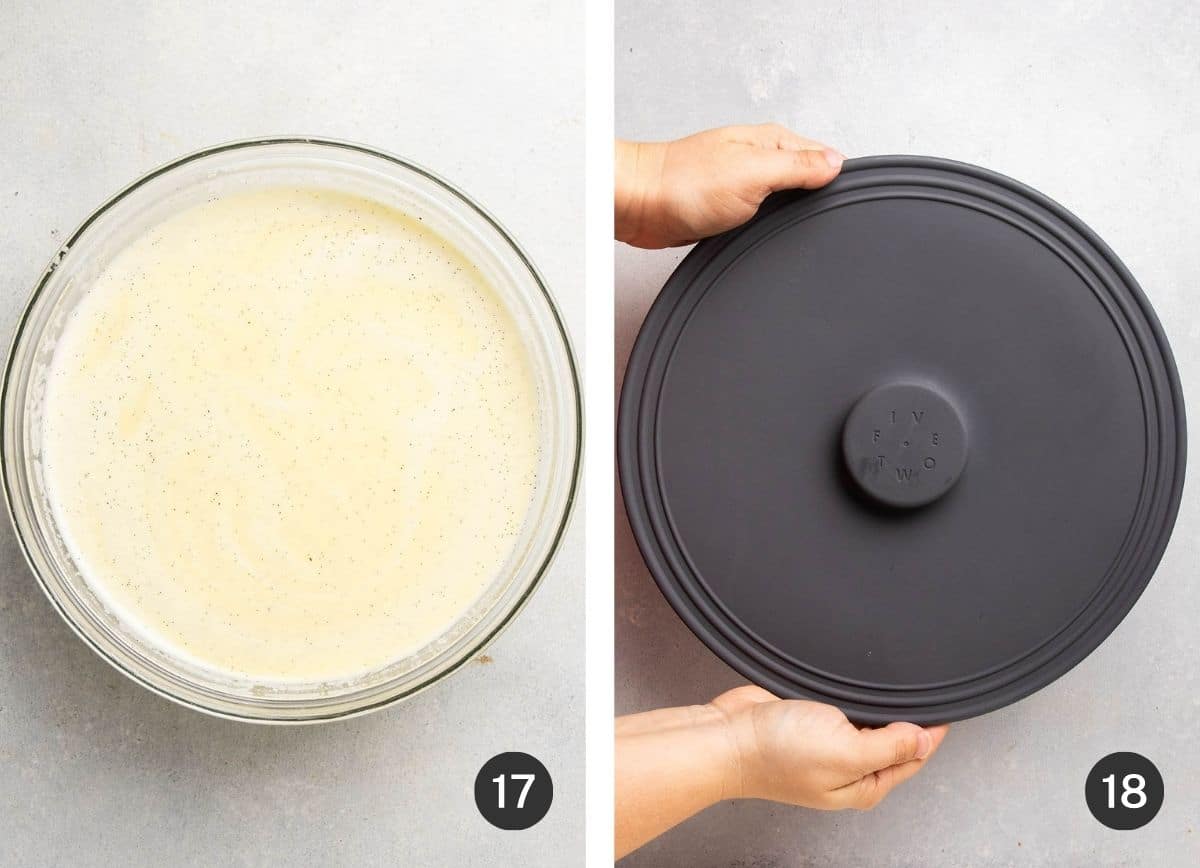
Cover the cooled vanilla custard with an airtight lid or plastic wrap. Refrigerate overnight.
Equipment note: The silicone lid in the photos above was recently discontinued; we also like these silicone bowl covers!
Day 2: Churn the ice cream
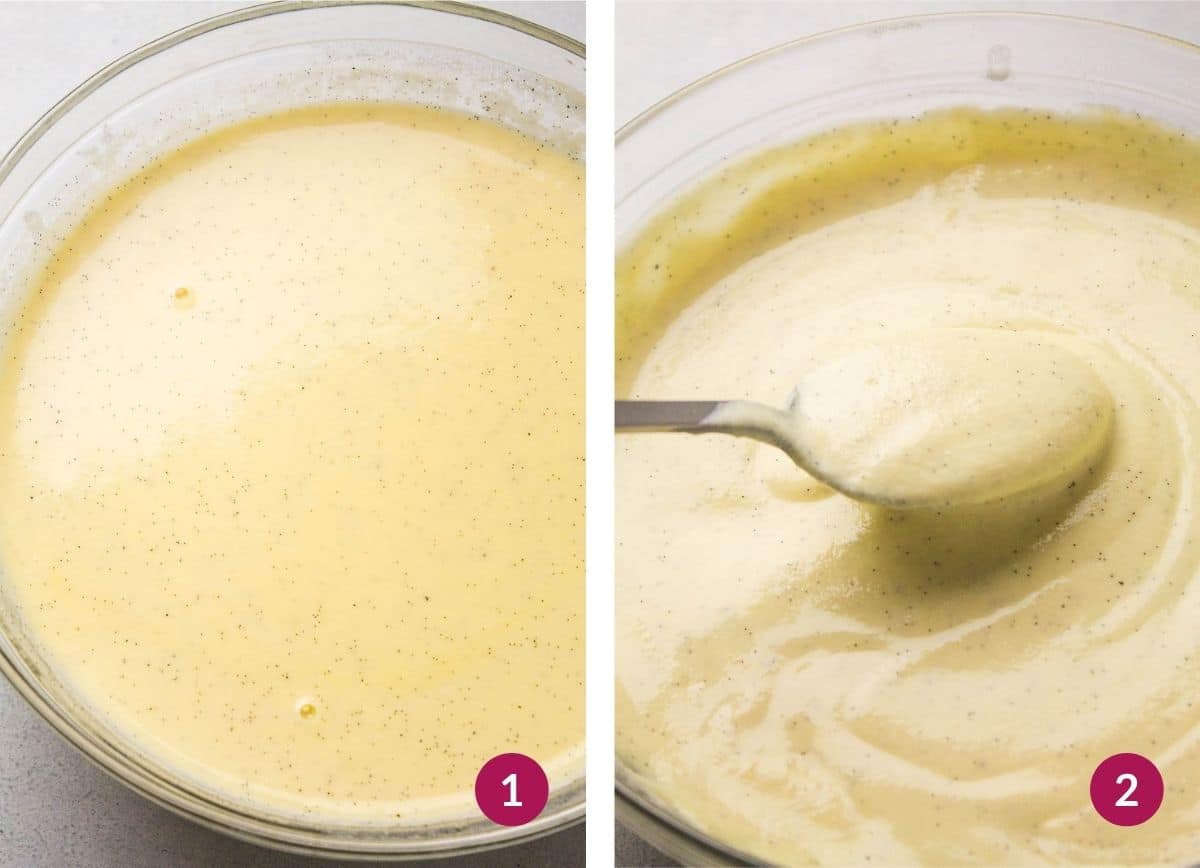
Pull the vanilla bean custard out of the fridge and remove the lid. The custard won't look too different, but it will have thickened a bit: It should resemble a loose yogurt when you stir it.
Pro Tip: This custard will thicken slightly in the fridge overnight, but it won't be as dramatic as our homemade chocolate ice cream, which has the consistency of a thick pudding when cold.
Churn the ice cream
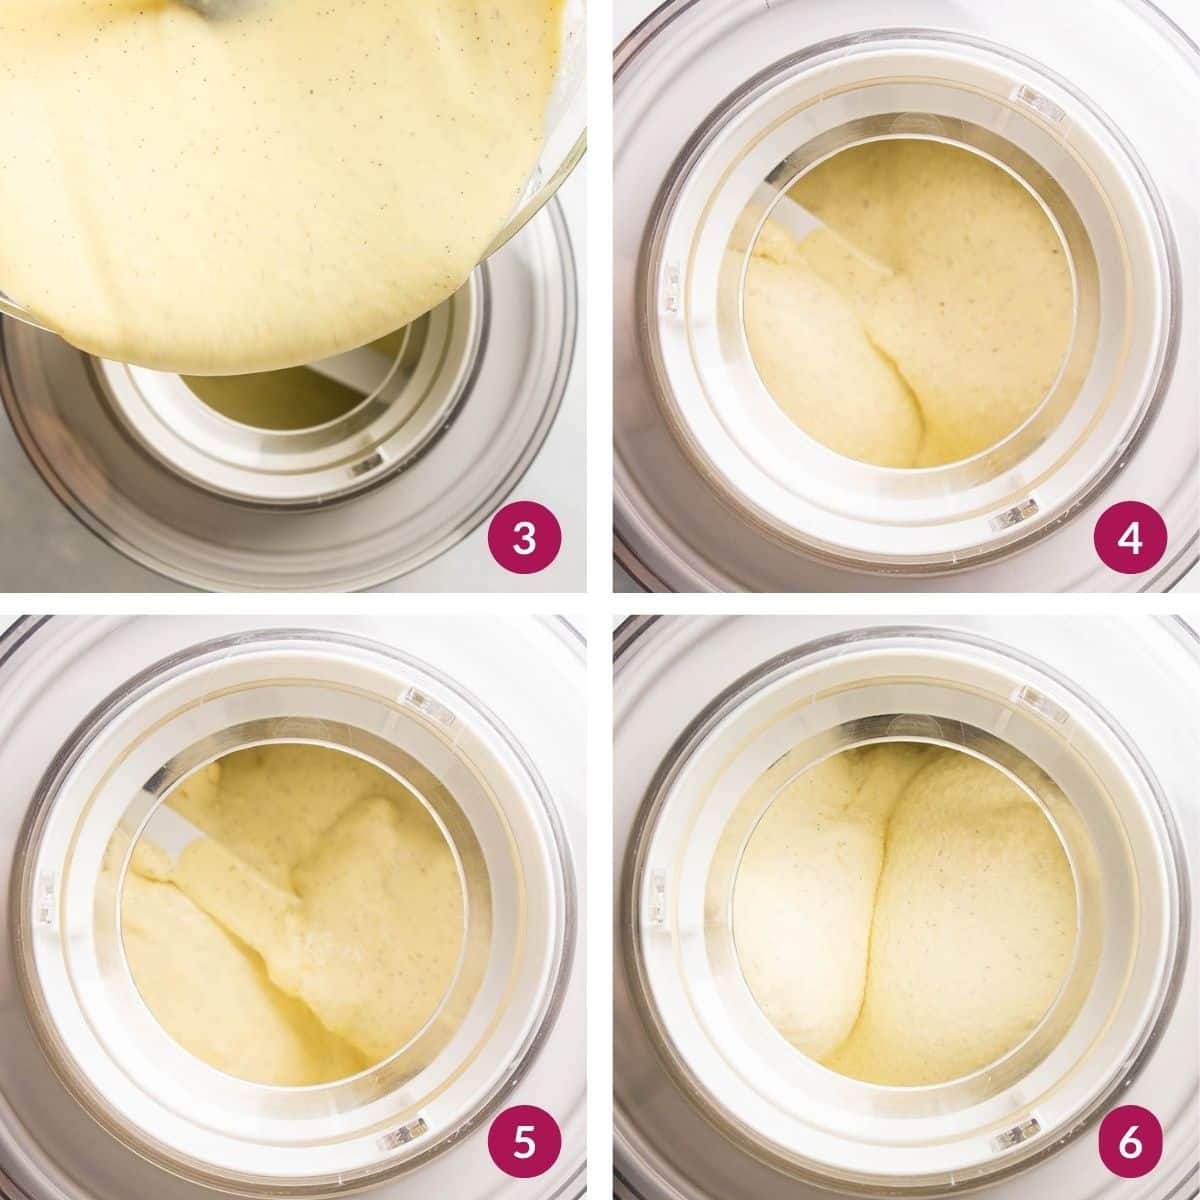
Prepare your ice cream mixer according to the manufacturer's instructions (in our case, we assemble the machine and turn it on before adding the custard).
Carefully pour the custard into the bowl of the ice cream machine and begin to churn. You'll likely need to use a spatula to help coax all of the custard out of the bowl.
Check the instructions on your ice cream machine! Every mixer is a little different. Be sure to consult your equipment's instructions to make sure you're assembling it correctly and adding the ice cream mixture properly.
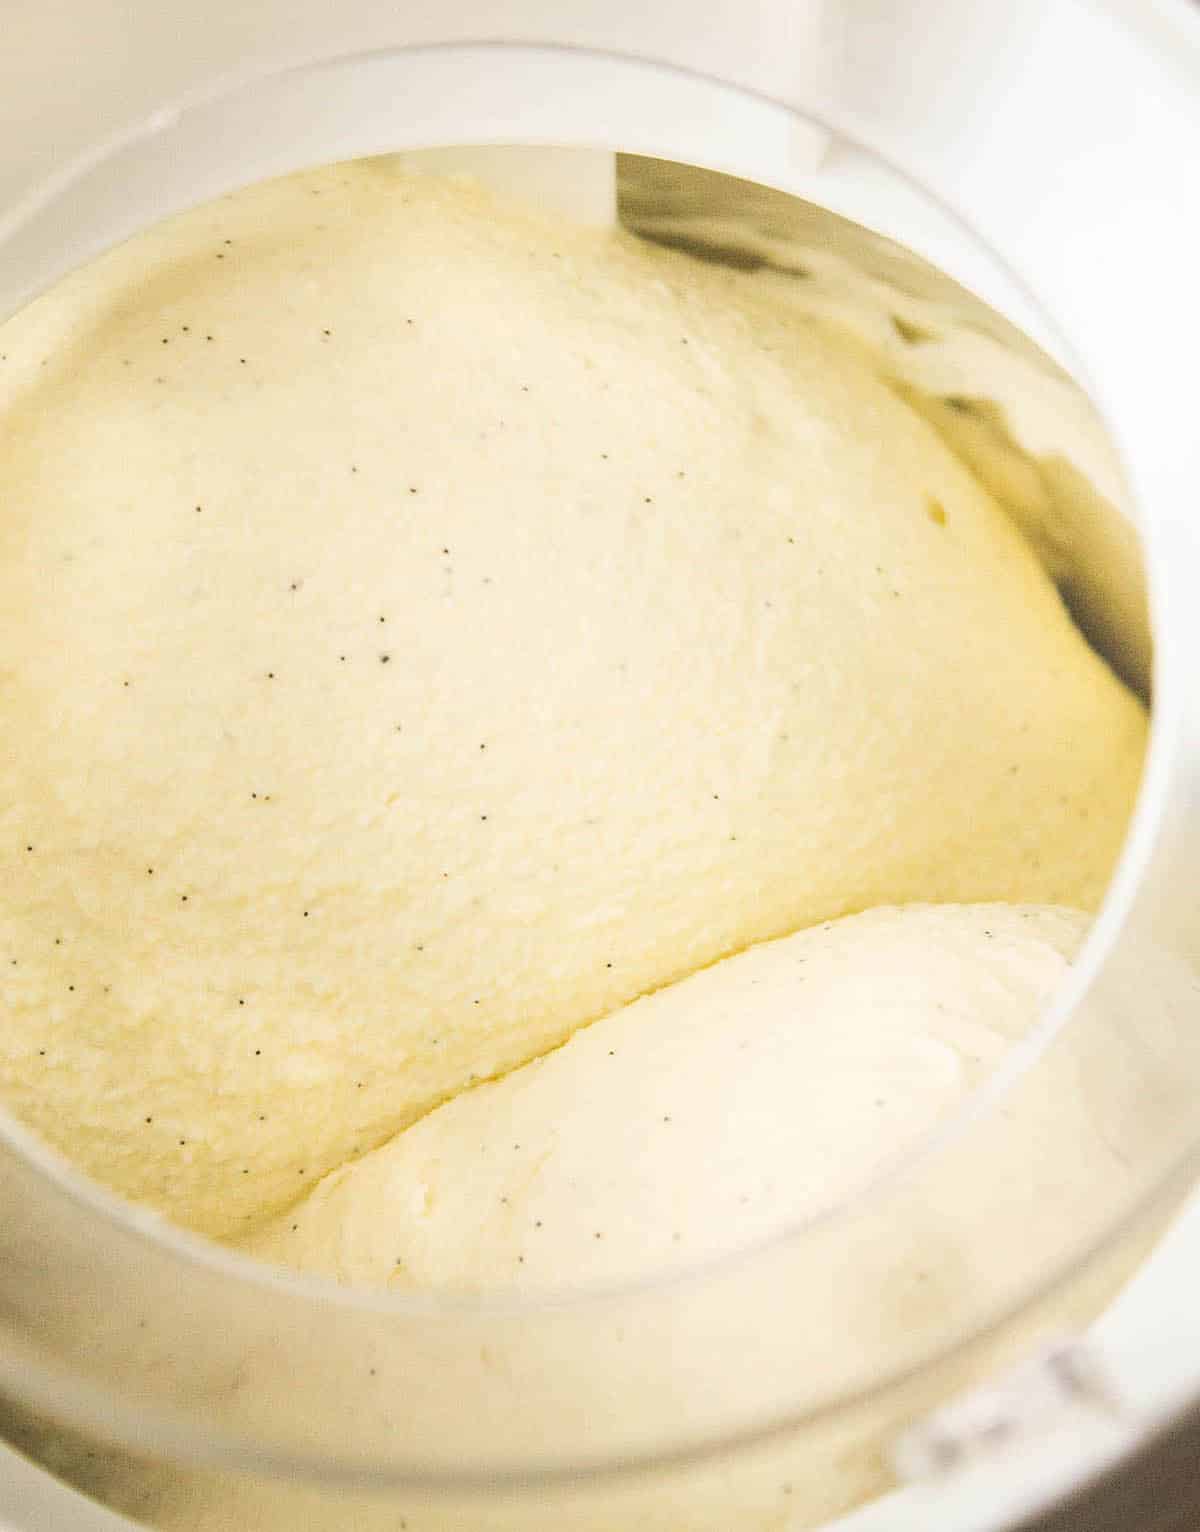
When it's ready, the ice cream will resemble soft serve (similar to a Wendy's Frosty!) It will also start to pull away from the sides of the bowl where it meets the mixing arm (see image above). With our ice cream maker, the churning process takes about 20 minutes.
Don't worry if the surface of your ice cream isn't perfectly smooth. It will settle and smooth out quite a bit as you transfer it to the storage container!
Don't over-churn! Once the ice cream reaches a soft serve consistency, transfer it to a container and place it in the freezer (it will continue to harden as it chills). If you continue to churn ice cream after it's "done", it can develop ice crystals that create a gritty texture. This is one reason it's important to consult the instructions for your ice cream maker - one machine may need more or less time to churn than another!
Pack the ice cream
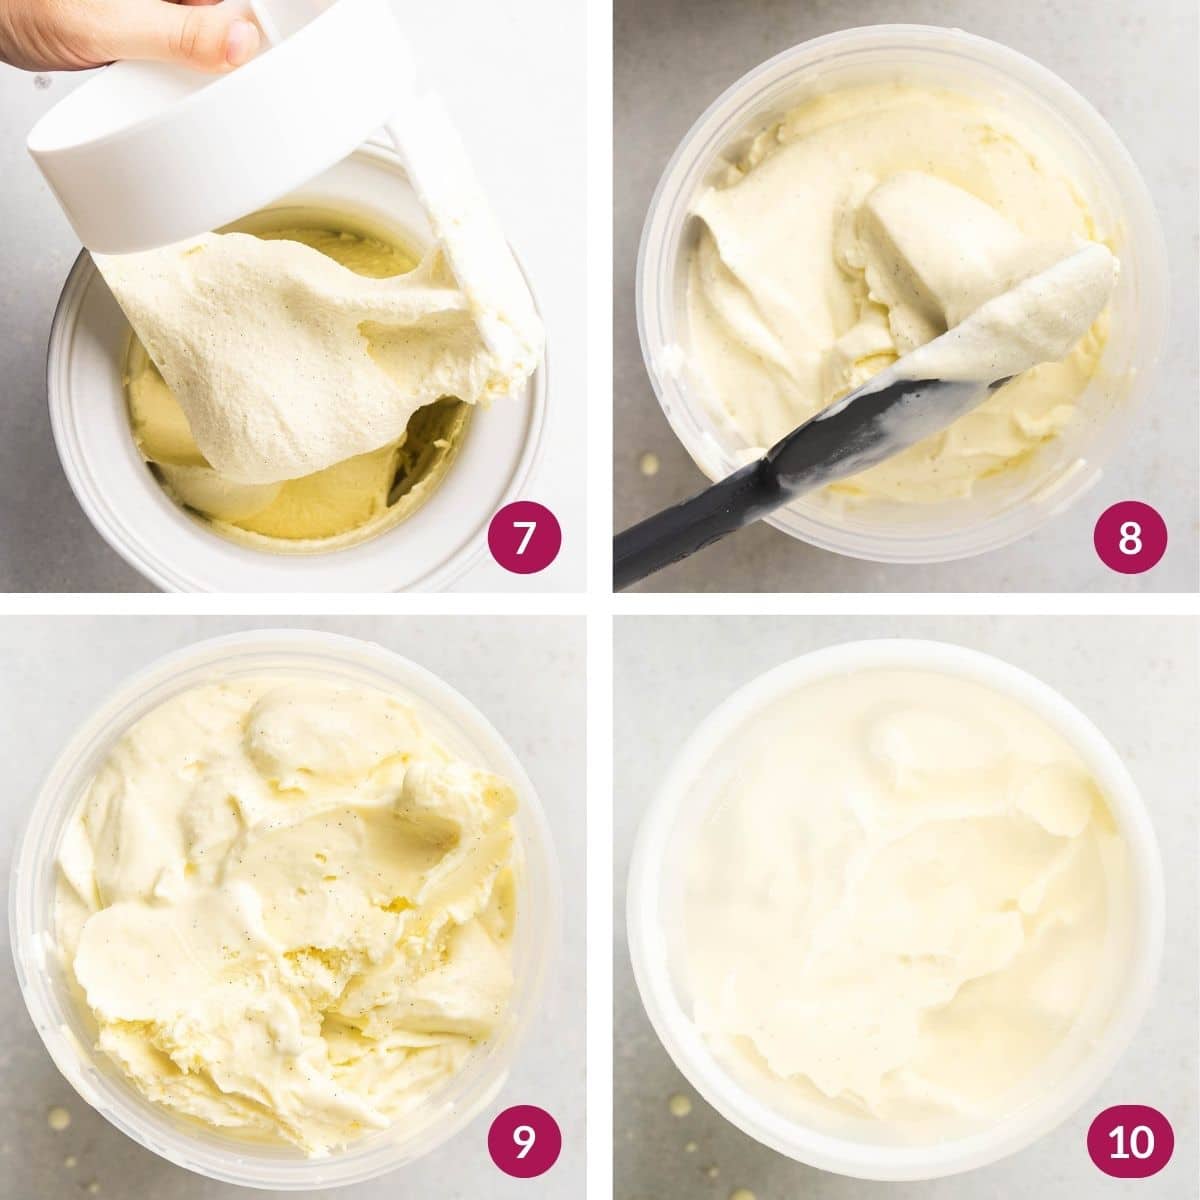
Turn off your ice cream machine and remove the mixing arm. Transfer ice cream to a freezer-safe container, working quickly to avoid melting. Place a lid on the container, then transfer it to the freezer for at least an hour before scooping.
The ice cream will continue to harden in the freezer. It may also darken slightly in color as it sets.
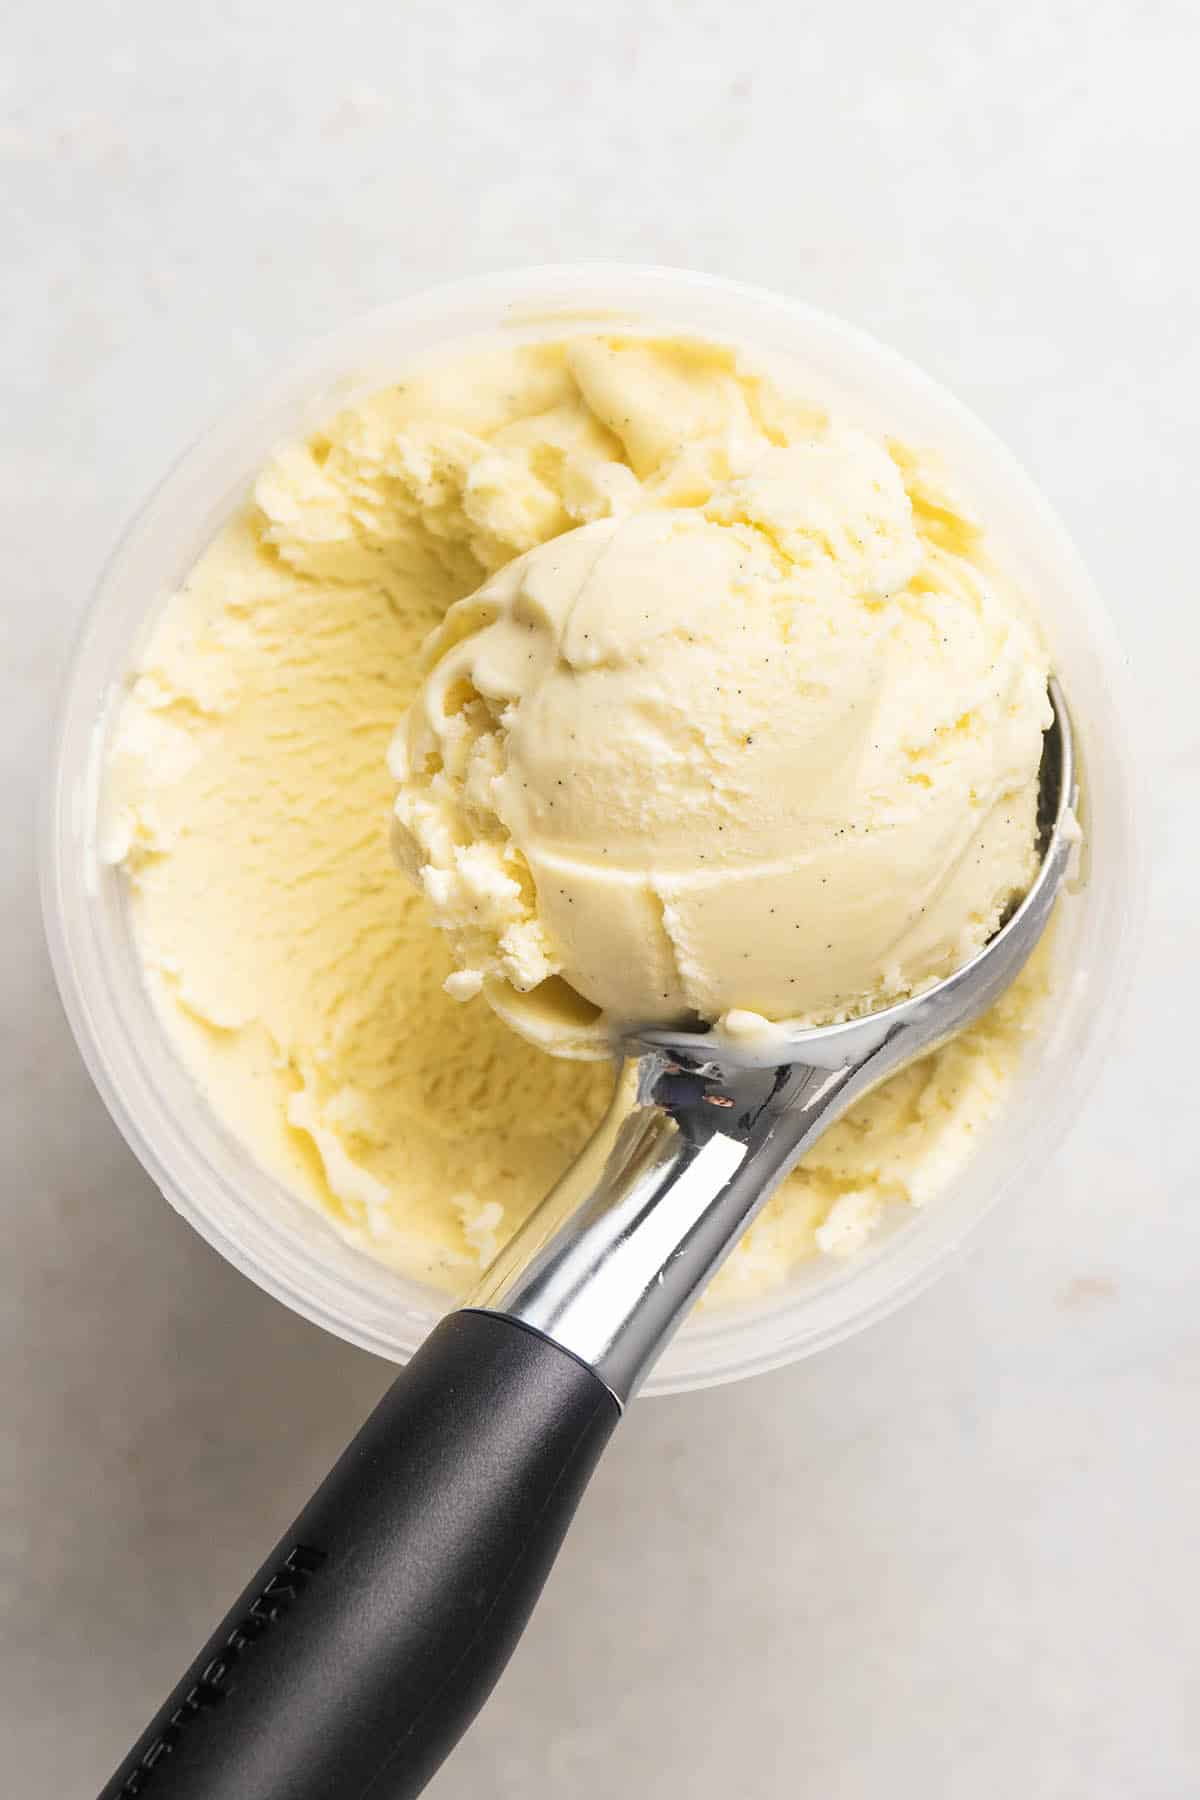
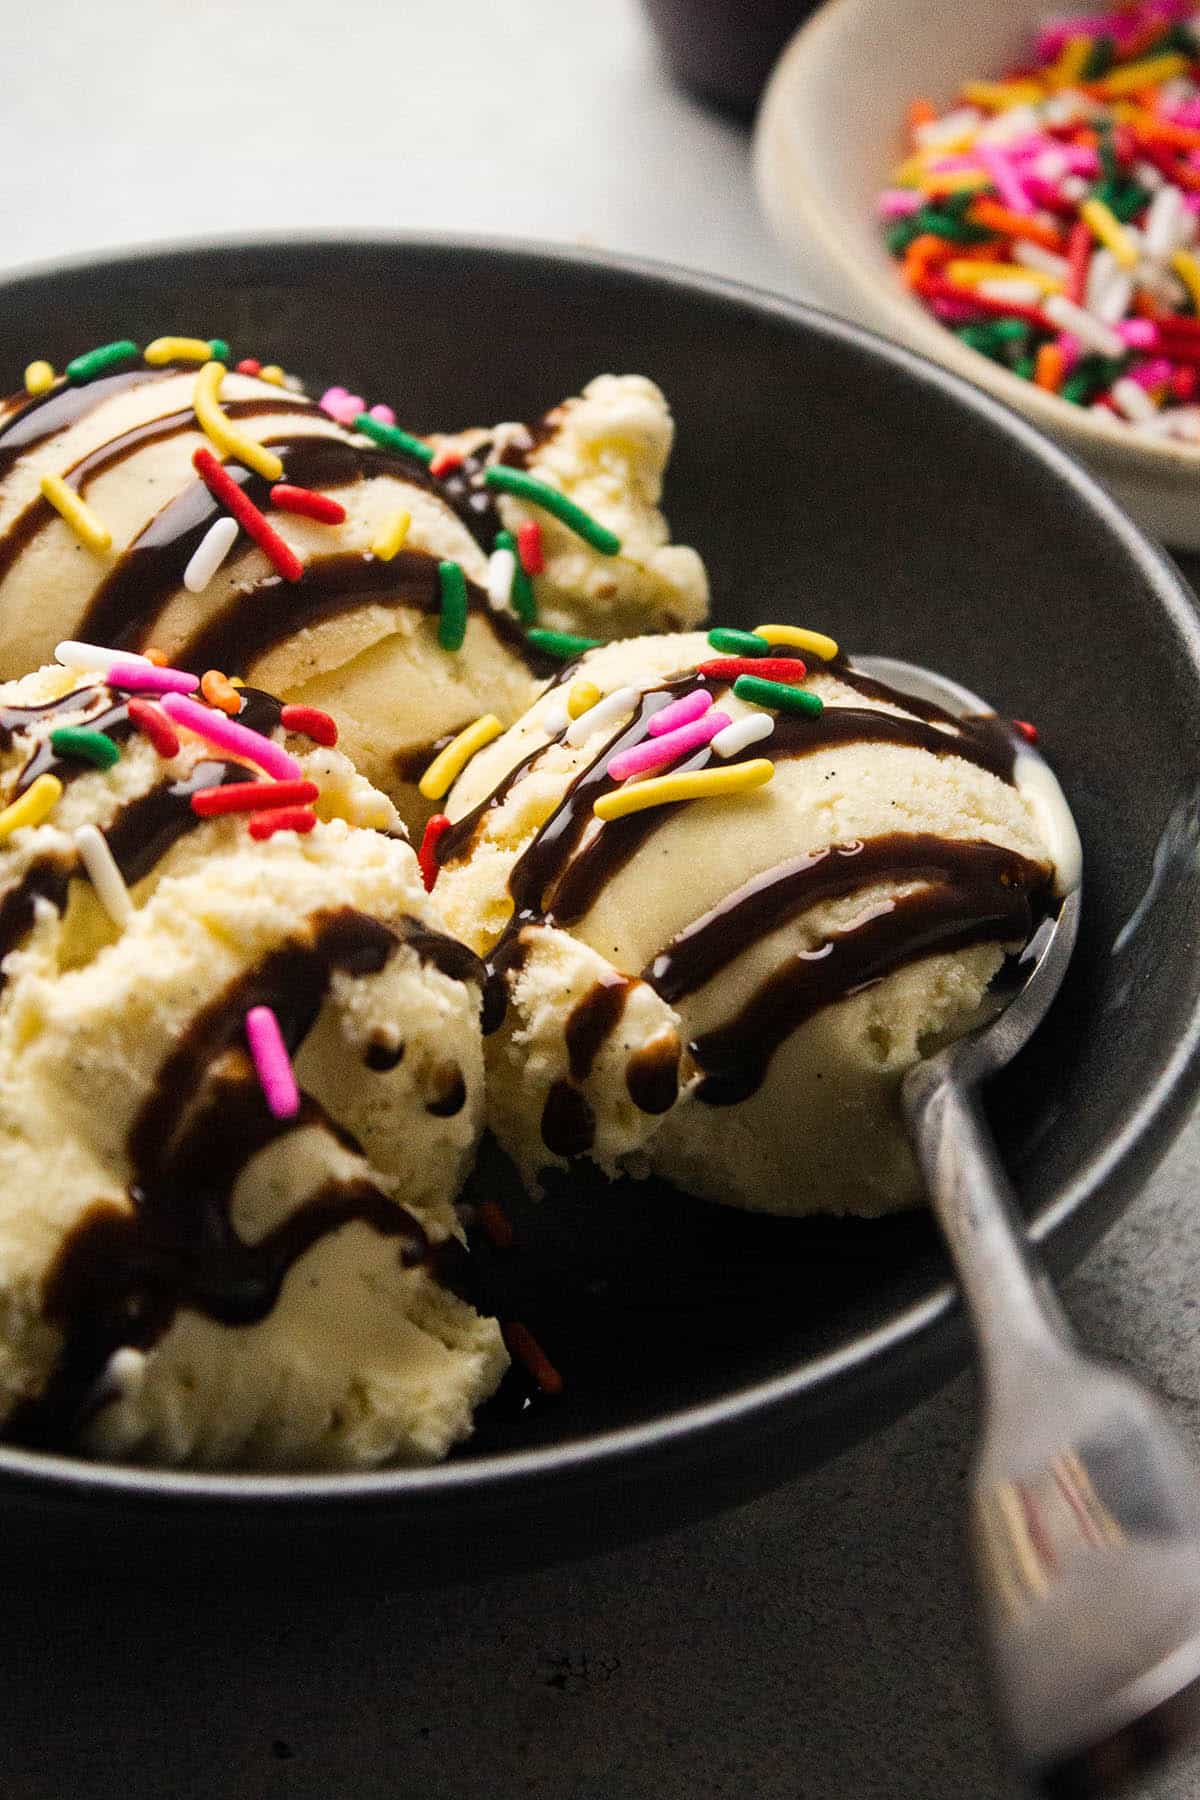
Use your favorite ice cream scoop to portion it into bowls, add your favorite toppings (we love pistachios, chocolate syrup, or fresh strawberries!) and enjoy!
FAQs
We find this homemade vanilla bean ice cream recipe is best eaten within 2 weeks. Past that - depending on the container you keep it in - it can start to dry out and form small ice crystals in the freezer.
If your custard isn't thickening, it may just need more time to cook! Because stoves and equipment can vary so much, you may need to adjust the exact cooking times in this recipe. Follow the visual cues provided, and use a kitchen thermometer to ensure custard reaches at least 170° Fahrenheit to reduce the risk of food borne illness. Keep in mind that this custard doesn't thicken a TON on the stovetop: It will continue to thicken as it cools on the counter, and again as it chills in the fridge overnight
If your eggs start to curdle and cook as you temper them, stop adding the hot liquid immediately! Whisk the egg mixture constantly for a minute or two, and try to work out any lumps while the eggs cool off after the shock of the hot liquid. You can also set the bowl in ice or cold water to help cool the eggs, or - if the curdling is minimal - give the mixture a zap with an immersion blender.
If you have just a few chunks of egg after tempering, don't worry - they'll get strained out when you pour the custard through a mesh sieve later on! But if the entire mixture starts to look very curdled - almost like cottage cheese or scrambled eggs - you might just have to start over, and add the liquid more slowly next time.
Don't forget that ice cream takes practice: Don't worry if it's not perfect on your first try! Keep at it. Learn More: How to Temper Eggs
If we're eating it within a few days, we pack ice cream in freezer-safe 1-quart deli containers.
Plastic containers can become brittle in the freezer over time, which makes them more prone to cracking under pressure (for example, if you squeeze the container too tightly while scooping chocolate ice cream). We find this problem is easily avoided by letting ice cream sit on the counter for five minutes before scooping.
Alternatively, you can store ice cream in a metal bread pan covered with plastic wrap, or a glass container with a freezer-safe lid. You can also find many specialty airtight container options for ice cream online!
If you have any vanilla paste (also called vanilla bean paste), this is a great place to use it: You can use about ½ teaspoon of vanilla bean paste in place of a whole vanilla pod.
If you don't have whole vanilla beans or vanilla paste, you can increase the vanilla extract in this recipe to 1 Tablespoon for a similar result.
You can use whole milk or heavy cream in place of some or all of the half and half if you like, but keep in mind these substitutions can change the texture of the ice cream significantly. Vanilla ice cream made with only whole milk won't be quite as rich or silky; ice cream made with heavy cream will be exceptionally rich. We use heavy cream and half and half in our homemade strawberry ice cream: take a look at that post if you're looking for some inspiration.
Did you make this recipe? Leave a comment and star rating below to let us know how it turned out!
📖 Recipe
Vanilla Bean Ice Cream
- Prep Time: 30 minutes
- Inactive Time: 8 hours
- Cook Time: 30 minutes
- Total Time: 9 hours
- Yield: 1 ½ quarts 1x
- Category: Dessert
- Cuisine: American
Description
This rich and creamy vanilla bean ice cream is perfect for summer! With a simple egg yolk custard base. Make the custard, refrigerate overnight, then churn in an ice cream maker for the perfect scoop.
Ingredients
- 5 egg yolks
- ¾ cup sugar
- 1 teaspoon vanilla extract
- 3 cups half and half
- 1 vanilla bean
- pinch of kosher salt
Instructions
Prep Work
- Check the instructions on your ice cream machine. You may need to place the mixing bowl in the freezer a day or two ahead of time!
- Read through the recipe post above (especially if it's your first time making ice cream!) and gather the equipment you'll need.
DAY 1 - Make the Ice Cream Custard:
- Make the egg mixture - Add egg yolks to a large mixing bowl. Use an electric hand mixer to beat the yolks together for one minute (or whisk vigorously by hand for 3-5 minutes) until they are slightly frothy and have lightened in color. Add sugar to egg yolks a little at a time, beating well between each addition, until you have a thick, pale yellow mixture. When all sugar is added, mix in vanilla extract. Set this egg mixture aside.
- Heat the half and half mixture - Add half-and-half to a medium saucepan and place it over medium heat. Cook, stirring frequently, for 8-10 minutes until the mixture reaches a low simmer (about 180° F).
- Temper the egg mixture - Use a small ladle to add a few Tablespoons of the hot half and half to the prepared egg mixture. Use a hand whisk to whisk constantly as you stream the hot liquid into the eggs. The goal here is to slowly raise the temperature of the egg mixture, so that the eggs cook without scrambling or curdling. Continue adding hot liquid to eggs a little at a time, whisking constantly, until you've incorporated about ⅔ of the liquid. When the eggs are properly tempered, the egg mixture should be warm to the touch and have a very pale yellow color.
- Mix it all together - Slowly pour the tempered egg mixture back into the saucepan with the remaining cream mixture, still whisking constantly. Whisk in a small pinch of kosher salt.
- Prepare the vanilla bean - Slice the vanilla bean lengthwise, then use the dull side of your knife to carefully scrape out all the seeds. Place the vanilla bean seeds and the empty vanilla pods in the saucepan along with the custard, and stir to distribute the seeds evenly.
- Thicken the custard - Return the saucepan to the stove; turn the heat to low. Cook, stirring frequently, for another 8-15 minutes, until the custard has thickened slightly and reached a temperature of at least 170° F. When the custard is ready, you should be able to run your finger along the widest part of your spoon or spatula and no custard should rush in to fill the path you just made.
- Strain the custard - Set a fine mesh strainer over a clean, large mixing bowl. Carefully pour hot custard through your strainer. Gently stir the custard in the strainer to help coax it through. Discard the empty vanilla bean pods.
- Let custard cool on the counter for an hour, until it is completely cooled (stir frequently to release any extra heat and speed the cooling process).
- Refrigerate Overnight. Cover the custard with an airtight lid. Refrigerate 8-10 hours, preferably overnight.
DAY 2 - Churn the Ice Cream:
- Remove custard from the fridge and give it a stir. It will have thickened slightly overnight, and should resemble loose yogurt.
- Transfer the custard to your prepared ice cream maker and churn according to your device's instructions. The ice cream will lighten in color and thicken up quite a bit as it churns; when it's ready, it will resemble soft-serve ice cream. With our Cuisinart ice cream maker, the churning process takes about 20 minutes.
- Scoop ice cream into a freezer-safe container with an airtight lid. Attach the lid and transfer the ice cream to the freezer for at least an hour so it can firm up before you scoop it. Ice cream will darken a bit and continue to harden for the first few hours in the freezer.
Notes
Please read the entire post above this recipe - especially if it's your first time making ice cream! - as it's packed with step-by-step photos and notes to help you succeed.
What ice cream maker should I use? We tested this recipe with the Cuisinart ICE-20 and ICE-21 ice cream machines. Make sure your ice cream machine has at least a 1.5-quart capacity, and be sure to follow the manufacturer's directions for churning the ice cream in whatever machine you use.
Great homemade ice cream takes practice. Homemade ice cream is almost entirely about technique. Plan to spend some time and attention on each step of this recipe, and don't be discouraged if things don't go perfectly on your first try! We have provided approximate times for each recipe step, but cook times may vary depending on your kitchen and equipment. Pay attention to visual cues and use the step-by-step photos in the post above to help you along!
Nutrition
- Serving Size: ½ cup
- Calories: 108
- Sugar: 15.7 g
- Sodium: 87.4 mg
- Fat: 2.7 g
- Carbohydrates: 18.3 g
- Protein: 2.6 g
- Cholesterol: 79.8 mg



Comments
No Comments