

This easy homemade whole wheat pizza dough is made from scratch with a mix of whole wheat flour and all purpose flour for a soft, delicious crust that's perfect for pizza night! No stand mixer required.

Nothing beats pizza night, and this easy homemade pizza crust is the perfect blank canvas for all your favorite toppings!
This pizza dough requires no kneading, but it does need at least one hour to rise at room temperature on the counter. This rise time is important because it gives our dough more time to develop flavor and gluten - both of which are essential to getting a chewy, airy texture and balanced flavor out of whole wheat doughs. (If you're in a hurry, we recommend using our fast pizza dough recipe, which is ready in 15 minutes and only needs all purpose flour!)
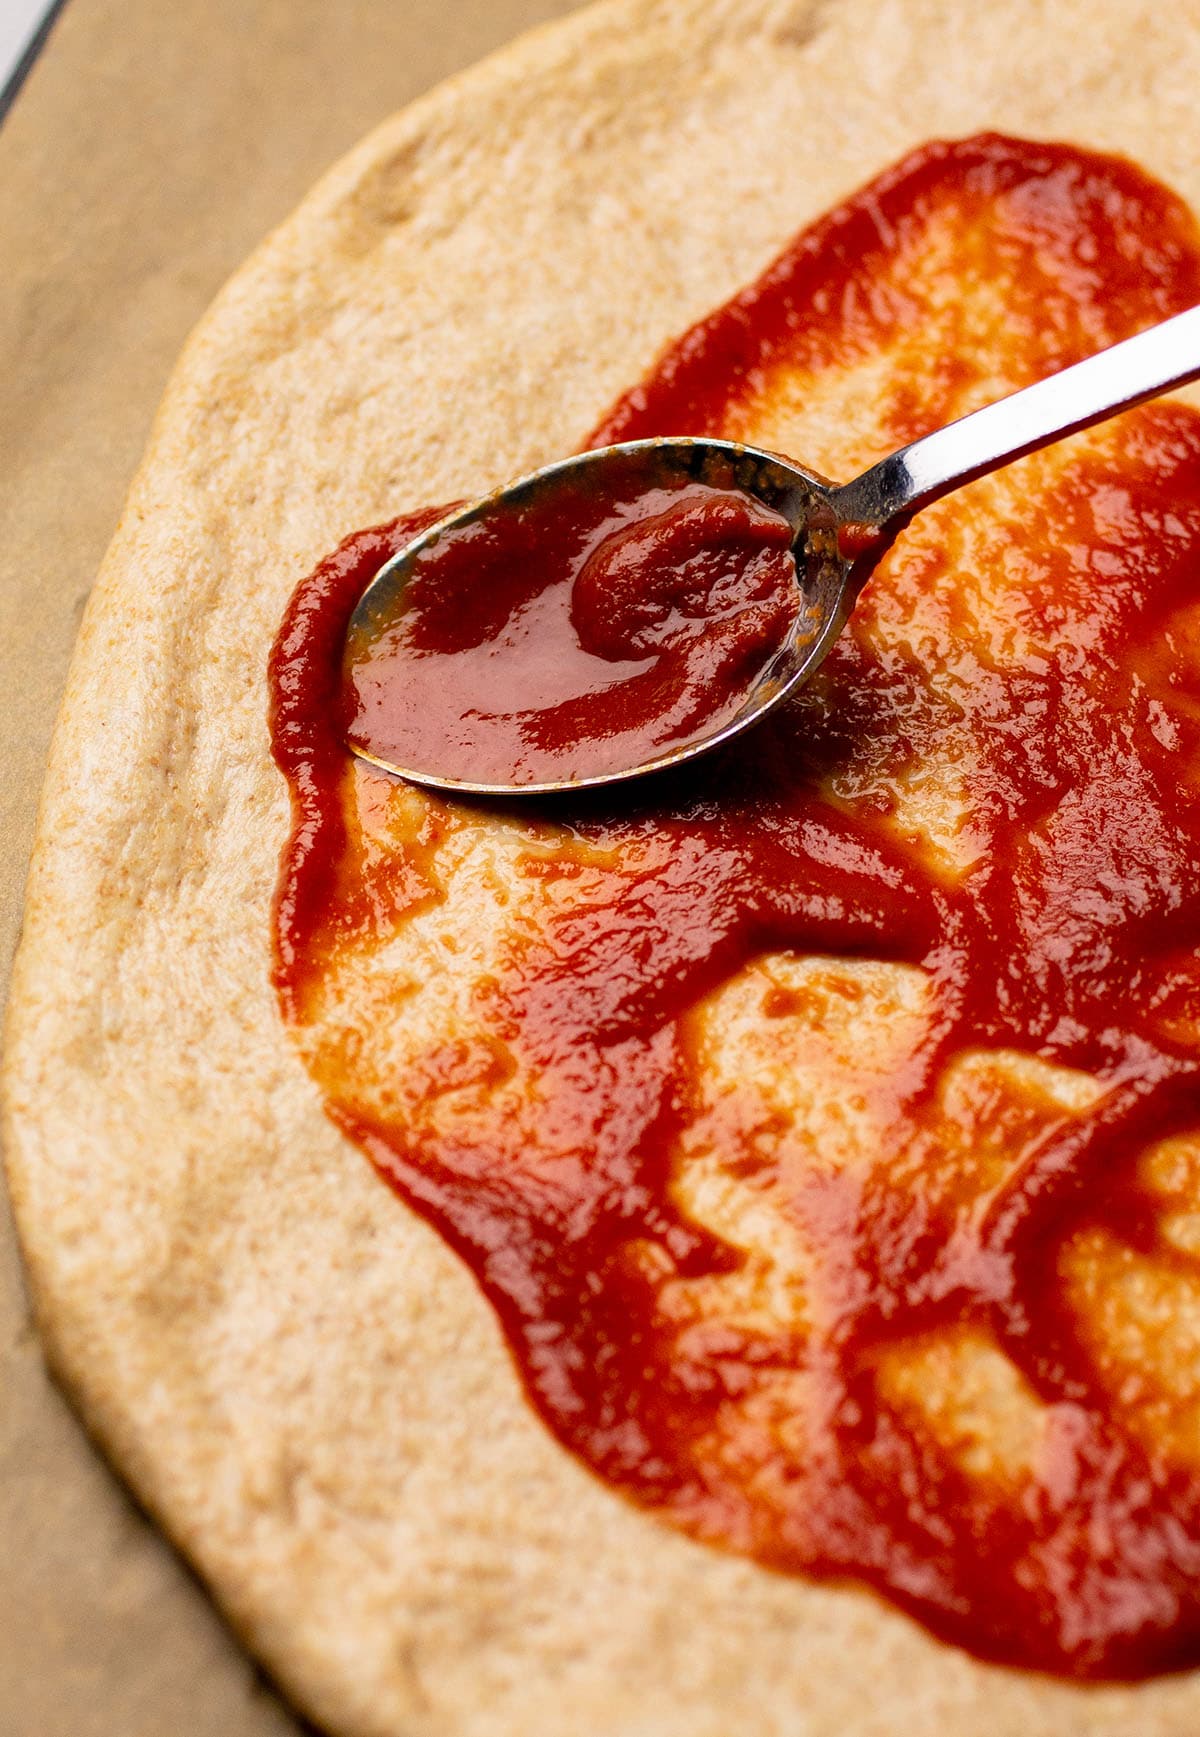
This dough works in any of your favorite pizza recipes (it's also great for calzones, breakfast pizza, or deep dish pizza!) We love topping it with a quick pizza sauce or homemade pesto, plus plenty of cheese and whatever veggies or protein we have on hand.
PS - This recipe is just the tip of the iceberg! To understand the why and how of great homemade pizza dough, check out our Everyday Artisan Bread course!
Jump to:
A few notes on ingredients
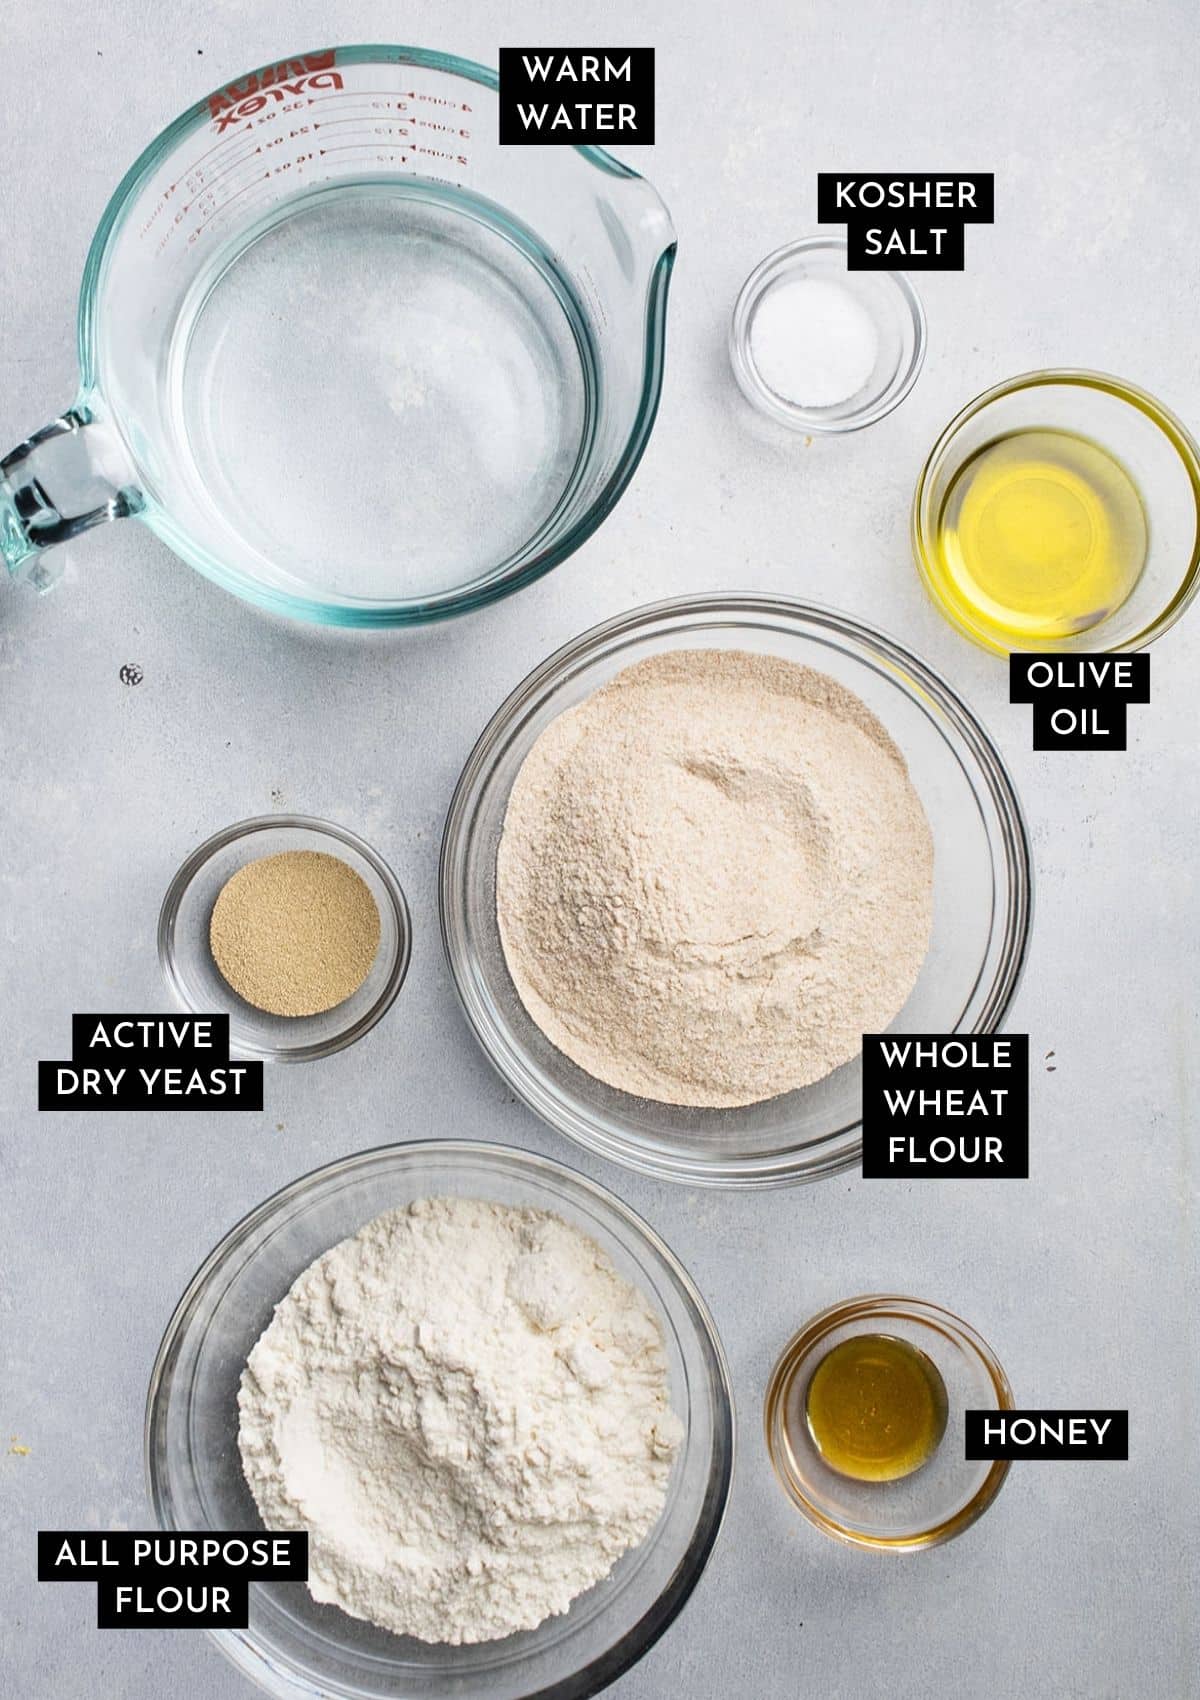
Our whole wheat pizza dough ingredients are pretty straightforward, but we want to highlight a few things:
- Use high quality flour. The brand of flour you use has a profound effect on the feel of your dough and the final texture of your pizza. We recommend baking with King Arthur flour for best results - their flours are the most consistent from bag to bag, and they have a high protein content (which gives you a stronger, more elastic, less sticky dough!)
- All Purpose Flour helps us guard against some of the more common problems with whole wheat dough, which makes this dough more forgiving (and beginner-friendly!) Whole wheat flour can be challenging to work with, especially for new bakers. It's easy to end up with bread that tastes crumbly or earthy or just...blergh. While it's definitely possible to make a 100% whole wheat dough, it requires a few advanced baking techniques and a lot more time (see our whole wheat dutch oven bread for more inspo!) Our goal is to give you a great whole wheat dough that requires minimal baking experience and is ready on the quickest possible timeline: This flour combo gives us the benefits and flavor of whole wheat without sacrificing texture, adding more rise time, or requiring additional steps. If you'd like a 100% whole wheat pizza dough recipe, you can find it in our Everyday Artisan Bread course!
- A tablespoon of honey in this recipe helps jumpstart our yeast for a quick, even rise, and it lends a bit of sweetness that really complements the earthiness of the whole wheat here. If you don't have honey (or just want to make this recipe vegan), you can use white sugar, brown sugar, or maple syrup in its place.
- Why add olive oil? Because we're working on such a quick timeline here, our dough doesn't have quite as much time as we'd like to develop a really smooth, stretchy texture. Adding a bit of olive oil to the pizza dough helps us mimic the extensibility we get from a longer-timeline dough (basically: It makes the dough a little smoother and easier to work with).
See recipe card for full information on ingredients and quantities.
Our pizza timeline
This homemade pizza crust is ready fairly quickly, but it has a bit of rise time and a few key check-in points. Here's a quick look at our order of operations:
- Proof the yeast - 10 minutes.
- Mix the dough - 5 minutes.
- Let it rise - 30 minutes.
- Fold the dough - 5 minutes.
- Let it rise again - 30 minutes.
- Shape and add toppings - 10 minutes.
- Bake - 15 minutes.

How to make this pizza crust
Proof the yeast and mix the dough
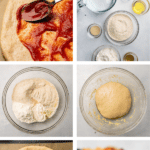
Proof a bit of active dry yeast in some warm water with a bit of honey until it's foamy. Stir in the flours (pro tip: use a kitchen scale to measure your ingredients!) into the yeast mixture, along with some salt and a bit of olive oil. You can use a stand mixer here if you have one, but mixing by hand with a wooden spoon or sturdy spatula is just fine!
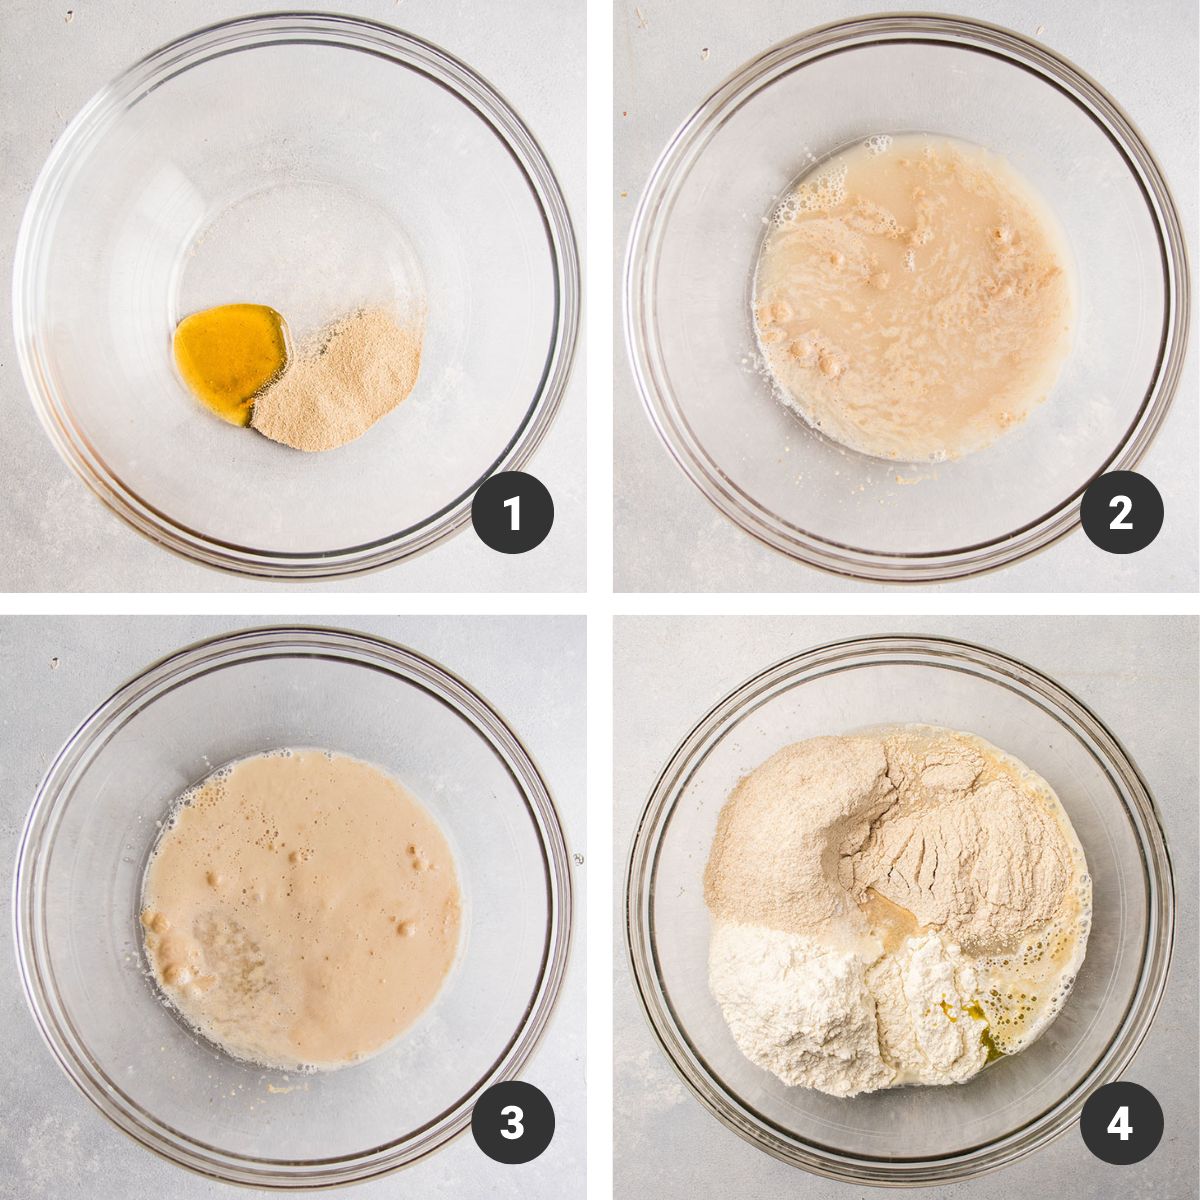
Don't worry if the dough feels shaggy or sticky right after mixing. It won't form a tight, elastic ball or pull away from the sides of a mixing bowl the way that some recipes do. Our primary goal is to make sure all of the flour is evenly saturated with the liquid, so be sure to mix until no dry flour remains in the bowl.
Let the dough rise for 30 minutes
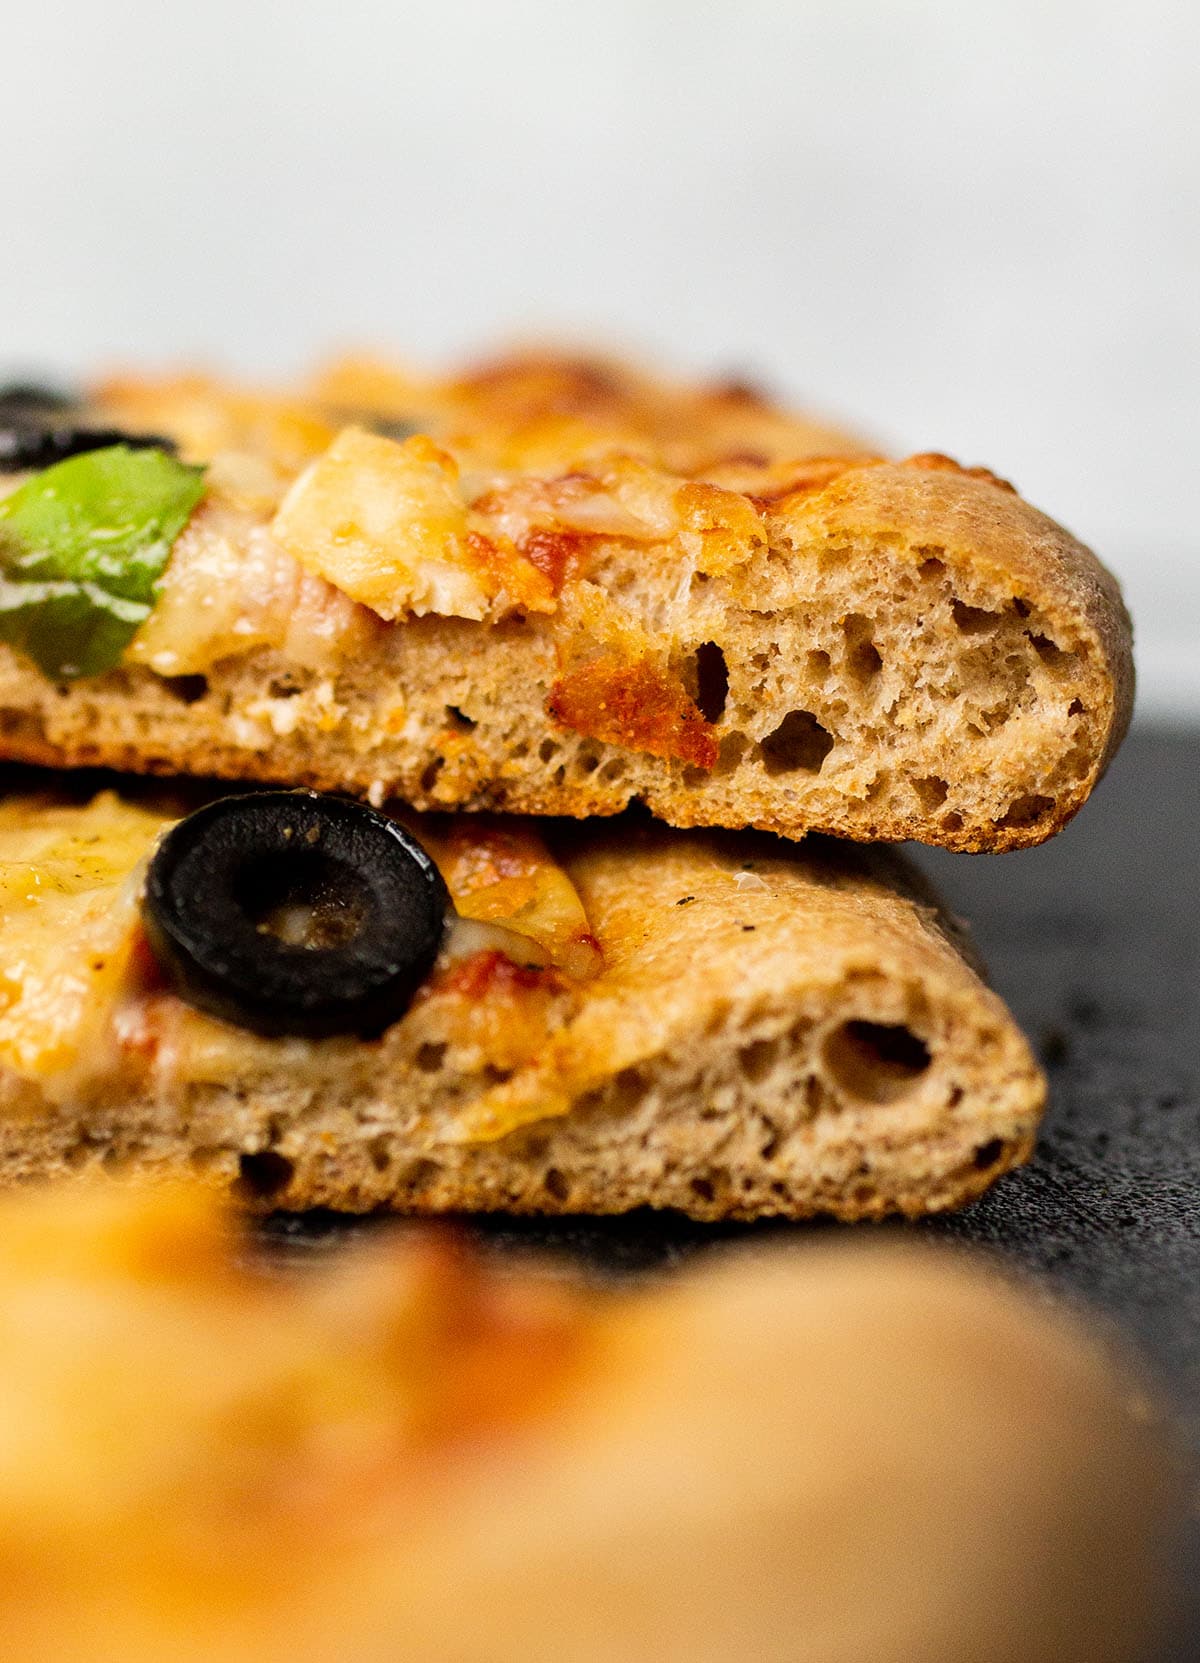
Once the dough is mixed, cover it with a clean tea towel and let it sit on the counter for half an hour. The dough will puff up a bit, but it won't double in size or look too dramatic. The goal of this first rise is to let our flour soak up all the water in our recipe and start developing strong gluten networks (that gluten is the key to a chewy, airy pizza crust!)
Fold the dough
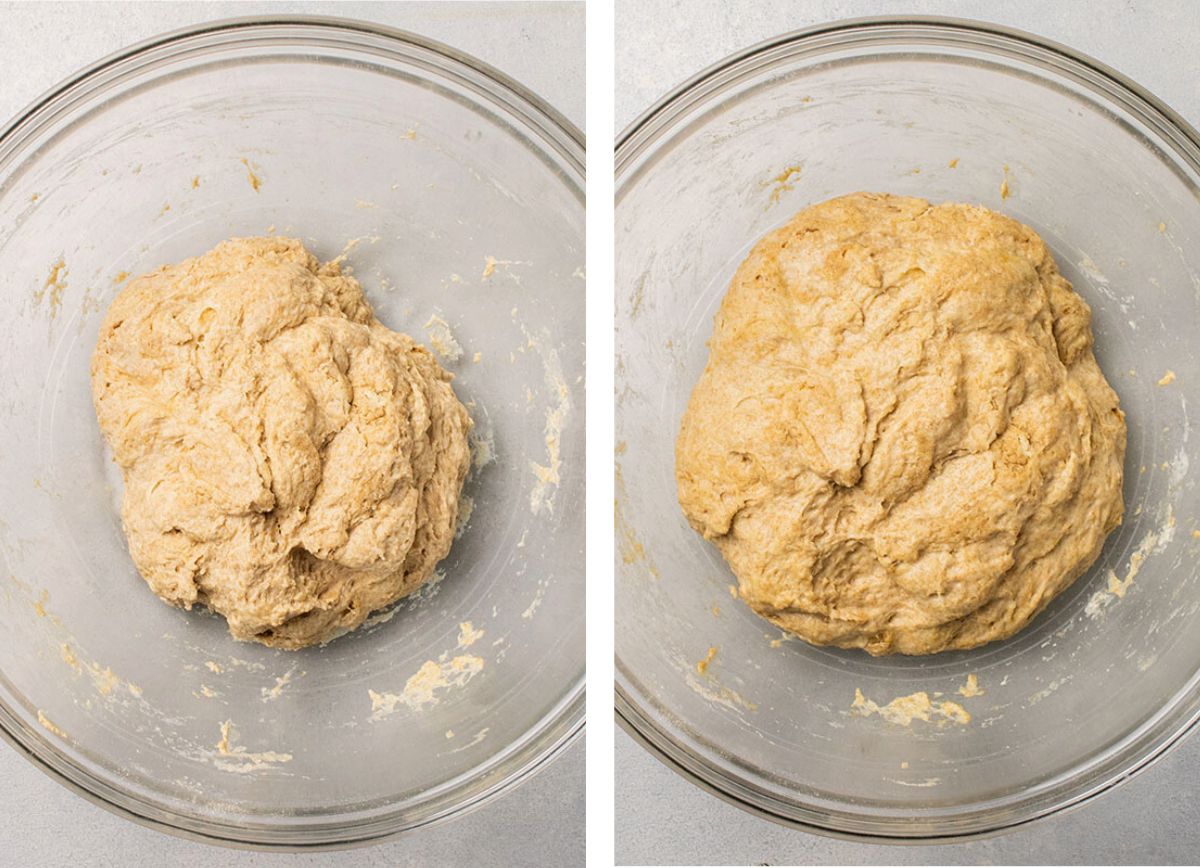
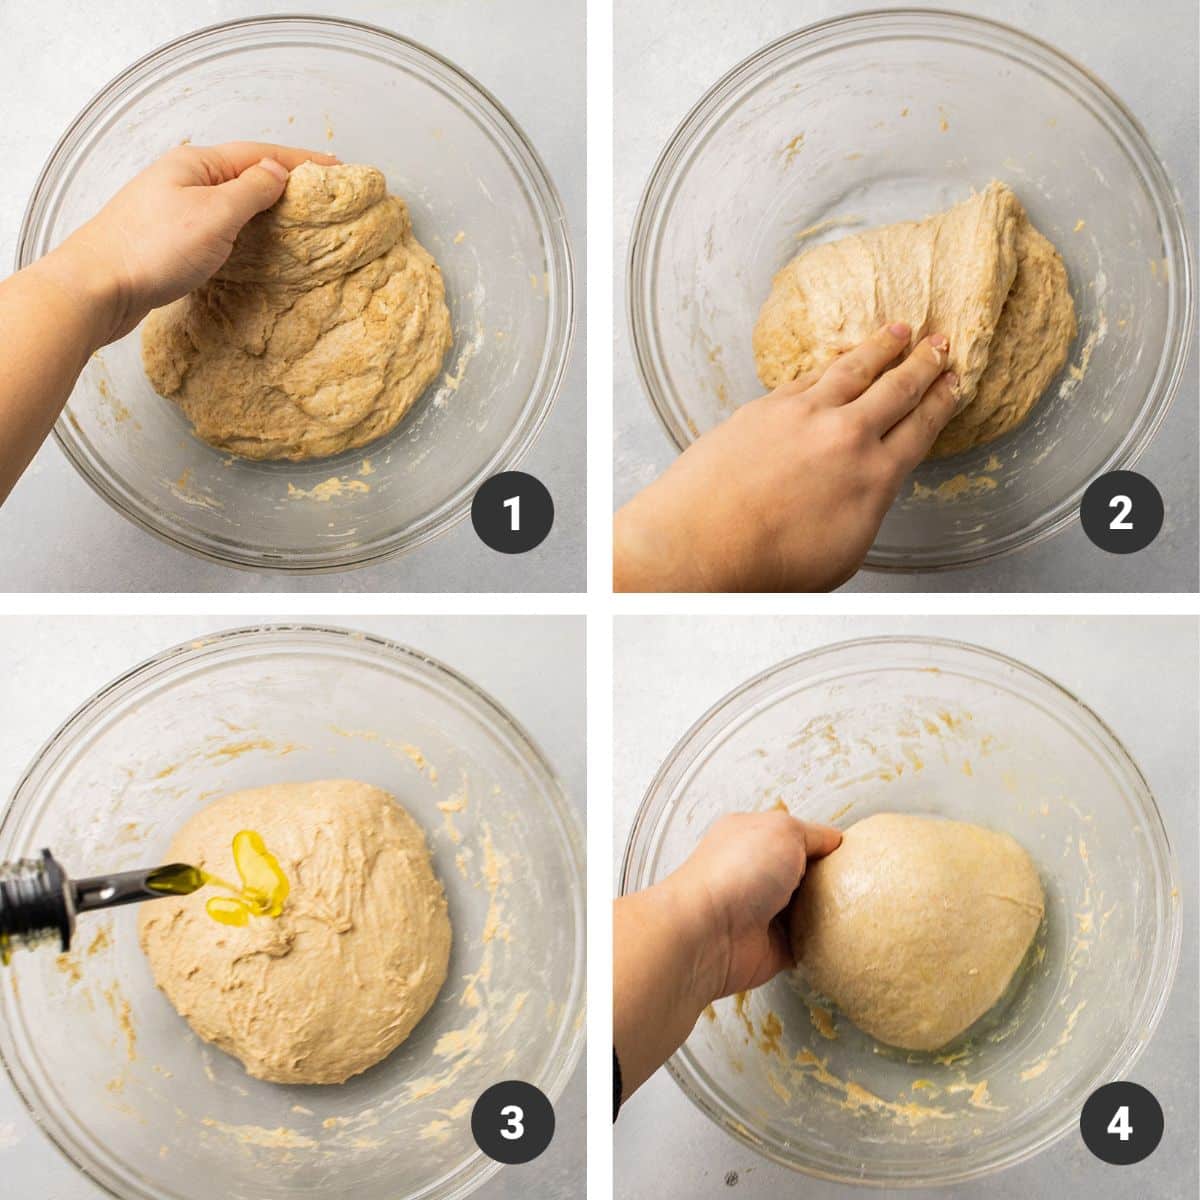
After thirty minutes, it's time to work the dough a little bit! Run your hands under some cold water (this helps prevent the dough from sticking) and gently slide your hands under the dough. The dough should feel a bit loose and sticky here - that's ok!
Gently pull the dough over on itself, folding each edge in towards the center like an envelope. You'll feel the dough start to tighten as you do this, and it will smooth out quite a bit. Repeat this process on each side of the dough (run your hands under some more cold water if it starts feeling too sticky!)
Tip: You're not so much kneading the dough here as you are folding it: Our goal is to gently shape it into a tighter, more uniform dough ball.
Add olive oil and let rise again
Once the dough is shaped into a smooth-ish ball, drizzle it with a little bit of olive oil and turn to coat the entire surface. Tuck the sides of the dough in so you have a relatively smooth, even dough ball.
Cover the dough with a clean kitchen towel and let it rise another 30 minutes (this is the point where we usually turn on the oven and start prepping our toppings!)

How to bake pizza at home
This homemade pizza dough works well with just about any baking method! When baking pizza at home, our favorite method is to use a baking steel or pizza stone.
Preheat the baking steel
Place a baking stone or steel (we love our Baking Steel!) on your lowest oven rack and preheat the oven to 450-500° Fahrenheit. (We like to bake pizza at 500°F, but not everyone is comfortable cranking their oven up that high - you can use a lower temp if you prefer!) Give your baking steel as much preheating time as you can - an hour is best, but at the very least leave it in the oven the entire time it's heating up.
Use a cutting board and parchment to slide pizza into the oven
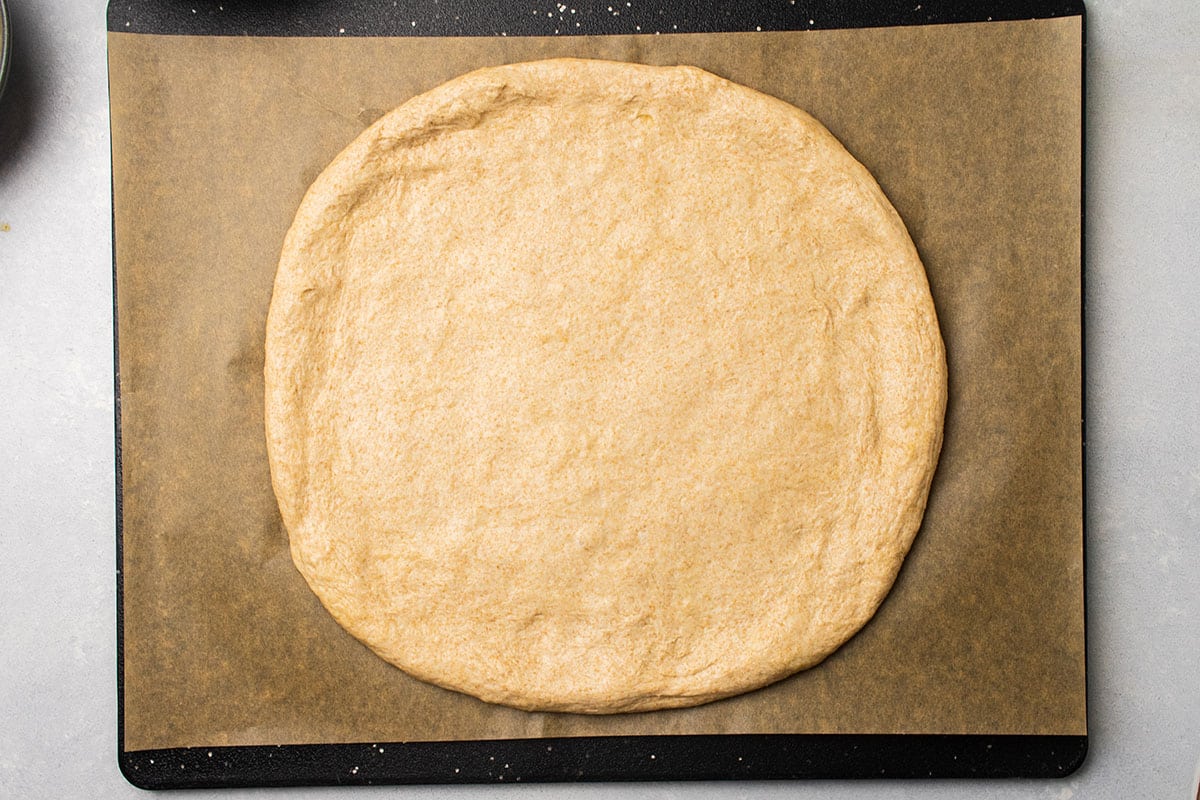
Put a piece of parchment paper on a large cutting board, then press your pizza dough into shape on top of the parchment. (You don't need to add flour to the parchment paper first unless you want to - that light coating of olive oil makes the dough pretty easy to stretch out!)
Add your toppings, then pick up the cutting board and use it like a pizza peel to slide the pizza and the parchment paper onto your baking steel. Check out this video for a visual: How to Use a Pizza Stone.
When the pizza is cooked, use tongs to pull the pizza off the stone and back onto your cutting board. Let it cool for a few minutes, then slice and serve!
Three rules for the best pizza dough
- Use a kitchen scale if you have one! Measuring by weight (with a scale) is much more accurate than measuring by volume (with a measuring cup). Because each person measures a cup of flour a little bit differently, it's easy to end up using way too much flour in a recipe - which results in dry, dense crust. But when you measure your flour in grams with a kitchen scale, you can measure flour perfectly every time - so if you have a kitchen scale, please use it! (No kitchen scale? Measure your flour with the scoop and level method for best results!)
- For a crispy crust, bake your pizza on a baking steel or pizza stone (and give the baking steel plenty of time to preheat!)
- Great pizza dough takes patience and persistence. When you're first learning how to make pizza crust at home, it might not look exactly like these pictures. THAT'S OKAY! The more you practice, the better you'll get. Stick with it!

Riffs and Substitutions
This pizza dough is fairly forgiving. Some of our favorite adjustments:
- Add mix-ins to your dough. Fold in some chopped roasted garlic (or garlic powder), fresh herbs, Italian seasonings (basil, oregano, and rosemary are great here), or shredded cheese when you mix the dough for an extra pop of flavor.
- Use any baking method you like! We love a baking steel or pizza stone, but you can also press this dough onto a pizza pan or baking sheet for an easy pan pizza, roll it out with a rolling pin for calzones, use it for grilled pizza, or press it into a cast iron skillet for deep dish pizza.
- Swap the all purpose flour in this recipe for bread flour if you have it! Bread flour has a higher protein content, which gives you better gluten development for a smooth dough and a chewy crust.
- Swap the honey for white sugar, brown sugar, or maple syrup (you can leave the sweetener out entirely if you want, but your yeast may not activate as quickly, so plan to give your dough a bit of extra time to rise).
- Add your favorite toppings! This pizza holds up well with just about any toppings (we love a summery corn & cilantro pizza or a quick prosciutto arugula pizza!)

How to make this dough the day before
Mix dough as directed the night before you want to make pizza, then cover with an airtight lid (you can use plastic wrap if you need to) and let it rise overnight in the refrigerator. An hour before you want to eat, transfer the dough to the counter, knead it a few times, then coat it with a bit of olive oil and let it come back to room temperature for at least half an hour before shaping and baking normally.
How to freeze pizza dough
To freeze dough, mix dough as directed and let it do its first 30 minute rise. Fold dough as directed, then transfer to a plate or baking sheet lined with parchment paper and place dough in the freezer (uncovered) for 2-3 hours. When dough is set and frozen, transfer it to an airtight container and store for up to 3 months. Thaw dough overnight in the fridge, then move it to the counter when you're ready to use it.
A few pizza dough FAQs
We talk a LOT about these differences in our online course, Everyday Artisan Bread! In a nutshell, whole wheat flour has more texture because it uses more pieces of wheat in the milling process. As a result, it absorbs more water than all purpose flour and has sharp pieces that can slice through the gluten networks in your dough more easily - both of which make 100% whole wheat dough more challenging to work with, especially for new bakers. By using a mix of all purpose and whole wheat flours here, we get great whole wheat flavor but still have a dough that's fairly easy to work with. For more about the differences between flours, and to learn how to scale up the amount of whole wheat flour in your recipes successfully, grab our Everyday Artisan Bread course!
A good rule of thumb is “warm to the touch.” Too-hot water (typically 130-140° Fahrenheit and above) will kill your yeast, but use too-cold water and your yeast will take too long to activate. We usually shoot for a water temperature between 95° and 110° Fahrenheit. You should be able to comfortably hold your hand under water running at about 100 degrees – it should feel quite warm, but not hot. Use a kitchen thermometer for a precise measurement if you like!
Yes. If you use instant or rapid rise yeast instead of active dry yeast, reduce the total amount of yeast by 25% for best results (so, use 1 ¾ teaspoons of instant or rapid rise yeast for every 2 ¼ teaspoons of active dry yeast called for). Learn more about various yeast types in this article.
Yes! As written, this recipe makes a soft, fluffy dough. For a thinner, crispier crust, reduce the yeast in this recipe by half.
More whole wheat bread recipes


Leave a comment below and our team will help you troubleshoot! You can also see more detailed FAQs about general bread baking in our Easy Crusty French Bread post, learn to bake taller, airier loaves with our FREE Bread Bootcamp Webinar, or enroll in our Everyday Artisan Bread course for personal support and step-by-step training videos that take you through every technique and buzzword!
📖 Recipe

Whole Wheat Pizza Dough
- Prep Time: 15 minutes
- Inactive Time: 1 hour
- Cook Time: 15 minutes
- Total Time: 1 hour 30 minutes
- Yield: Serves 2-4 1x
- Category: Pizza
- Cuisine: Italian-American
- Diet: Vegan
Description
This easy whole wheat pizza dough is perfect for pizza night!
Ingredients
- 9 grams active dry yeast (2 ¼ teaspoons, or 1 packet)
- 12 grams honey (1 Tablespoon)
- 240 grams warm water (about 1 cup)
- 180 grams whole wheat flour (about 1 ½ cups)
- 180 grams all purpose flour (about 1 ½ cups)
- 7 grams kosher salt
- 20 grams olive oil, plus extra for drizzling
Instructions
Proof the yeast (10 minutes)
- Mix yeast, honey, and warm water in a large mixing bowl. Let sit for 5-10 minutes, until yeast is foamy.
Mix the dough & first rise (30 minutes)
- Add whole wheat flour, all purpose flour, kosher salt, and olive oil to the yeast mixture. Use a wooden spoon or sturdy spatula to stir everything together until no dry bits of flour remain. If it gets tough to stir the dough with a spoon, use clean hands to knead the dough together until it’s well mixed.
Note: You can continue to knead this dough by hand (5-10 minutes) or with the dough hook on a stand mixer (3-5 minutes) until it’s smooth and elastic if you like; this will develop more gluten for a smoother dough and a bit more chew. If you’re short on time or just don’t feel like putting in that much elbow grease, just mix the dough until no dry bits of flour remain (it’s ok if it’s still a little shaggy and sticky!) We have tested this recipe with and without additional kneading and it’s good either way, so feel free to adjust based on your personal preference! In the photos above, we mixed the dough until it was just combined (with no additional kneading).
- Once the dough is thoroughly mixed, cover with a clean tea towel and let rise at room temperature for 30 minutes.
Fold dough & second rise (30 minutes)
- Run your hands under a bit of cold water (this helps prevent the dough from sticking). Gently slide your hands under the pizza dough and fold each edge in towards the center, almost like you’re folding an envelope. You’re not really kneading the dough here, per se - you’re more just folding it into a neater little dough ball. The dough may feel pretty sticky here - that’s ok! Just run your hands under a little more cold water if it’s sticking too much. You’ll feel the dough begin to tighten up as you fold it.
- Drizzle the dough ball with a bit of olive oil, then give it a turn until it’s evenly coated. Re-cover with the tea towel and let rise another 30 minutes, until you’re ready to shape and bake your pizza.
Shape & Bake
- Line a large cutting board with a piece of parchment paper, then gently stretch or roll the dough into shape on the parchment (we like using a piece of parchment paper here to make it easy to slide our dough in and out of the oven).
- Top with your favorite sauce, cheese, and toppings and bake with your favorite method. We like to bake pizza on a hot baking steel at 450-500°F for 10-20 minutes until the cheese is bubbly and the crust is golden brown.
Notes
How much dough does this recipe make? This recipe makes enough for one large (~14") pizza, two medium (~8-10") pizzas, or 4-6 individual pizzas (depending on how thin you stretch your dough!) One batch of dough is usually enough for 2-3 large portions (with no side dishes) or 4 smaller portions (perfect for serving with a quick salad).
How warm should my “warm water” be? A good rule of thumb is “warm to the touch.” Too-hot water (130° F and above) will kill your yeast, but use too-cold water and your yeast will take too long to activate. We usually shoot for a water temperature between 95° and 110° Fahrenheit. You should be able to comfortably hold your hand under water running at about 100 degrees – it should feel quite warm, but not hot. Use a kitchen thermometer for a precise measurement if you like!
Substitutions. Use bread flour in place of all purpose flour. Add dried or fresh herbs, roasted garlic, or grated parmesan cheese when you mix the dough for extra flavor. Use sugar or maple syrup instead of honey.
Please use a kitchen scale if you can! Measuring by weight with a kitchen scale is much more accurate than measuring by volume (with cups). Because each person measures a cup of flour a little bit differently, it's easy to end up using way too much flour in a recipe - which results in dry, dense crust! When you measure your flour in grams with a kitchen scale, you can measure flour perfectly every time.
Mix this dough by hand OR with a stand mixer - it works well either way! If you use a stand mixer, fit it with the dough hook and add the flour a little bit at a time to ensure the mixer incorporates everything evenly. Let the mixer run an additional 3-5 minutes once all the flour is incorporated to develop the gluten in the dough more fully for a stronger, smoother dough.
Adjusting the rise time. If your kitchen is especially chilly, you may need to let the dough sit another 15-30 minutes during the first rise.
For more ideas and instructions about flour types, dough shapes, and other substitutions and techniques, be sure to enroll in our Everyday Artisan Bread course.
Nutrition
- Serving Size: Makes 4 Servings
- Calories: 373
- Sugar: 2.8 g
- Sodium: 683.6 mg
- Fat: 6.4 g
- Carbohydrates: 70.1 g
- Protein: 11.5 g
- Cholesterol: 0 mg


Jessie @ Life As A Strawberry
I can't stop making this pizza dough! Definitely a new favorite, and that quick dough folding step mid-way through rising helps it develop a ton of great, chewy texture (which can be hard to do with whole wheat dough!)