

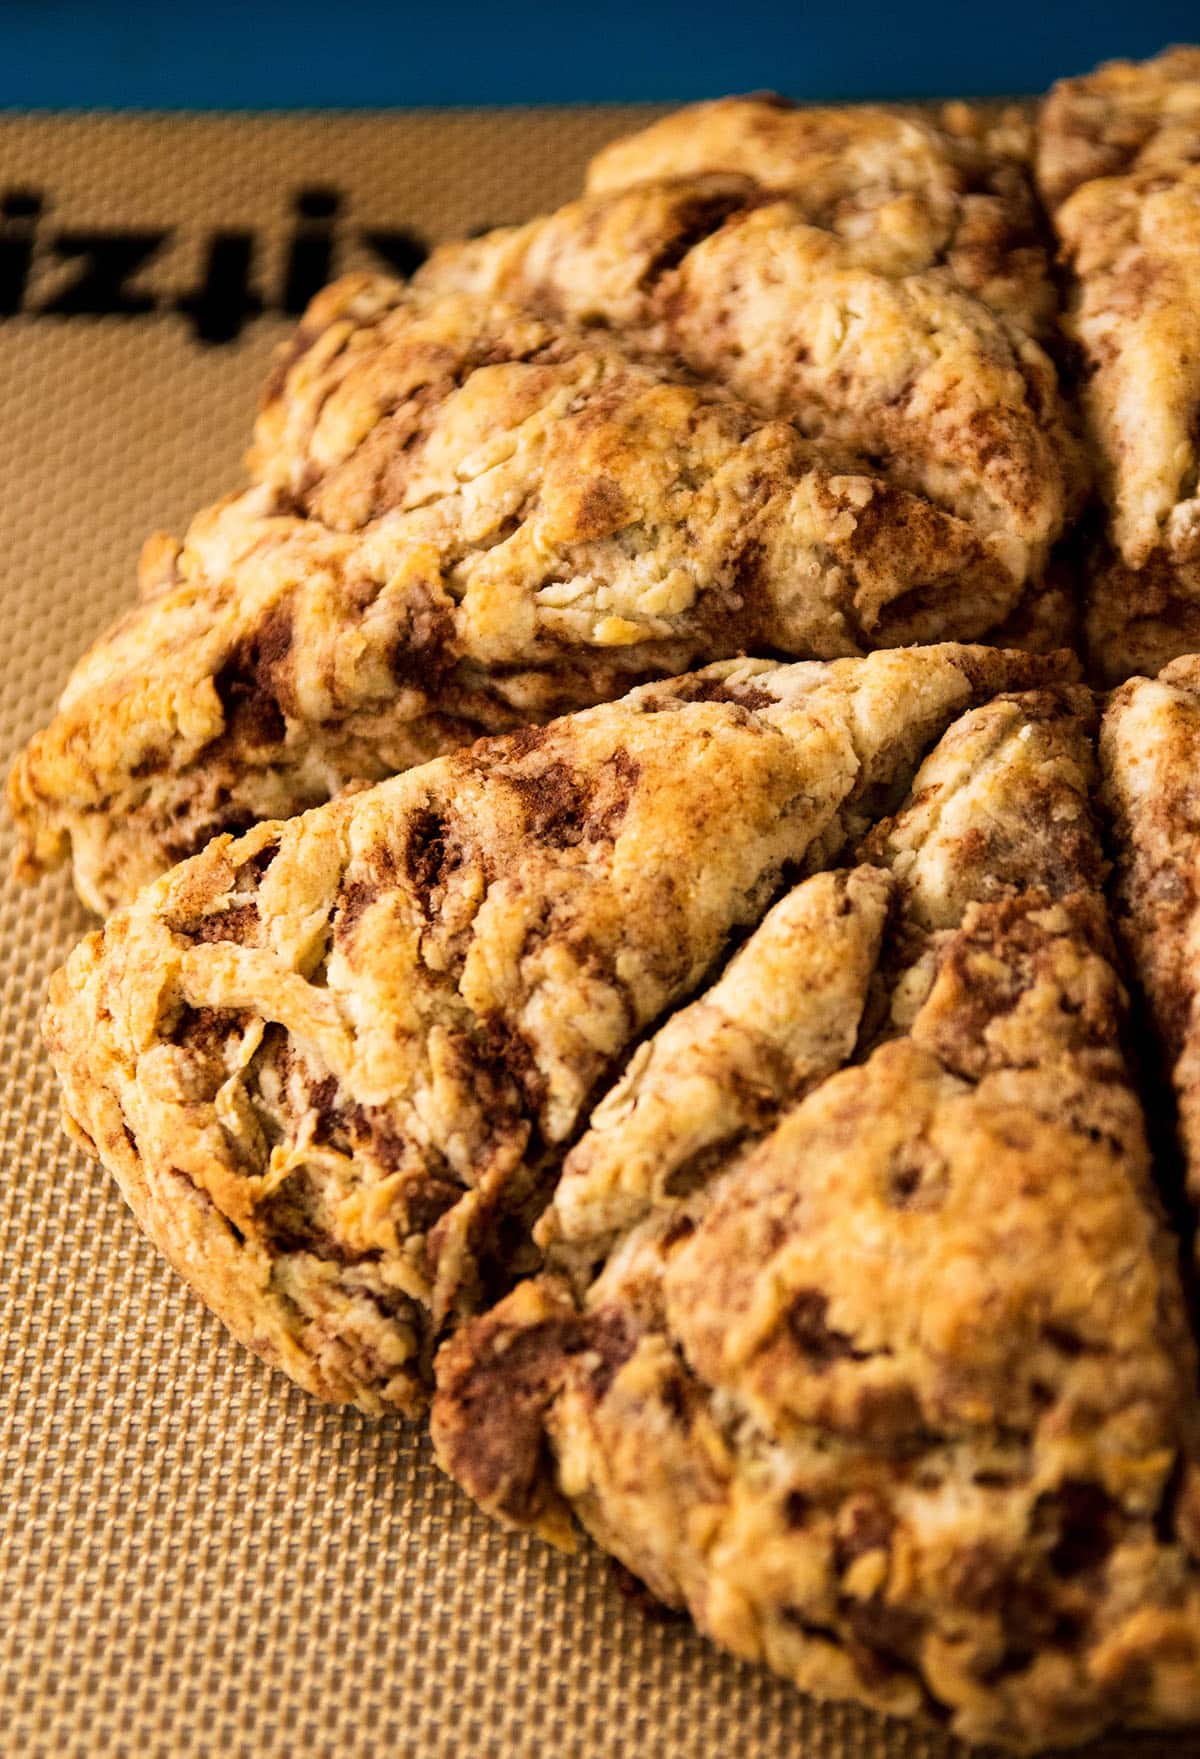
These delicious cinnamon scones get their beautiful marbled look from homemade cinnamon butter! Mix the cinnamon butter together, pop it in the freezer, then shred into pieces and stir into our basic scone dough for cozy, buttery bursts of flavor. No artificial cinnamon chips necessary! Topped with a simple cinnamon glaze.

These cinnamon scones are about to be your new breakfast BFF. They're buttery, cozy, and perfect for dunking in your morning coffee or serving with a fall brunch spread.
We're working with a basic scone recipe here, but we're swapping plain ol' butter for a homemade cinnamon compound butter that gives us delicious pockets of cinnamon flavor and lends a beautiful, marbled, swirly look to the finished scones. (The cinnamon butter might sound intimidating, but we promise it's deceptively simple!)
Jump to:
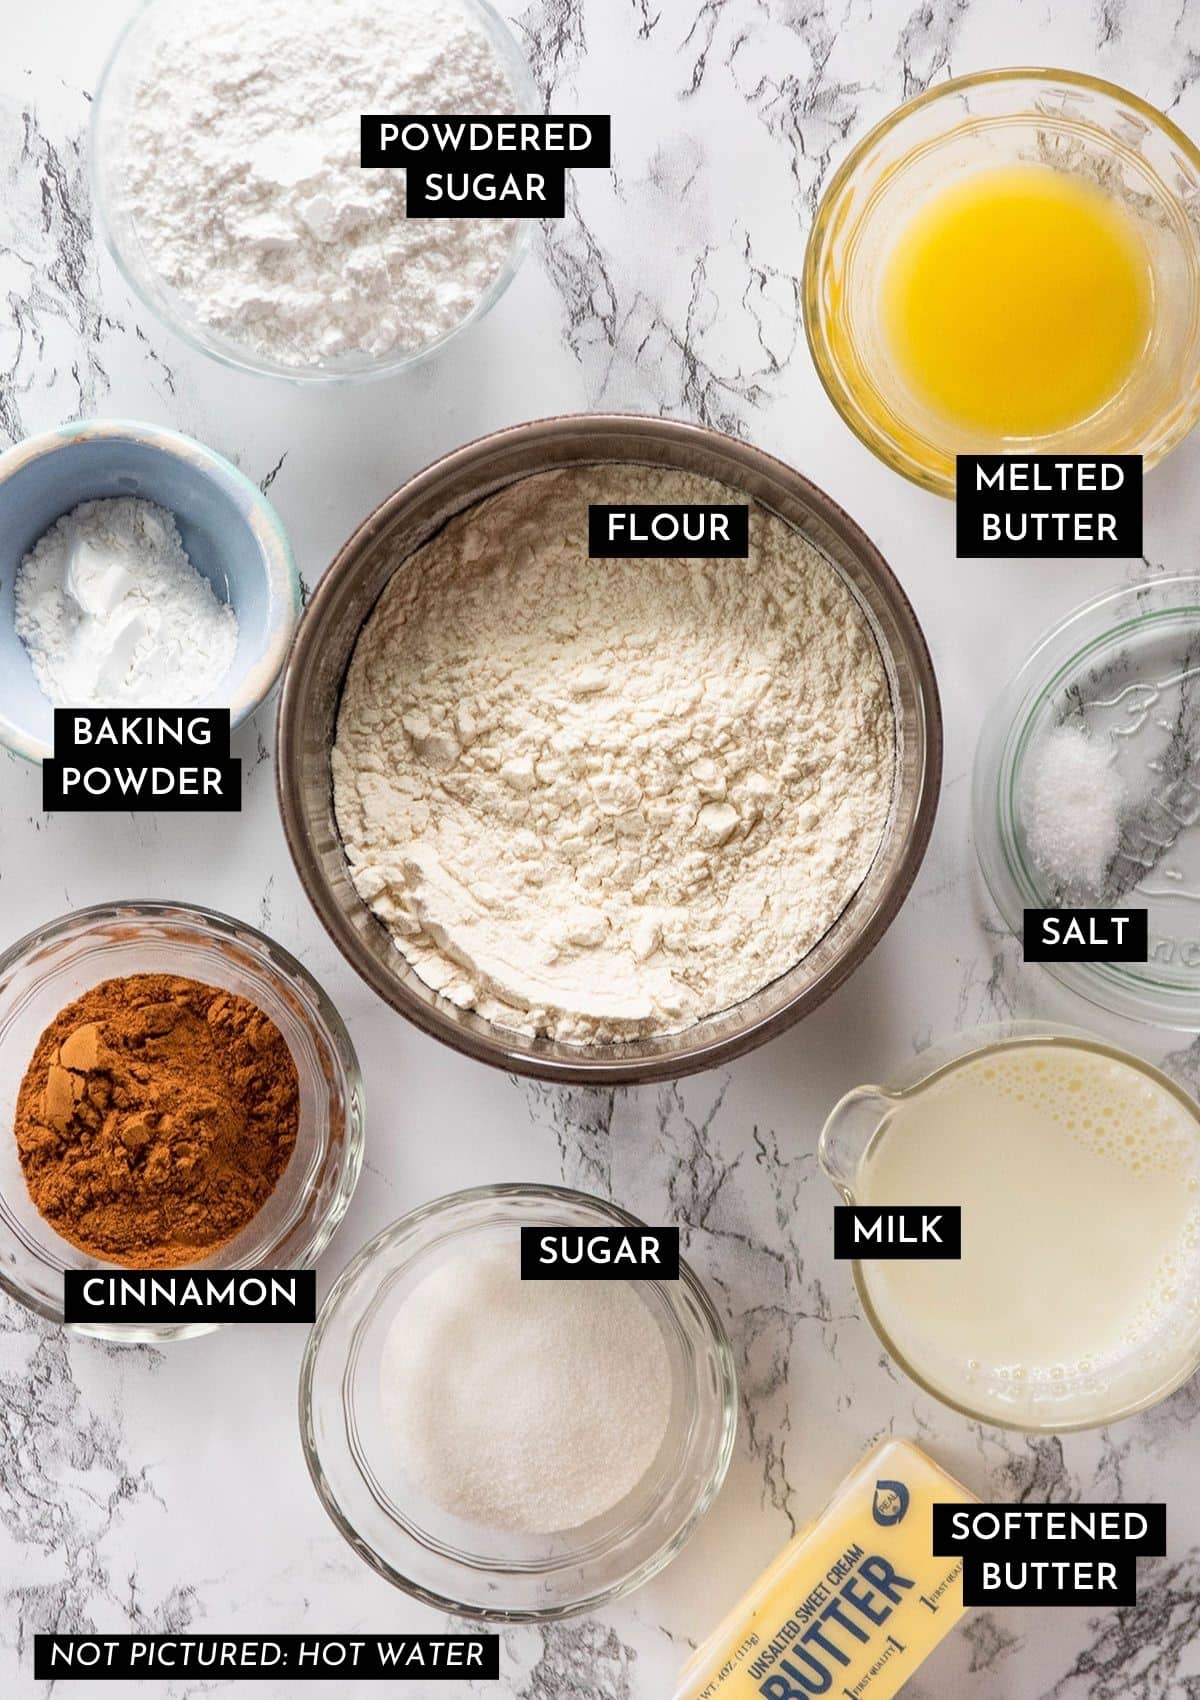
Ingredients
Our secret weapon: Cinnamon Butter
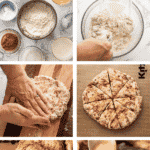
Our homemade cinnamon butter is the star of the show here. It takes a little bit of time to prep (but we promise it's worth it!) Here's the process in a nutshell:
Mix the butter and cinnamon
Start by mixing softened butter with ground cinnamon. You can do this by hand, but we find it's a little quicker to use an electric mixer.

Shape into a log
When the butter is well mixed, transfer it to a piece of parchment paper (you can also use wax paper) and gently press it into a log shape. It doesn't have to be perfect: The goal is just to shape the butter into one solid piece so it will be easier to shred later.
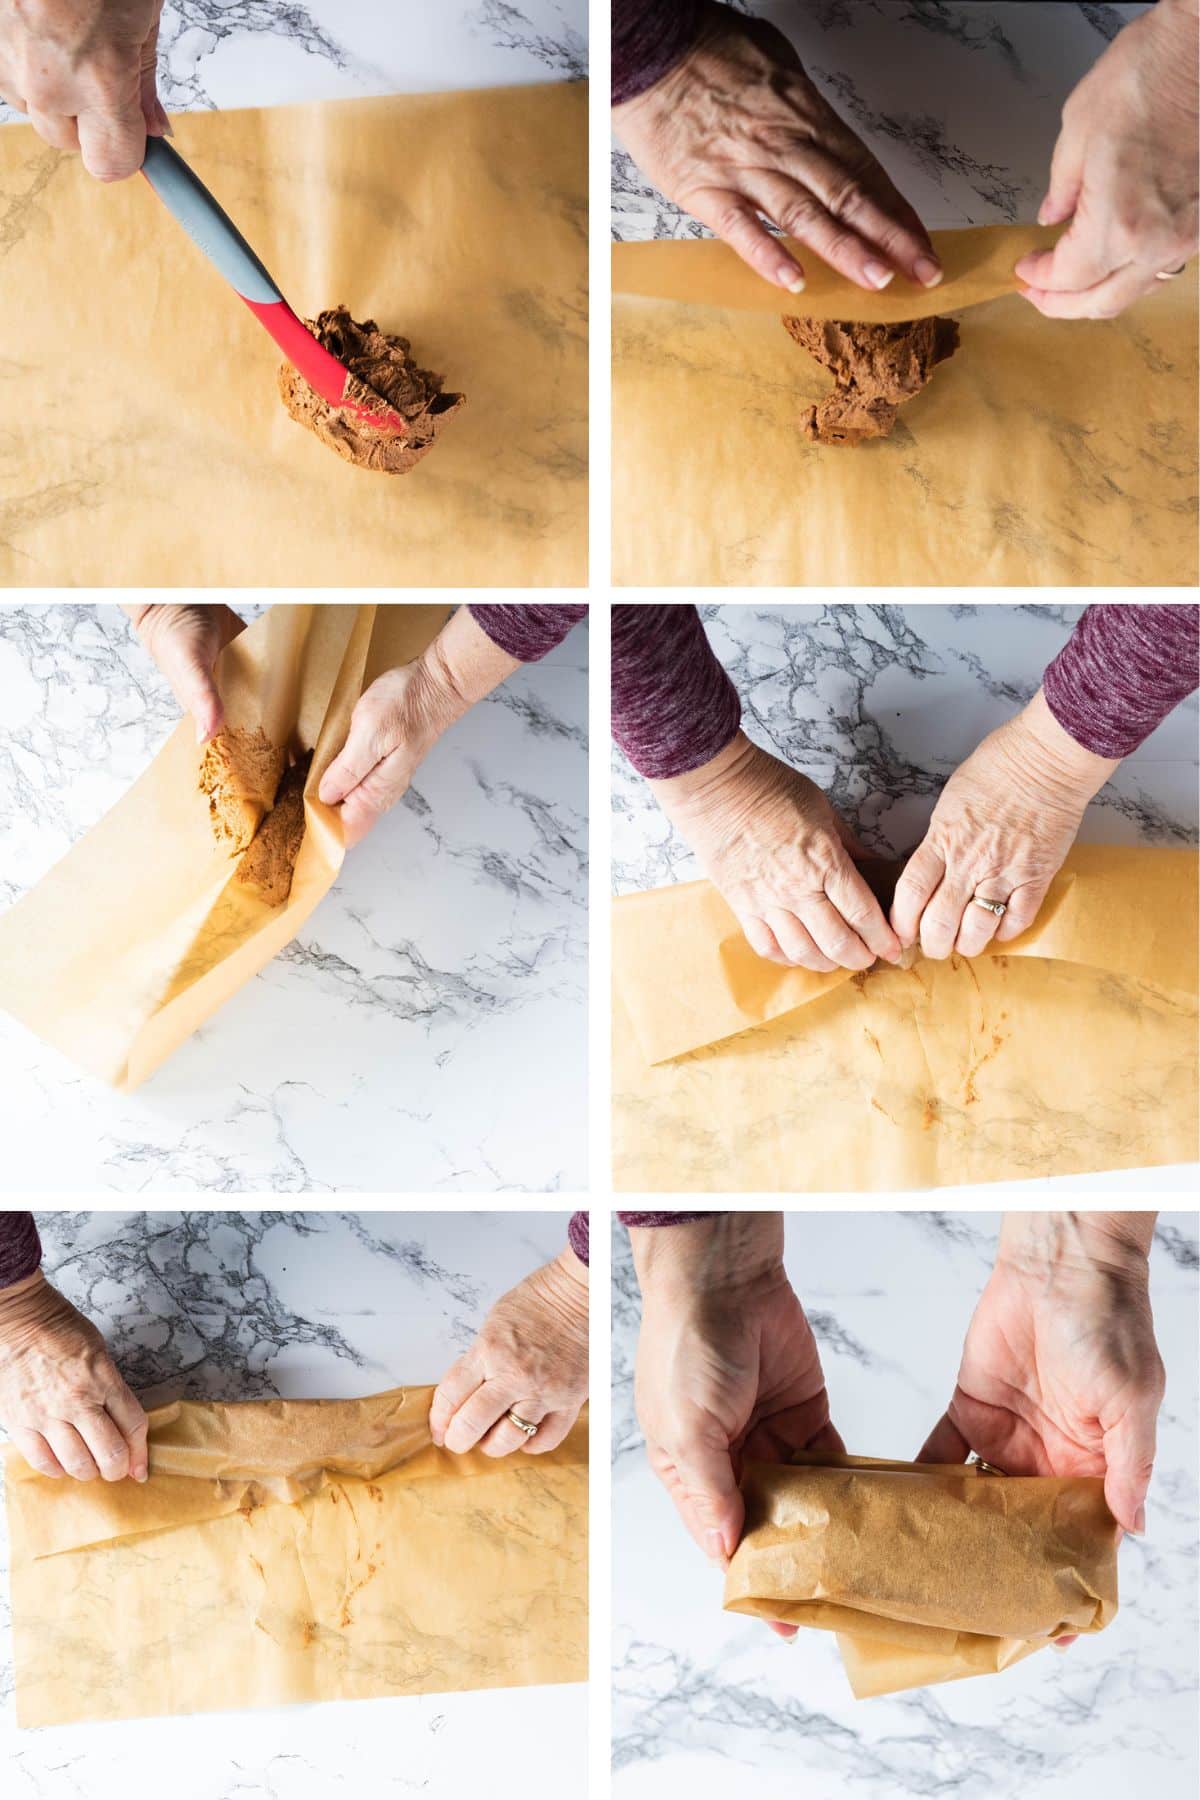
Freeze your cinnamon butter
Once the butter is gathered into shape, fold the edges of the parchment paper over to form a little bundle, then pop it into the freezer to set for at least 15 minutes or until butter is very cold and no longer soft.
It's important to let the butter get really cold for two reasons:
- Cold butter is easier to grate - it won't melt in your hand as quickly and will form more even shreds as it moves through the holes of the box grater.
- As cold butter pieces melt in the oven, they leave small pockets behind, which creates the light and crumbly pastry texture we love with scones. If butter is too warm when the dough is mixed, it will melt into the dough before baking and yield a dense, not-so-crumbly scone.
Fun fact: Super-cold butter is important anytime you're dealing with flaky pastry, like the pie crust in this Tomato Galette or the flaky layers of your favorite biscuits.
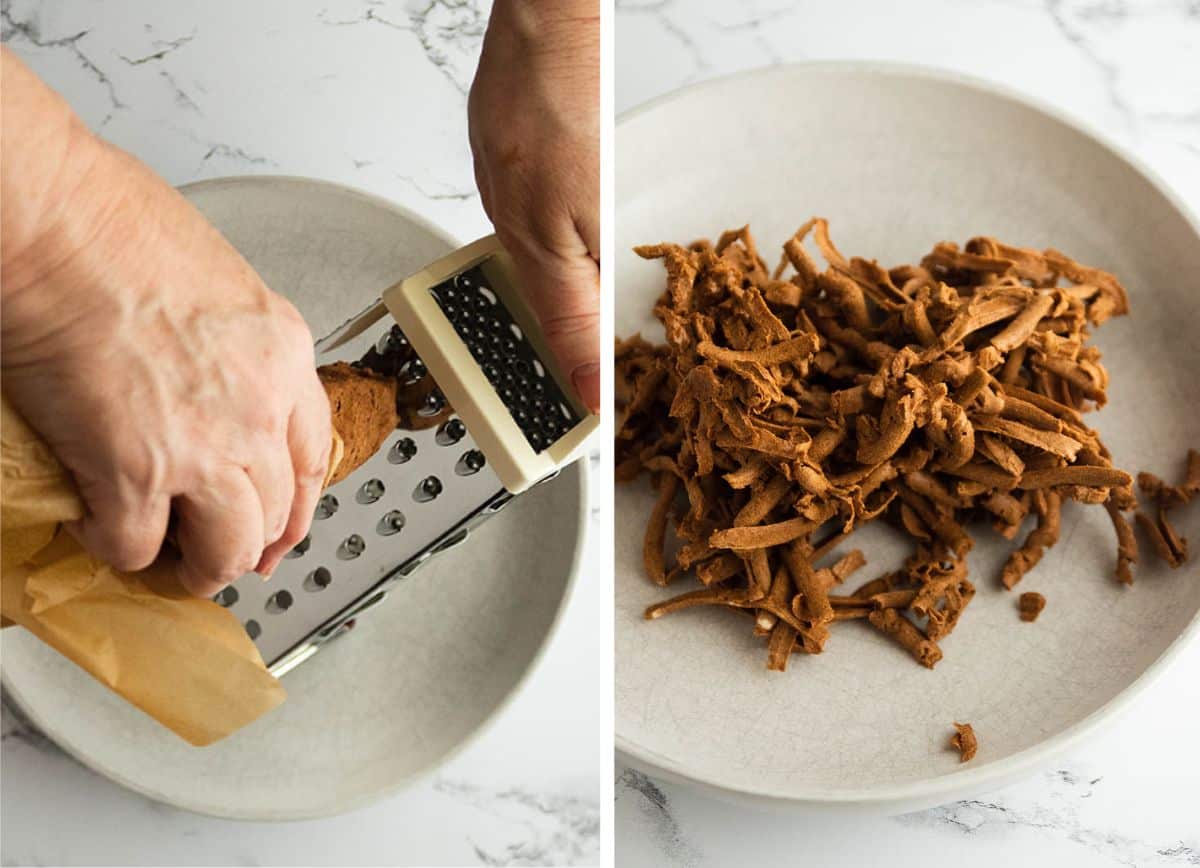
Grate the cold butter
When your cinnamon butter is nice and cold, carefully shred it using the large holes on a box grater. We like to use the same parchment we wrapped the butter in as a makeshift handle to hold the end of the butter as we grate it.
You can also use a food processor fitted with the shredding disc attachment to shred the butter here if you like!
Once shredded, pop the butter back into the freezer to keep it cold while you prepare the rest of the scone ingredients.
Making the cinnamon scones
When your cinnamon butter is shredded and ready to go, it's time to mix your dough! Once the butter is taken care of, the rest of this recipe comes together very quickly.
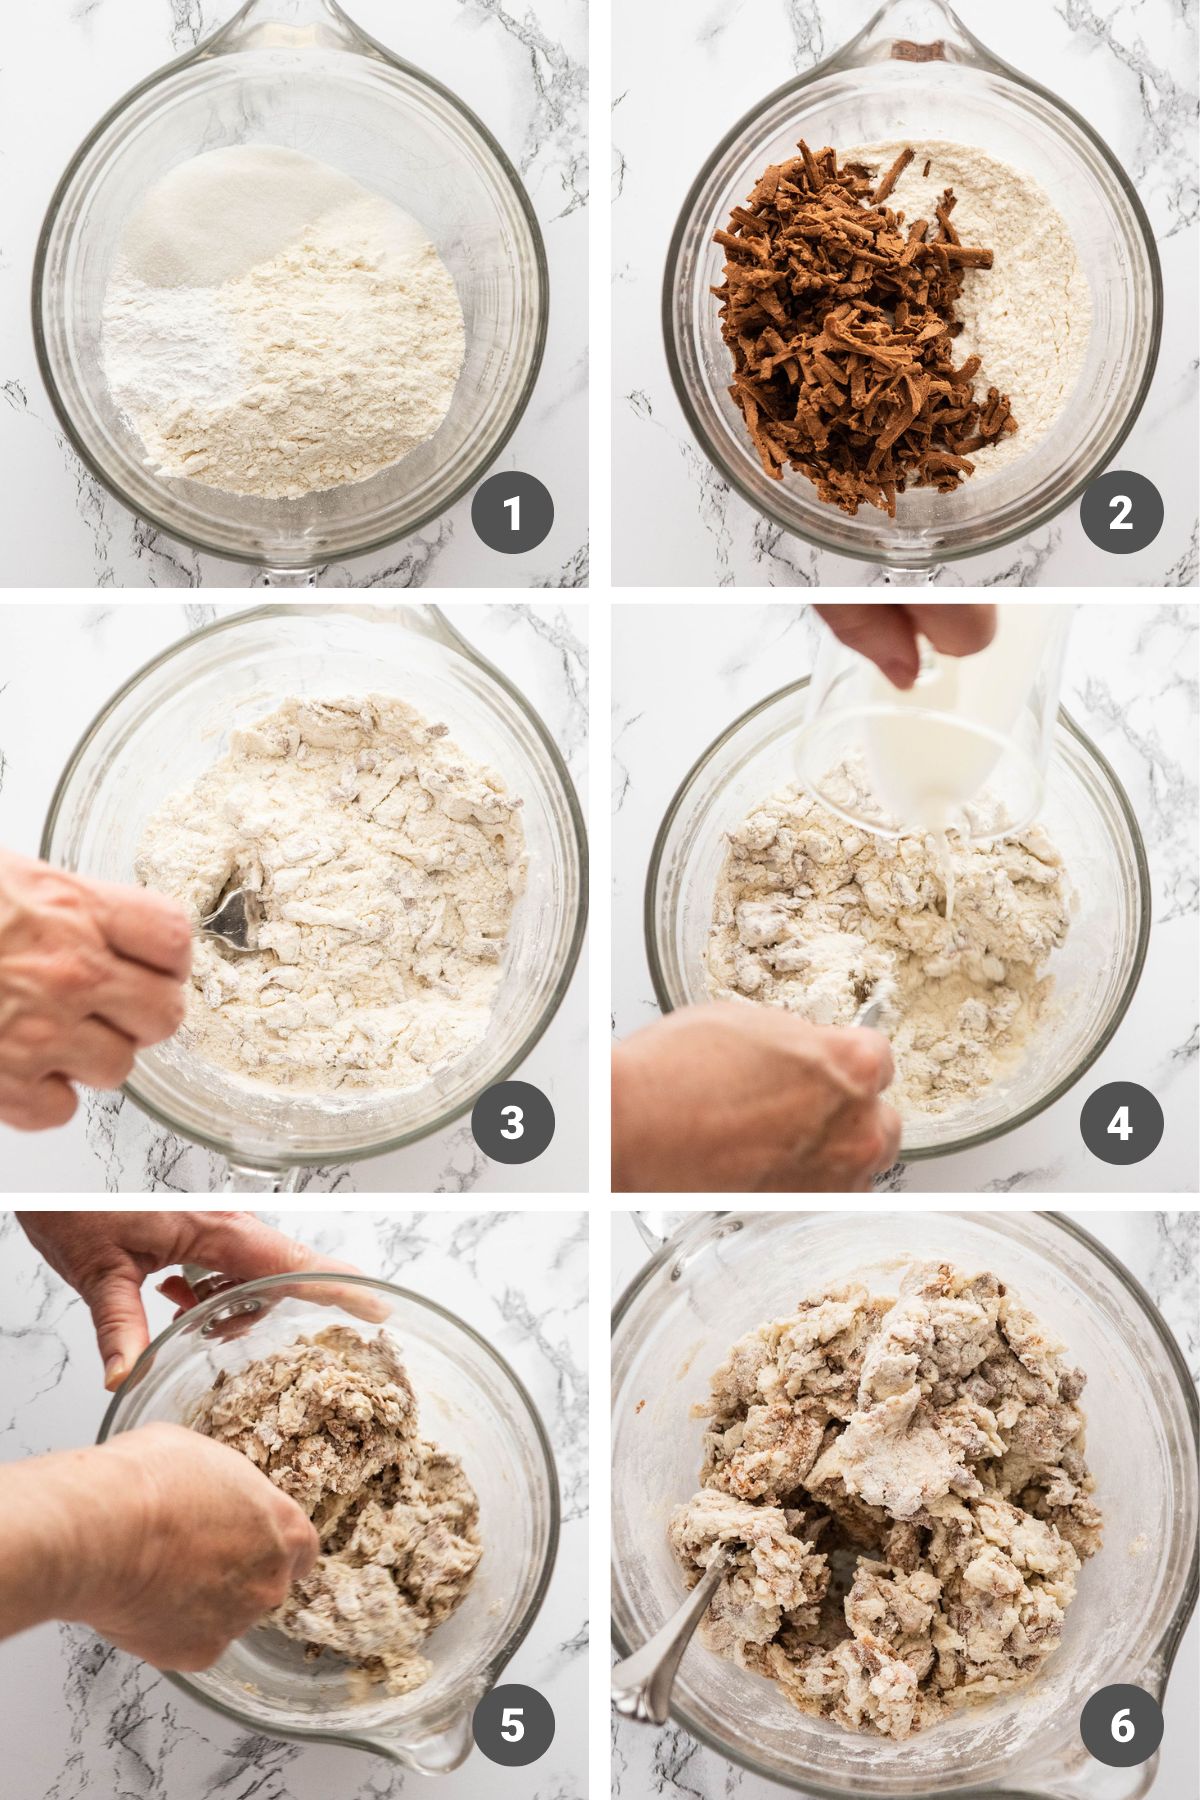
Mix the dry ingredients
Use a fork to whisk flour, salt, baking powder, and sugar together in a large mixing bowl. Then stir in the cold grated cinnamon butter.
Stir in the milk
Add milk to the dry ingredients a little at a time, stirring until the dough just starts to come together (it should still be a bit crumbly!)
Note: For best results, measure your flour by weight with a kitchen scale. If you measure the flour by volume (with cups) you may need to add a little bit more milk to get your dough to the perfect consistency!
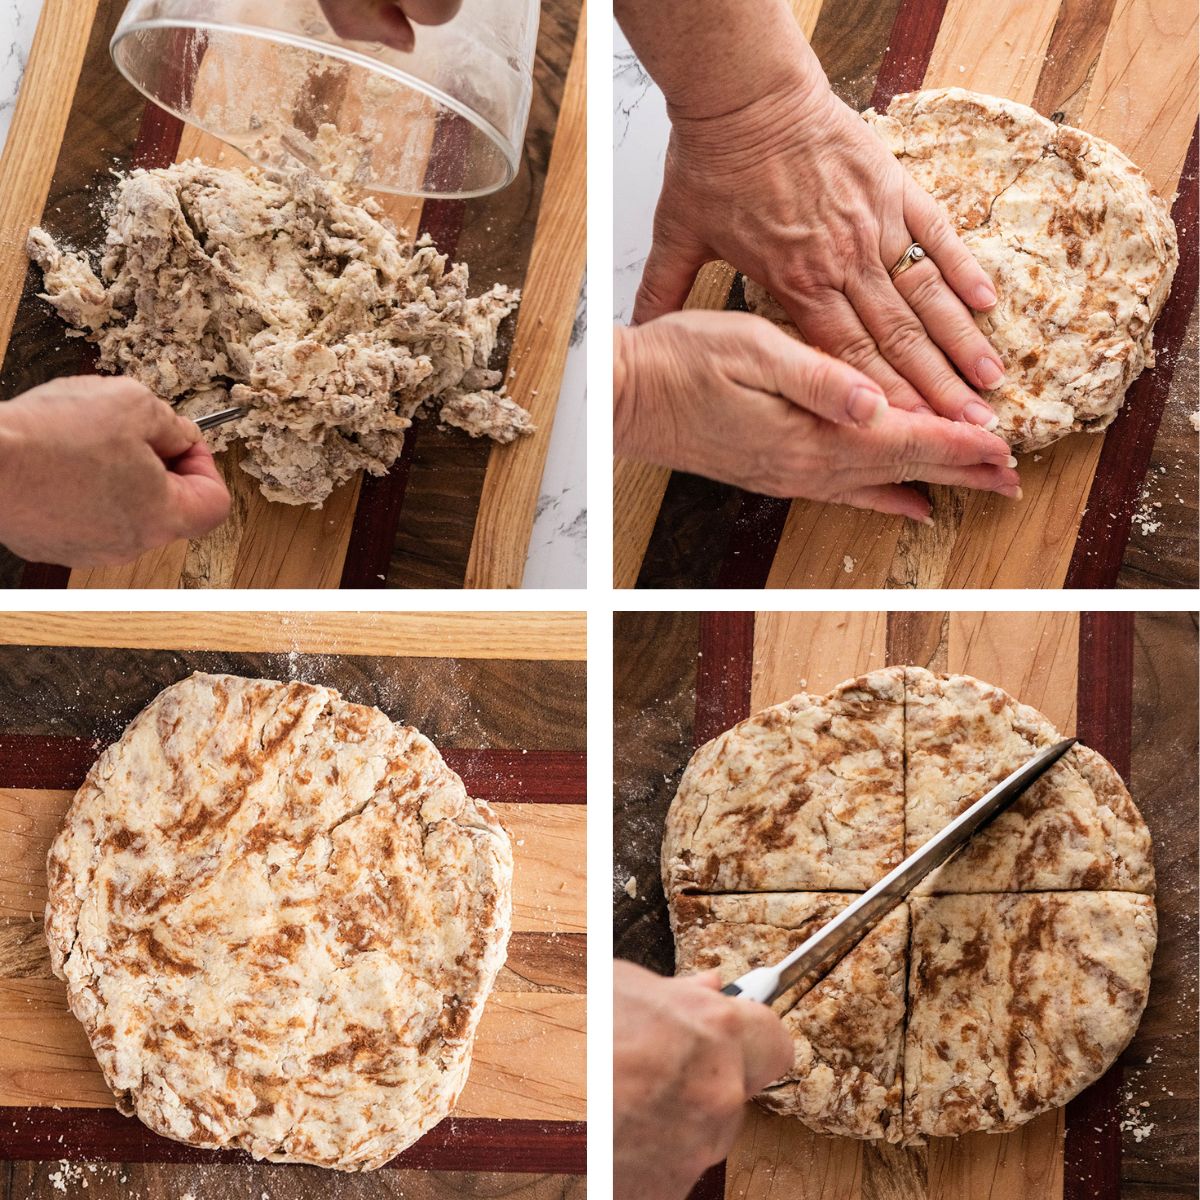
Cut and bake your scones
Transfer dough to a lightly floured surface, then use clean hands to gently pat it together and work in any remaining dry pieces. Fold the dough over on itself a few times (this helps create tall, crumbly layers!), then pat it into a ½-inch thick circle and cut into wedges.
Pro tip: Work quickly and handle the dough as little as possible. We want to keep our butter nice and cold to get a flaky, airy, perfect scone!
Move scones to a baking sheet lined with a nonstick baking mat. For soft sides, leave the scones arranged in a tight circle with the sides touching (pictured below). For firmer sides, separate the wedges so the edges don't touch.
To help scones keep their shape, place them in the fridge for 20 minutes (or in the freezer for 10 minutes) to set, then transfer to a hot oven and bake!

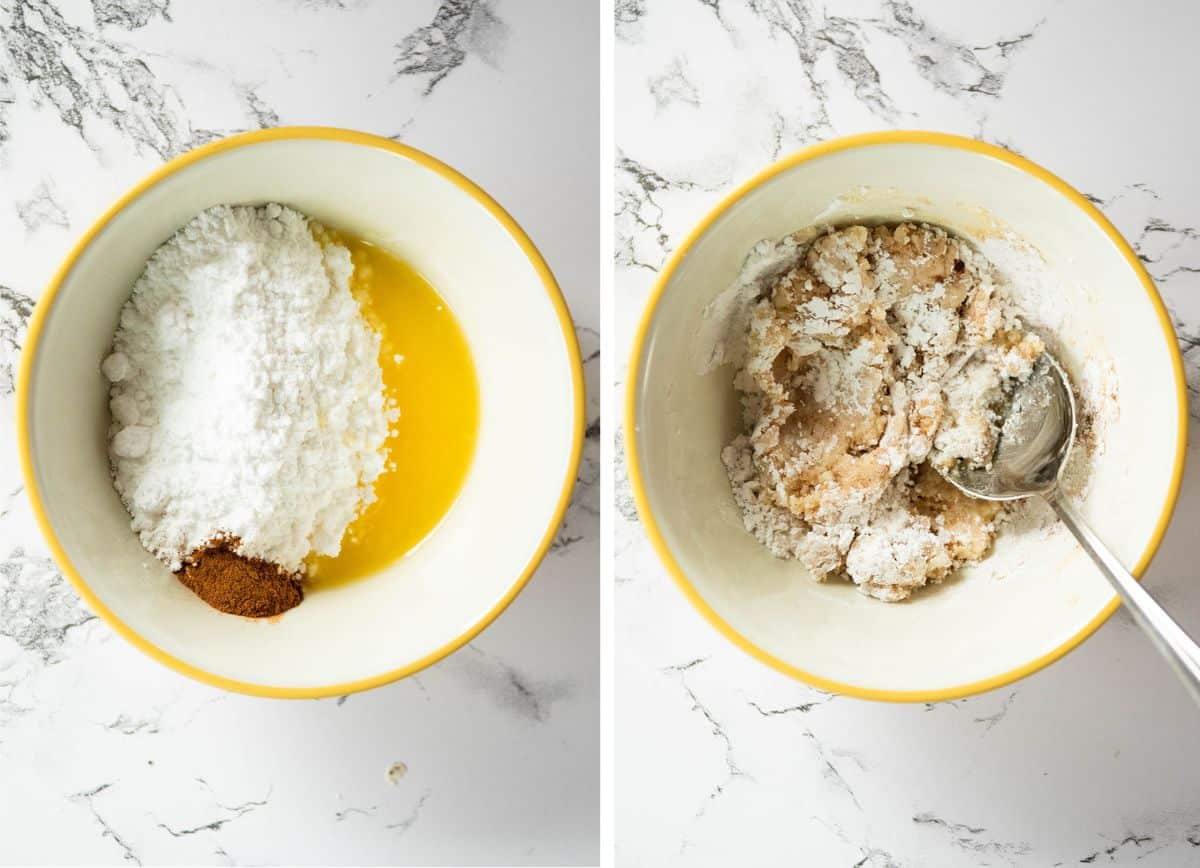
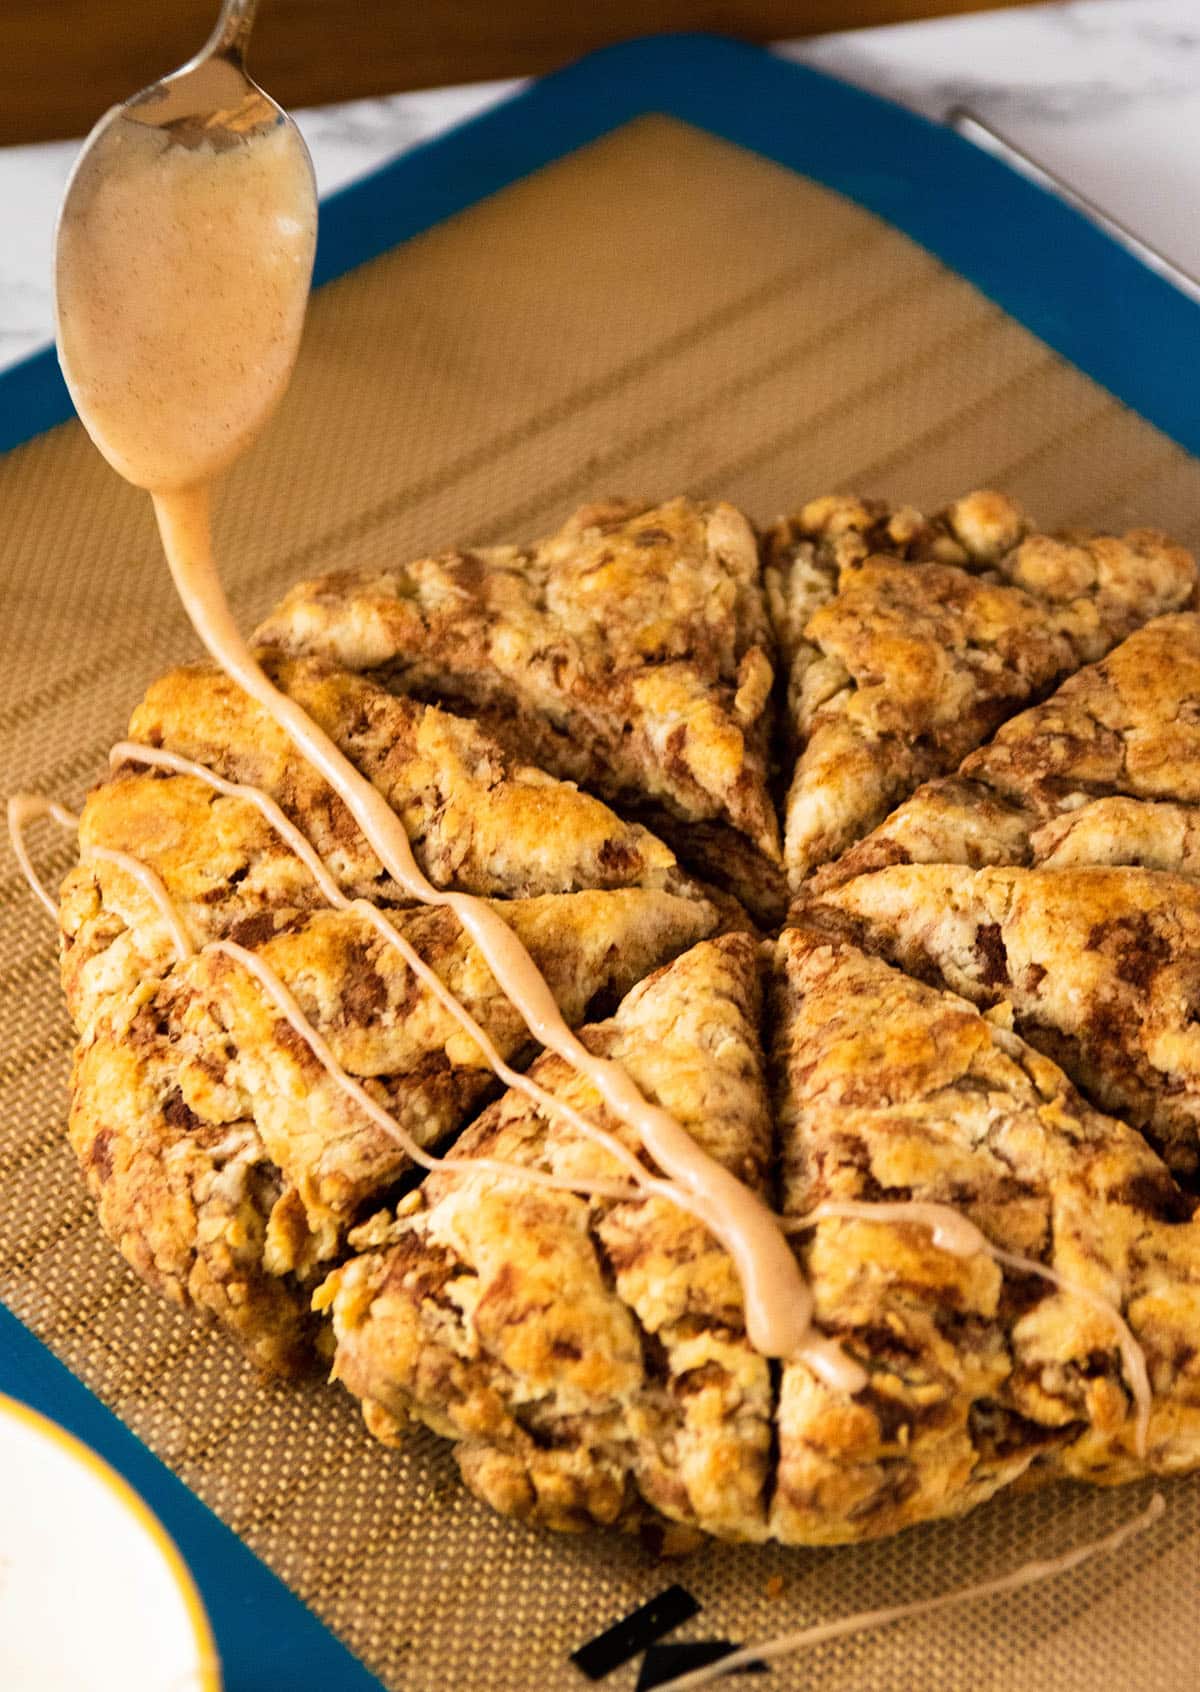
Make the glaze
Finish your cooled scones off with an easy cinnamon glaze: it adds some extra cinnamon flavor, lends a pop of sweetness, and gives them an elegant look. The melted butter in this glaze will stiffen and set as it cools, so the frosting will hold its shape and the scones won't be too sticky.
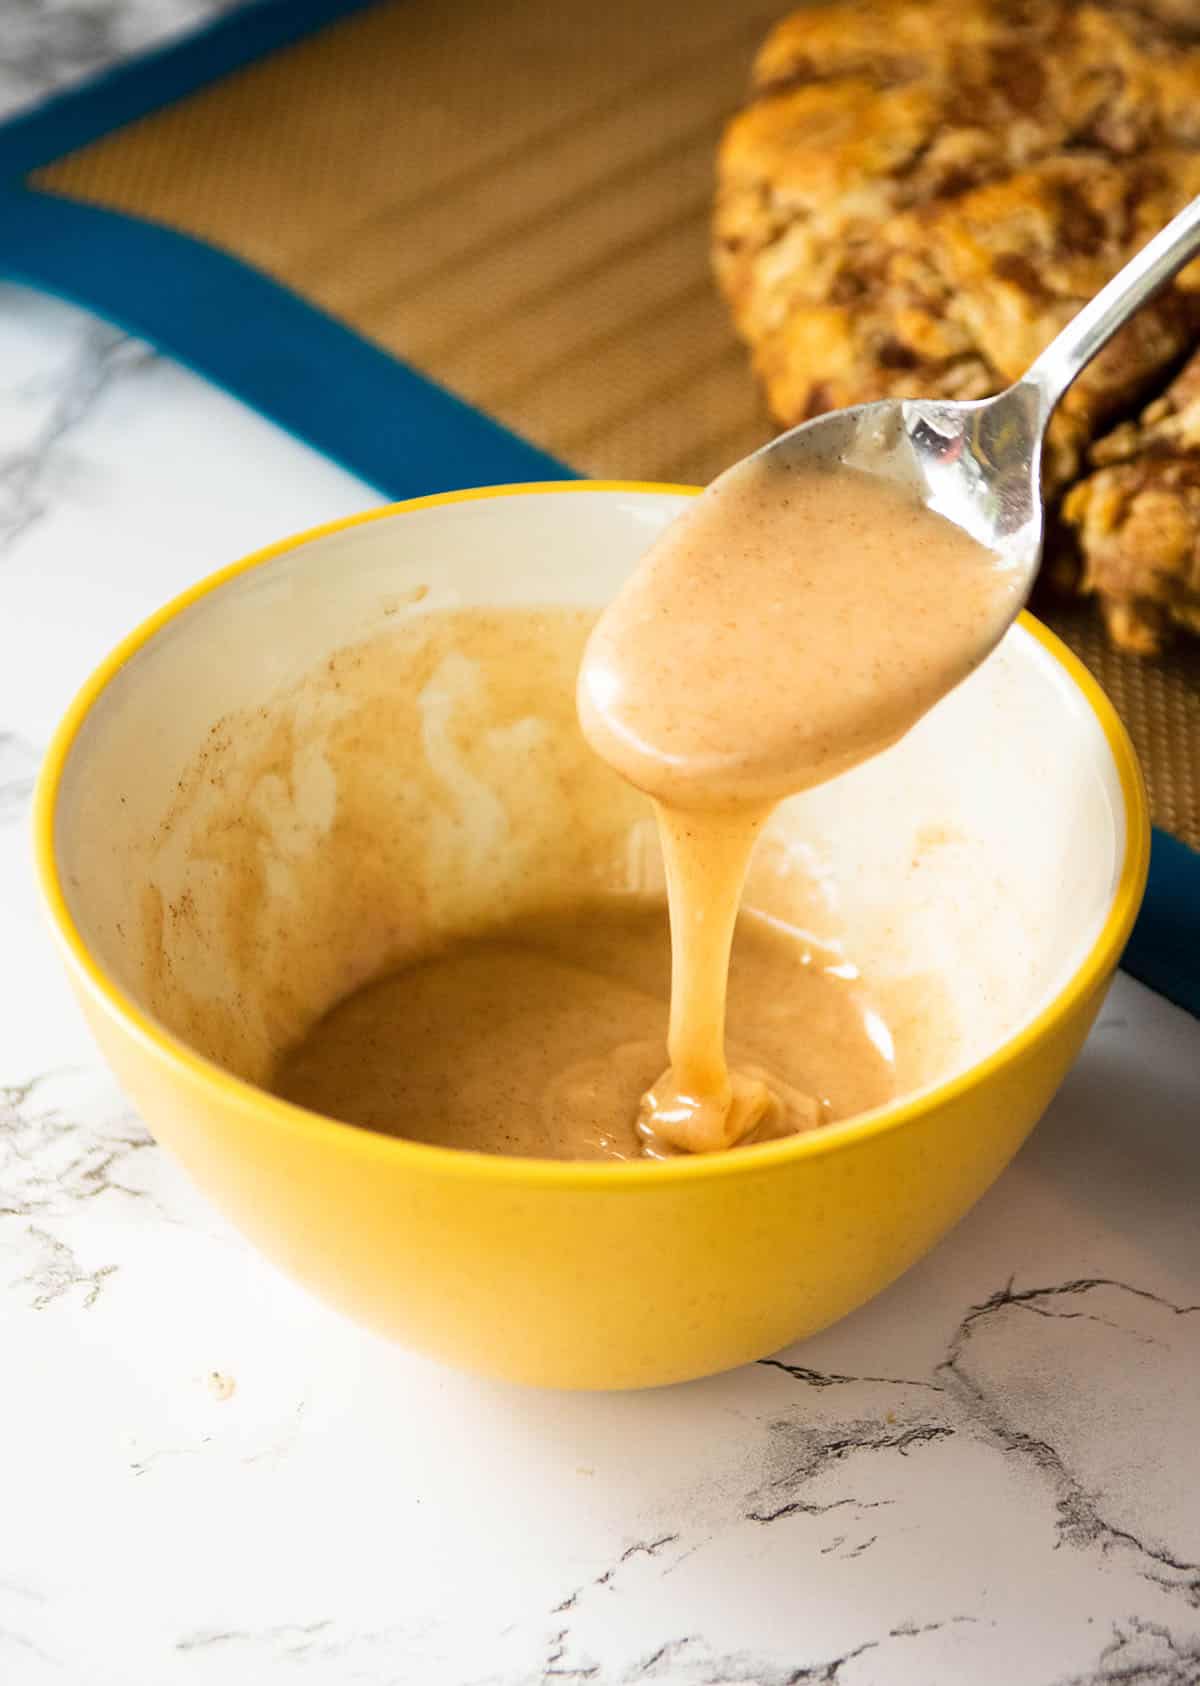
To mix the icing, just stir some cinnamon, powdered sugar, and melted butter together in a small bowl (this mixture will clump up a bit - that's ok!) Then stir in some hot water a teaspoon at a time until you have a smooth glaze. Drizzle it over the scones, let it set for 10 minutes or so, and serve!
Riffs and Substitutions
We love these cinnamon scones as-is, but they're also fairly forgiving. Here are a few of our favorite swaps and substitutions!
- Time Saving Tip: Make the cinnamon butter 1-2 days in advance and store it in the fridge until you're ready to use it. You can also shred the butter in advance and store it in an airtight container in the freezer for several months! Tip: We like to make a double or triple batch of this cinnamon butter, chill and shred it, then store in individual containers in the freezer so we can make these scones on demand. You can toss the shredded butter into this scone dough right from the freezer!
- Adapt the cinnamon glaze. We love using hot water to bring this icing together, but you can swap straight-from-the-fridge milk, half and half, or heavy cream if you like! You can also add a spoonful of cream cheese or maple syrup to the frosting for extra flavor, or omit the cinnamon for a more subtle flavor.
- No time to make a glaze? Sprinkle scones with demerara sugar or turbinado sugar just before baking to add some sweetness and texture to the top of each scone.
- Stir a handful of chopped walnuts or pecans into the scone dough for extra texture if you like!
- No time to make compound butter? Shred a stick of cold unsalted butter into the dough as directed, and whisk the ground cinnamon in with the dry ingredients (instead of mixing it into the butter). You lose a bit of texture with this route, and the cinnamon won't pop quite as much, but it's good in a pinch! You can also add a few handfuls of store-bought cinnamon baking chips to the dough in place of ground cinnamon if you go this route.
Troubleshooting tips
If your scones are coming out dense, hard, or too flat, here are some tips to get you back on track!
- Use very cold ingredients. Make sure you give your compound butter adequate time to chill and solidify before shredding and mixing it into the dough. If the butter isn't cold enough, it will melt into the dough before baking and create a dense, flat scone. We also recommend chilling scones right before baking (for 20 minutes in the fridge, or 10 minutes in the freezer) to help them keep their shape and rise well in the oven.
- Double check your baking powder. Old or expired baking powder can prevent scones from rising properly. Not sure if your baking powder is still good? Add a teaspoon of baking powder to ½ cup of very hot water. If it bubbles, it's still good. If not, toss it.
- Don’t overwork the dough. Scone dough should be mixed until just combined: You should be able to see some visible shreds of butter throughout the mixing and shaping process! For best results, handle the dough as little as possible and work quickly to prevent the heat of your hands from starting to melt the butter.
- Use a kitchen scale. Measuring flour by volume (with cups) is notoriously unreliable and can often result in excess flour being added to a recipe. For best results, measure your ingredients (especially flour!) by weight with a kitchen scale using our gram measurements.
A Few FAQs
Scones vs. biscuits
Scones and biscuits are very similar. So what's the difference? At Life As A Strawberry, we default to this view:
Biscuits flake. Scones crumble.
A great biscuit will have layers you can peel apart one by one; a scone is perfect for breaking into small pieces and dunking in your tea or coffee. A scone is a little bit drier than a biscuit, and a little more dense.
We shred the butter for our scone recipes (instead of cubing it like we do in our biscuit recipes) to achieve that perfect, crumbly texture. These smaller butter pieces give a more uniform, less flaky final dough. We'll also use a touch less milk here compared to our biscuit recipes for a slightly tighter, more dense crumb.
These cinnamon scones are best eaten the day they are baked, but they'll keep for a day or two in an airtight container on the counter!
Yes! These scones hold their flavor well for up to 3 months in an airtight container in the freezer. Defrost scones on the counter for a few hours or pop them in a 300°F oven until warmed through.
Yes! Use coconut oil instead of butter: Melt the coconut oil into its liquid form, stir in the cinnamon, then chill and cut it into the dough with a pastry blender instead of shredding it (it'll be easier). Use coconut milk or almond milk instead of dairy milk - very similar to our easy vegan biscuits.
Yes! For mini scones: Divide the dough into two equal portions, pat each piece into a circle ¼- to ½-inch thick, and cut each circle into 6-8 wedges. For square scones, shape the dough into a rough square and cut into thirds from top-to-bottom and side-to-side to form 9 square pieces. Add an extra splash of milk to make the dough a little bit looser for drop scones (just drop a spoonful of batter directly onto your baking sheet - no rolling or cutting necessary!) If you would prefer to make biscuits with this dough, we recommend cutting the cinnamon butter in with a biscuit cutter instead of shredding it. Note: If you adjust the size or shape of these scones, you may also need to adjust the baking time.
Love this recipe? Try our lemon poppyseed scones →
📖 Recipe

Cinnamon Scones
- Prep Time: 20 minutes
- Inactive Time: 45 minutes
- Cook Time: 15 minutes
- Total Time: 1 hour 20 minutes
- Yield: 8 large scones or 12-16 mini scones 1x
- Category: Breakfast
- Cuisine: American
- Diet: Vegetarian
Description
These easy cinnamon scones get a burst of autumn flavor from a homemade cinnamon butter!
Ingredients
For the cinnamon butter:
- ½ cup (1 stick) unsalted butter, softened to room temperature
- 3 Tablespoons ground cinnamon
For the scone dough:
- 270 grams all-purpose flour (about 2 ¼ cups), plus extra for dusting
- ¼ teaspoon kosher salt
- 1 Tablespoon baking powder
- ¼ cup sugar (50 grams)
- ⅔ cup milk
For the cinnamon glaze:
- ¼ teaspoon ground cinnamon
- ½ cup powdered sugar (you might need a little more, depending on the consistency you want and how much glaze you want on each scone)
- 1 Tablespoon butter, melted
- 1 Tablespoon very hot water (you may not need it all)
Instructions
Make the cinnamon butter:
- Add softened butter and cinnamon to a medium-sized mixing bowl. Use a hand mixer or a sturdy spatula to thoroughly mix until butter is a deep brown color and all cinnamon is incorporated.
- Transfer cinnamon butter to a piece of parchment paper. Use the sides of the paper to gently press butter into a log shape, then twist the ends and tuck them under the butter to make a little bundle. See the post above for photos of this process!
- Place butter in the freezer for at least 15 minutes, until butter is very cold and no longer soft.
- Carefully shred the cinnamon butter over the large holes of a box grater. Once shredded, transfer butter back to the freezer while you prep the rest of the ingredients.
Note: You can prepare and shred this cinnamon butter in advance if you like! Store the butter log in the fridge for 3-4 days before shredding, or store shredded butter in the freezer for up to 3 months.
Make the Scones:
- Heat the oven to 425° Fahrenheit.
- Whisk flour, salt, baking powder, and sugar together in a large mixing bowl.
- Add grated cinnamon butter to flour mixture and stir to combine.
- Add milk a little at a time; stir until just combined. The mixture should still be a little crumbly - that’s ok!
- Tip dough onto a lightly floured cutting board. Use your clean hands to quickly and gently bring the dough together, then fold it over on itself a few times and pat it into a circle about ½ inch thick. Work quickly here to avoid melting the butter with the heat from your hands!
- Use a large knife to divide the dough into 8 evenly sized wedges, then transfer to a sturdy metal baking sheet lined with a nonstick baking mat or a piece of parchment paper.
- Place scones in the fridge for 20 minutes (or in the freezer for 10 minutes) to chill. This will help them keep their shape and rise well in the oven.
- Transfer scones to the oven and bake at 425° F for 12-18 minutes until golden brown. The total baking time will depend on the size and thickness of the scones.
- Remove scones from the oven and let cool completely before adding glaze.
For the Glaze:
- In a medium bowl, combine cinnamon, powdered sugar, and melted butter.
- Mix with a spoon until smooth.
- Add the hot water a teaspoon at a time until you reach your desired consistency. You may not need all of the water.
- Drizzle glaze over cooled scones and enjoy!
Notes
Additions and substitutions. Reduce the amount of cinnamon in the cinnamon butter if you’d like a more mellow flavor. Add up to ⅓ cup sugar to the dough if you would like sweeter scones (you may also need to add an extra splash of milk if you go this route). Stir a handful of walnuts or pecans into the scone dough for extra texture. Use milk or cream instead of hot water in the glaze, or skip the glaze entirely and sprinkle scones with demerara or turbinado sugar just before baking for an extra pop of sweetness and some texture.
Make-ahead tips. Make the cinnamon butter and shape as directed, then store in the fridge for 1-2 days before shredding. Store shredded butter in an airtight container in the freezer for up to 3 months (you can add the butter to this scone dough straight from the freezer when you’re ready for it).
Adjust the shape and size of your scones. Shape your dough into a large square and cut it into thirds from top-to-bottom and side-to-side to form nine square scones if you like. Make mini scones by shaping dough into two or three smaller rounds before cutting, or add a splash of milk to the dough for a looser consistency that's perfect for drop scones. If you adjust the size of your scones, just remember to adjust the baking time as needed!
Storing and freezing scones. These scones are best eaten the day they are baked, but you can store extras in an airtight container on the counter for a day or two without affecting the texture too much. Freeze extra scones in an airtight container for up to 3 months; defrost by placing on the counter for a few hours or heating in a 300° F oven for a few minutes until warmed through. We recommend freezing scones before adding the glaze for best results.
A note about butter. We love shredding the butter for scone recipes because it gives the final product great texture. Wrap a bit of the parchment paper around the end of your cinnamon butter when shredding it with a box grater: It gives a better grip, acts as a small buffer between your hands and the blade, and stops the butter from melting as quickly. You can also shred butter using the shredder attachment of a food processor, or you can cut the butter into small cubes and cut it into the dough using a pastry blender (just like in a biscuit recipe!) If you cut the butter in with a pastry blender rather than shredding it, your scones will be a bit flakier (more like a biscuit-y texture).
Adjust the amount of milk if necessary. If you measure your flour by weight (with a kitchen scale) the amount of milk in this recipe should be just about perfect. If you measure your flour by volume (with cups), you may find you need an extra Tablespoon or two of milk to help the dough come together. If it's especially humid outside, or if you cut the butter into the dough (instead of shredding it) you might need a tiny bit less milk than the recipe calls for: start with just ½ cup milk and add a Tablespoon at a time as necessary.
Nutrition
- Serving Size: 1 scone
- Calories: 307
- Sugar: 14.8 g
- Sodium: 51.9 mg
- Fat: 13.3 g
- Carbohydrates: 43.8 g
- Protein: 4.4 g
- Cholesterol: 34.7 mg


charline
Hi ! Can we have the recipe in g ? Thanks
Rhonda @ Life As A Strawberry
This is one of my favorite scone recipes!
We've listed the grams in the recipe for the larger quantities, but smaller measurements like teaspoons, and sometimes Tablespoons, can be more difficult with some scales. If you have a good scale it should work. The missing ingredients that can be measured in grams are:
In the butter: 3 Tablespoons cinnamon (18 grams)
In the dough: 1 Tablespoon baking powder (15 grams) and 2/3 cup milk (this will depend on the milk you are using) (160 grams - 166 grams)
In the glaze: 1/2 cup powdered sugar (53 - 60 grams - depending on how you measure your powdered sugar)
Hope that helps!
KC
Made these this afternoon. They are delicious. I chuckled at some of the comments about too much cinnamon. My husband and I love cinnamon so I used way more. My only problem was my oven which slightly overcooked them. Next time I’ll reduce the temperature a tad my oven just got too hot.
Rhonda @ Life As A Strawberry
So glad you loved them. These are one of my personal favorites but we recognize not everyone loves cinnamon as much as we both do (thus the comments)! If you're having issues with your oven temp (and don't yet have one) we'd definitely recommend an oven thermometer to help you know just how much to reduce or increase the temperature for your baking.
Chad McConnell
Hello,
I am going to be making these in a baking class. I am wondering what percent milk do you use?
Rhonda @ Life As A Strawberry
I normally use 1% but we've also made them with whole milk and 2%. We don't recommend non-fat since the fat in the milk contributes to making the scones soft.
Claudia
There's no egg in this
Rhonda @ Life As A Strawberry
No egg! Scones usually have a little drier crumb while still being moist and tender. Adding eggs will change the texture and could make the scones more like a muffin.
Senia
I read several comments before making this because I was worried there was too much cinnamon in the butter, but all of the comments were positive, so I ignored my instincts and went forward, though I did add some extra sugar to the dough and the butter. Unfortunately, the cinnamon was far, far too strong. The cinnamon butter made every bite gritty and bitter. If the dough had any flavor, it was completely overwhelmed. We ended up throwing the whole batch away.
Rhonda @ Life As A Strawberry
Oh no! These are a cinnamon forward scone. The gritty texture was probably due to the extra sugar added to the dough and butter, also make sure the cinnamon and butter are completely mixed together. If you feel like trying them again, I'd recommend making them as written (no extra sugar) and use only 2 Tablespoons cinnamon in the butter for a less cinnamon forward scone.
Happy Baking!
Pam
I have a question about the amount of cinnamon in the compound butter. It's a lot. I don't want it to be spicy and have a burn. Lol.
Rhonda @ Life As A Strawberry
If you find cinnamon to be spicy, you can definitely reduce the cinnamon for a more mellow flavor. Remember the compound butter will melt leaving that delicious cinnamon flavor in the dough. If you're concerned, I'd recommend reducing by 1 Tablespoon and see what you think, they'll still be delicious! Have fun with them and find your sweet spot for the amount of cinnamon.
Kris
I love it when people give one star reviews and start the review out with “I didn’t follow the recipe, but it sucked” 🙄
I brushed the tops with heavy cream and added 1/3 cup of sugar. Had to put it in a bit longer because mine were thick, but they’re great. Haven’t glazed them yet but I can only assume they’ll get even better.
Kris
Update: I glazed them and oh my God they were incredible.
I also want to clarify that I added 1/3 cup of sugar and not the 1/4 cup the recipe calls for, I did not add an additional 1/3 cup to the 1/4 cup.
Rhonda @ Life As A Strawberry
YEAH! So glad you love them as much as we do and adding a little extra sugar will just make them a little sweeter.
Rhonda @ Life As A Strawberry
These scones are one of our favorites!
Glad you're liking them.
Howard Reisner
I've been looking for a copycat recipe of the Au Bon Pain cinnamon scone. They do not use cinnamon chips. When I saw this recipe I thought the cinnamon butter would most closely replicate their cinnamon deposits found throughout their scones. I did add dark brown sugar to the butter right from the start (only 1 tablespoon) because I thought I'd forgo the drizzle at the end. The scone is delicious. I did feel it needed a pinch more sweetness for my liking so I did in-fact add the drizzle. This will be my go to scone recipe! Thank you!
Rhonda @ Life As A Strawberry
We love this scone and are so glad you do too!
BG
Very bland. I did not add the glaze as I don’t think you should depend on a sugary topping to add flavor. Followed the recipe to a T. Disappointing.
Rhonda @ Life As A Strawberry
The topping is definitely a delicious part of this recipe. If you make it again, we would recommend double-checking that you used enough salt in the dough (if you skip the salt, it can definitely taste bland!) and making sure you use a high-quality cinnamon with plenty of flavor.
Natalia
This looks amazing! Have you ever tried adding sweetener to the cinnamon butter? I'm trying to avoid making the glaze, so need to add more sweetness to the cinnamon, but am not sure if it would still work with the grating. Thanks for any input! 🙂
Rhonda
We love these scones! We have not added sugar to the butter but it should work. We recommend mixing a little brown sugar into the butter with the cinnamon. Follow the recipe for everything else. Also, remember that scones are not a very sweet pastry so just a little sugar goes a long way.
Kyle
Great recipe! I also liked the section about scones vs. biscuits. A debate for the ages.
Team Life As A Strawberry
We're glad you enjoyed the recipe and our analysis on scones v. biscuits!
Jessie @ Life As A Strawberry
Our team had so much fun testing and perfecting these scones! The cinnamon butter gives them the most perfect little pops of flavor. I hope you love this recipe as much as we do!
CatherineIrungu
My friends loved it. I added raisins. And it was awesome. Currently freezing up the cinnamon margarine (butter is costly where i am). I will make it without the raisins. I am wondering whether nutmeg can also be used. Like grating on top
Team Life As A Strawberry
We're so happy you and your friends enjoyed the scones! Nutmeg pairs great with cinnamon and would be a nice addition. It might not stick well to the top of the scones, but could be mixed into the glaze, cinnamon butter, or scone batter!