

Ready to level up your homemade cupcakes? We'll teach you to take any cupcake recipe from good to great! You'll find our favorite tricks - pulled from decades of catering and professional recipe testing experience - plus a ton of side-by-side photos that show you exactly how different variables will affect your cupcakes. Plus, answers to your most frequently asked cupcake questions!
This guide was originally published in 2013. It was updated in 2023 with additional photos and more FAQs!
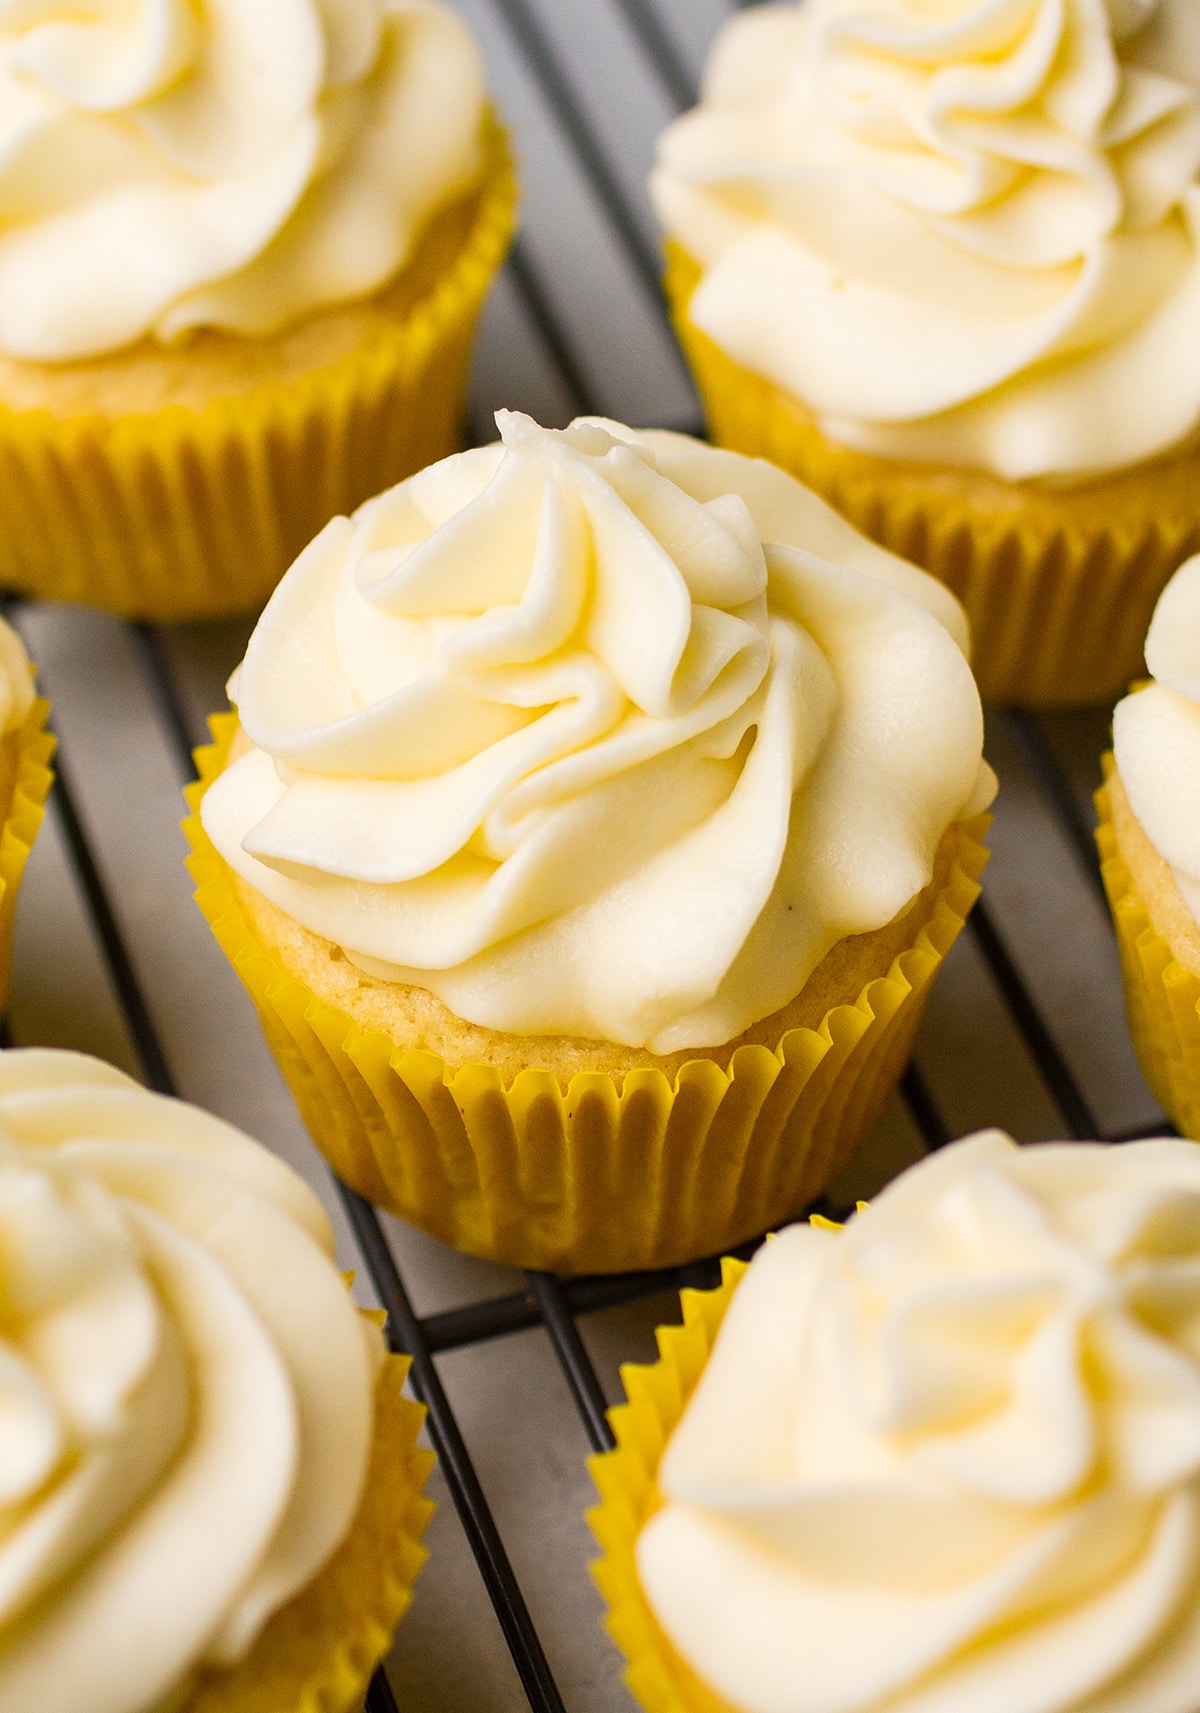
Cupcakes: An essential food group? We say yes.
But homemade cupcakes can also be notoriously, well, finicky. From cupcakes that sink in the middle to wrappers that peel away for no good reason, there's no shortage of cupcake problems that plague home bakers. But good news: We're here to help!
Of course, great cupcakes start with a great recipe - and not all recipes are created equal! Look for high-quality sources who test their recipes for accuracy (*casually drops a link to our cake and cupcake recipe collection*) But also, don't forget that everyone's palate is different: You may have to try a few different recipes before you find one that's perfectly suited to your taste buds! (Also, worth noting: Please follow the recipe you're using! If you make a bunch of substitutions, you're going to run into problems fast).
Still, a great recipe is only one part of the equation. Perfect homemade cupcakes also depend on the ingredients you use, the techniques you employ, and the variables in your own kitchen. But thankfully, in most cake recipes, the same basic principles apply.
In this guide, we're sharing the most important rules to bake great cupcakes at home. These battle-tested tips will give your homemade cupcakes a bakery-level WOW factor, whether you're baking cupcakes from scratch or using your favorite boxed cake mix!
Jump to:
- 1. Use high-quality ingredients
- 2. Bring ingredients to room temperature
- 3. Use a kitchen scale
- 4. Don't Overmix the Batter
- 5. Check your oven temperature
- 6. Don't open the oven door during baking
- 7. Bake cupcakes in the center of your oven
- 8. Use a Scoop to Fill Cupcake Liners
- 9. Move cupcakes to a wire rack to cool
- 10. The most important cupcake ingredient
- Three rules for at-home cupcake experiments
- Our Top Cupcake FAQs
- Our Favorite Cupcake Recipes
- 💬 Comments & Reviews
1. Use high-quality ingredients
Trust us: Ingredients matter. You don't need to splurge on every baking staple, but there are a few key upgrades that will make a world of difference in the depth and complexity of your cupcake flavors.
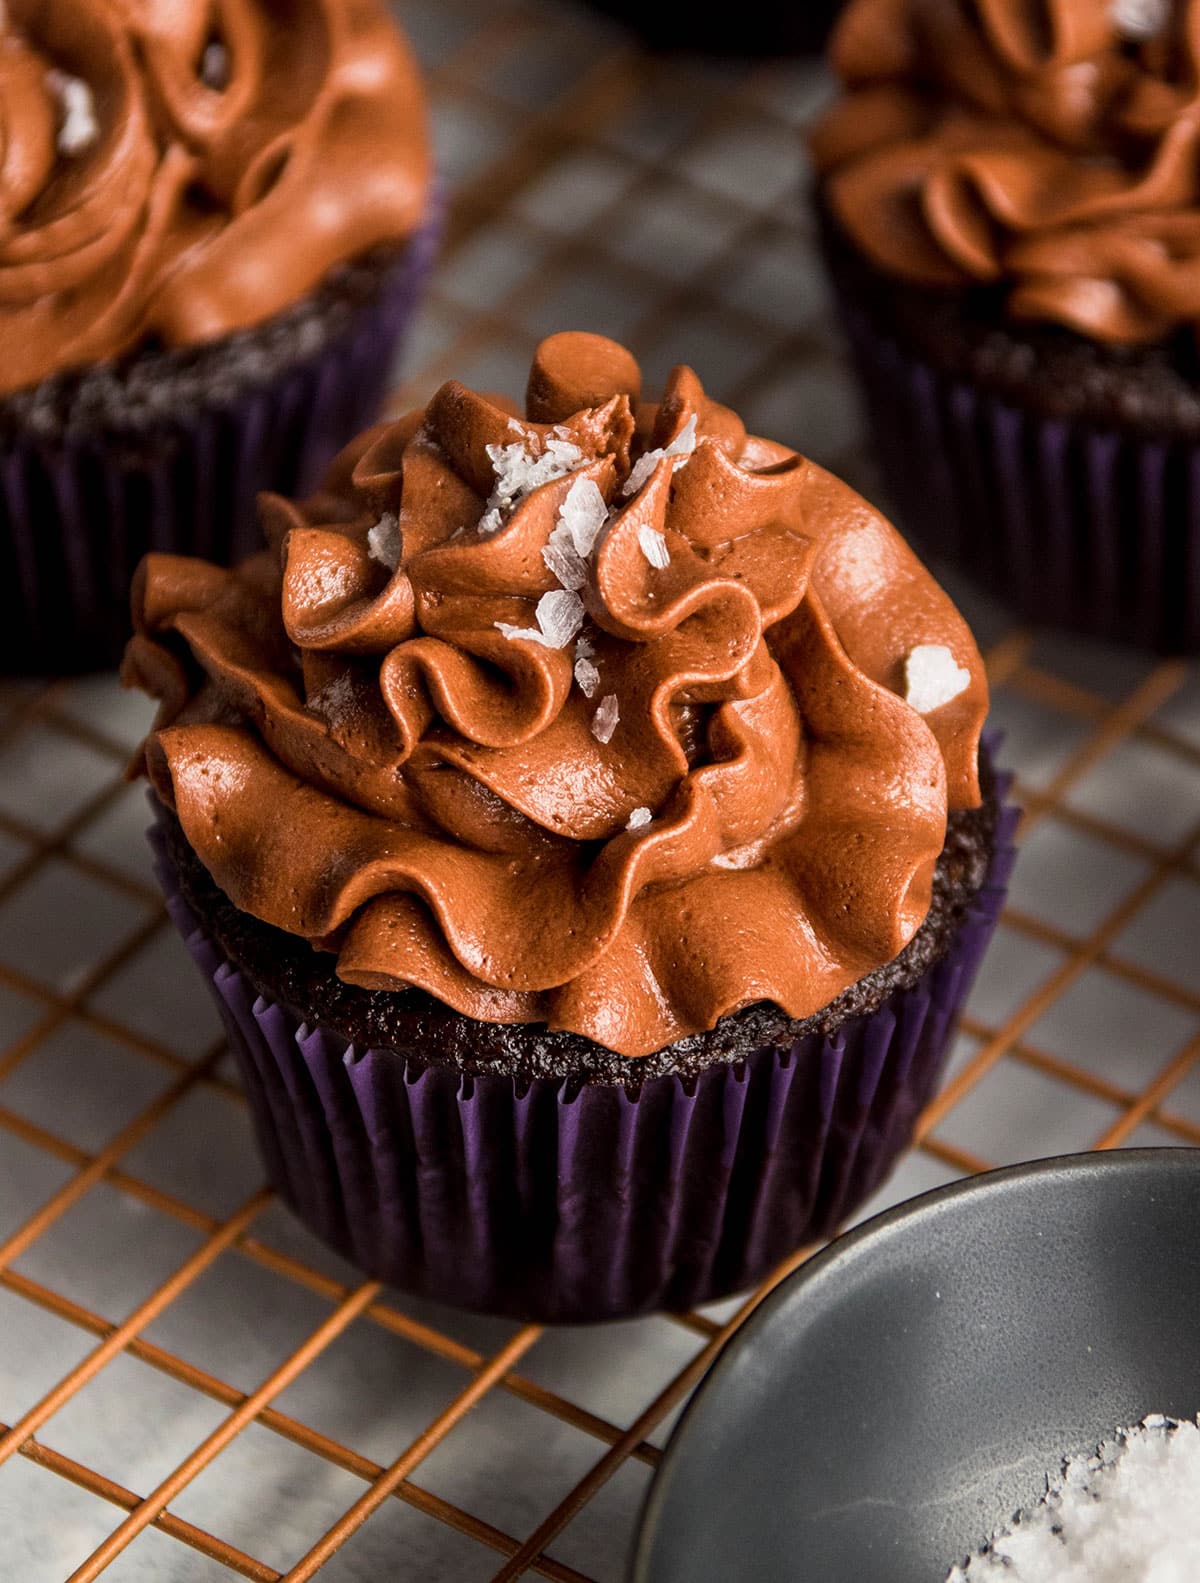
Cocoa Powder
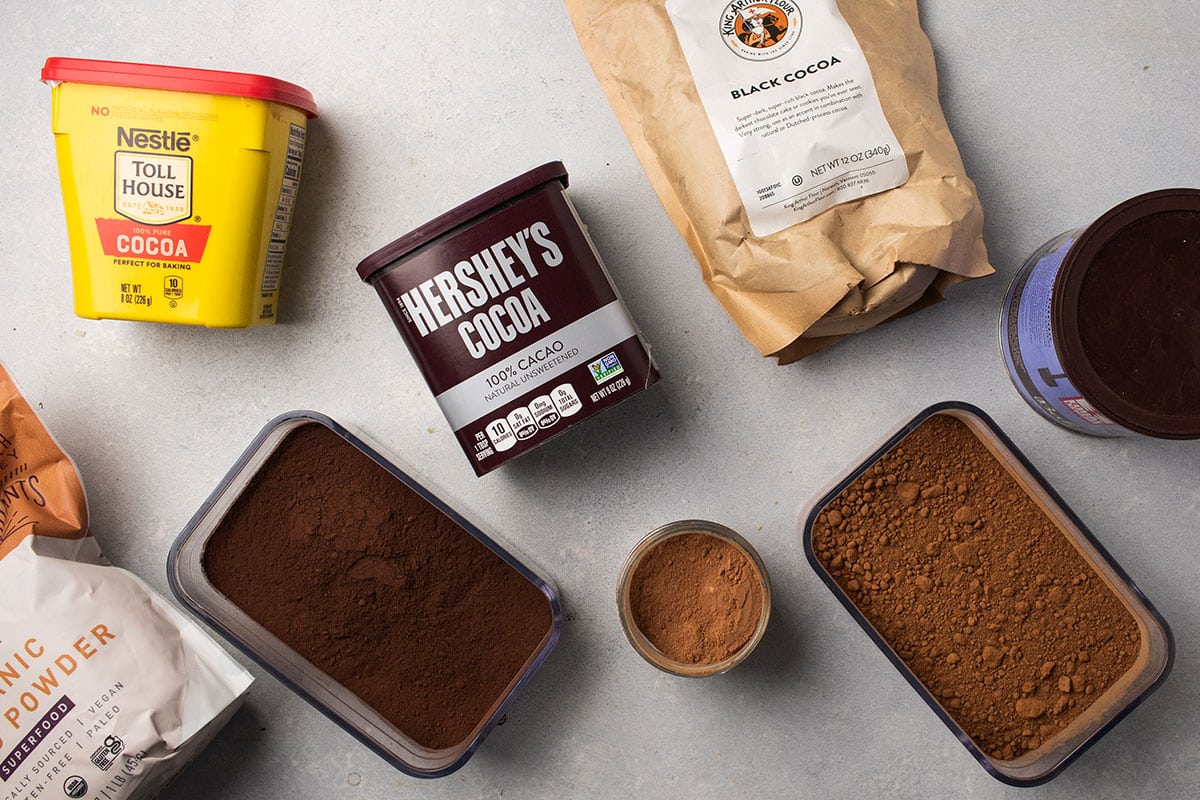
Investing in a deep, flavorful cocoa powder is the single best thing you can do to level up your homemade chocolate cake. We've tested hundreds of chocolate cake recipes: Great cocoa (and great vanilla! But we'll get to that in a minute) consistently makes the biggest difference in flavor.
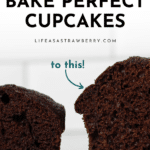
Cocoa powder also makes a difference in the texture, color, and even height of a chocolate cupcake. Observe:
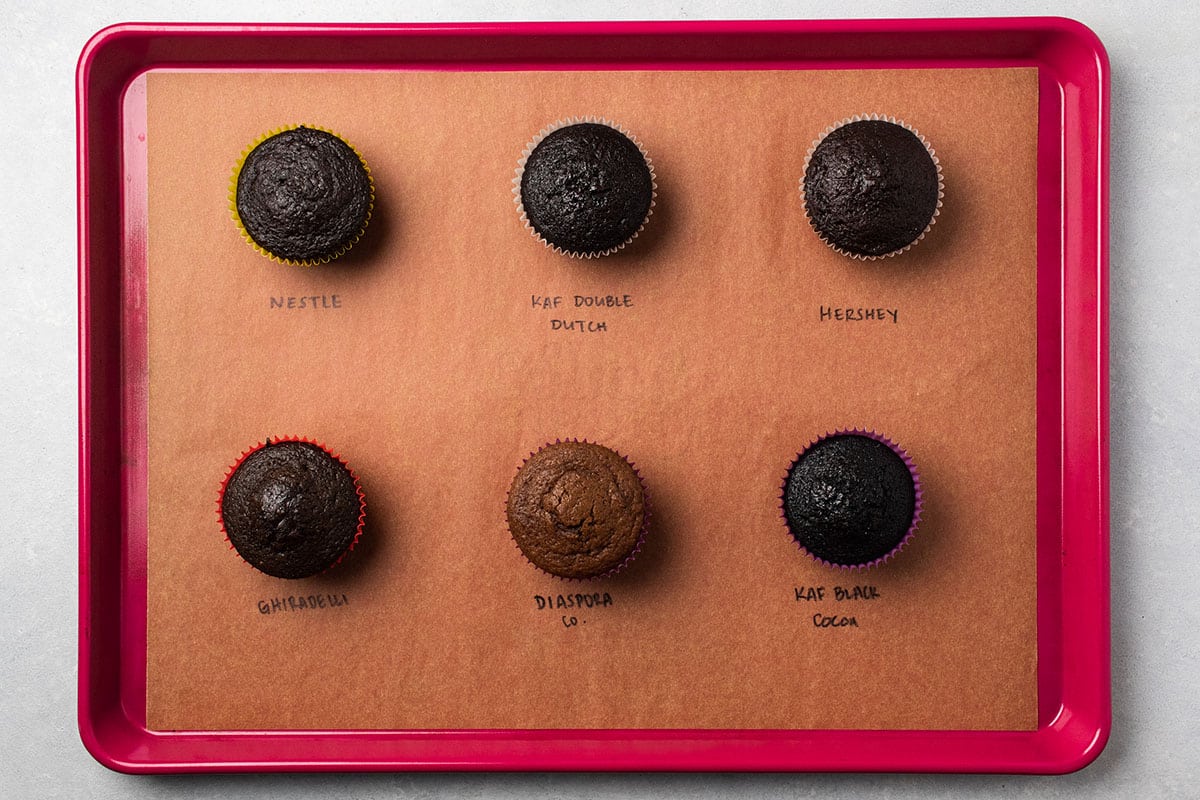
We baked six versions of our small batch chocolate cupcakes for this experiment, each with a different brand or style of cocoa powder. In the photo above, you can see the dramatic color difference that resulted - as well a difference in the texture of each cupcake top!
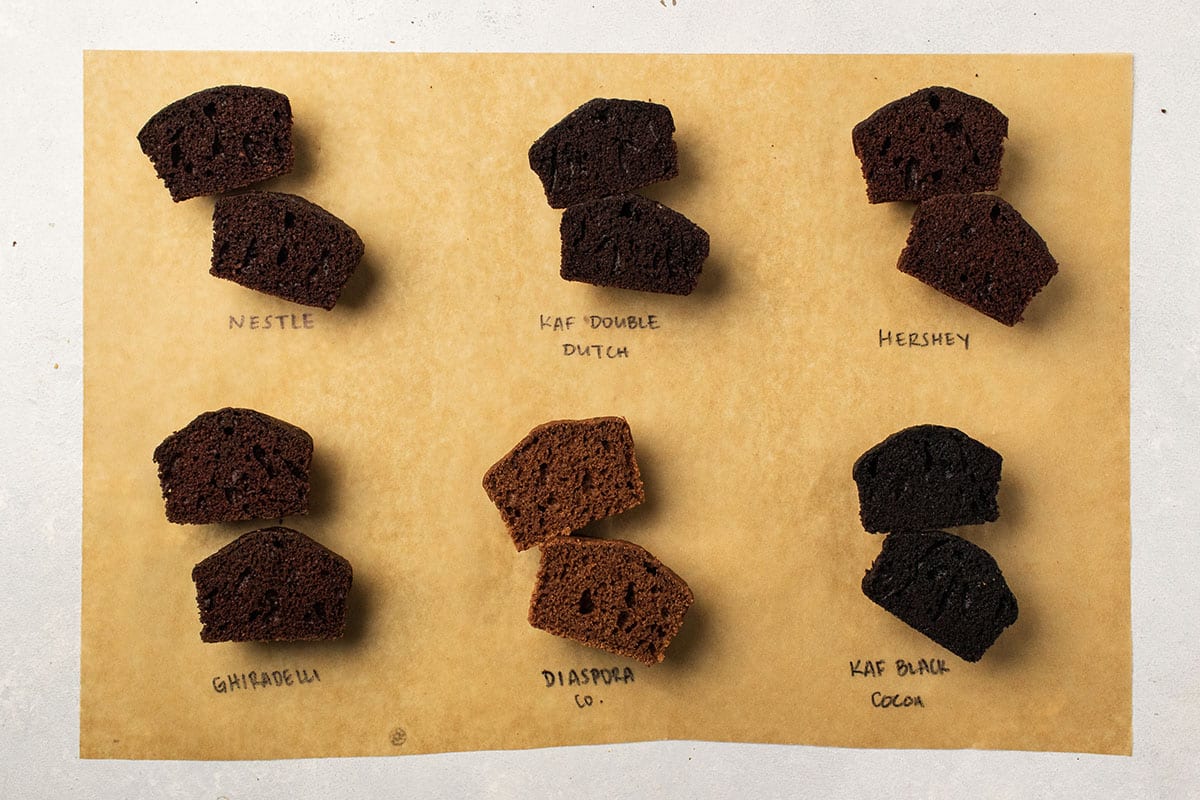
Cocoa powder can also have a surprising effect on the height and shape of a baked cupcake:

Why the stark difference between cocoa powders? Cocoa contains a bit of acid, which reacts with any baking soda in a cupcake recipe. Some varieties of cocoa powder have a higher acid content than others, which can affect the leavening power of your baking soda and lead to some variation in the rise and shape of a chocolate cupcake.
And of course, different brands of cocoa also make a difference in the color of a cupcake's interior:
What type of cocoa should I use for cupcakes?
While cocoa powder can have a big impact on the shape, color, and look of a chocolate cupcake, we always believe that the most important criteria is how it tastes. We recommend trying a few different varieties of cocoa powder until you find the one you like the most!
Our favorite all-around cocoa powder: King Arthur Flour Double Dark Cocoa Powder. We use this cocoa powder in cupcakes, brownies, and more - it works well in any baking recipe and has a gorgeous, deep chocolate flavor. If we could only stock one cocoa powder in our kitchen, it would be this one.
We also love using different cocoa powders for different occasions (or just for fun!) A few of our favorites:
- Diaspora Co Anamalai Cocoa has a very light color with a delicate, almost floral taste. It's perfect for summertime, for pairing with fruit frostings or fillings, or as a complement to rich toppings like caramel or chocolate ganache.
- Ghirardelli Unsweetened Cocoa Powder is a great all-around cocoa. It doesn't pack quite as much flavor as the KAF Double Dark, but it's a close second (and it's available at most grocery stores!) We have noticed this cocoa powder tends to clump more than others, so you may want to sift it to work out any lumps.
- King Arthur Flour Black Cocoa. This cocoa powder is a deep midnight black color and has the most amazing, bitter taste. It won't be everyone's favorite, but the folks who get it, get it.
Vanilla Extract
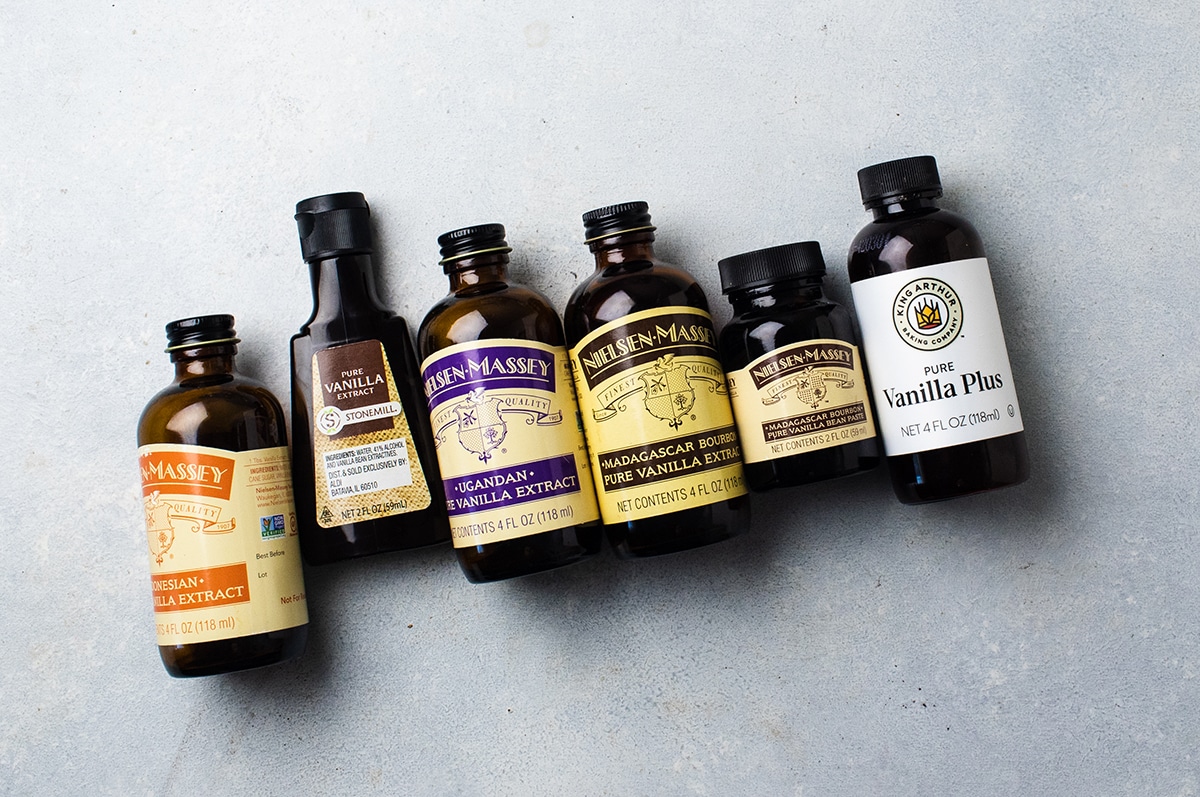
Great vanilla makes a shocking difference in homemade cupcakes - from a small dash in your favorite chocolate sheet cake batter to a heavy pour in our Lemon Vanilla Cupcakes.
Unlike cocoa powder, you can't really see a difference when you switch vanilla extracts, but you'll definitely taste one: A good vanilla brings out all the other flavors in the batter for better balance and a richer, more complex cupcake.
Which vanilla extract is best for cupcakes?
- Our go-to vanilla for baking: Nielsen-Massey Madagascar Bourbon Vanilla Extract. Nielsen-Massey vanillas are an investment, but they're hands down the best we've tested. This particular vanilla is usually the lowest price point in their collection: You'll get all the benefits without the higher price tag. One bottle lasts us 2+ years even with heavy use.
- Our favorite budget vanilla extract: ALDI Pure Vanilla Extract. ALDI doesn't mess around with their store brands, and this vanilla extract packs a punch on a budget.
- Our favorite splurge vanilla extract: Nielsen-Massey Ugandan Vanilla Extract. Nielsen-Massey's vanillas are all excellent, but if we had to pick a favorite from their premium options, it'd be this one. It has a deep, rich, almost fruity flavor that works so well in rich recipes like chocolate cake or brownies.
If you can only splurge on one pantry staple, make it a good vanilla extract. It makes a big difference in cupcakes, but it will also elevate your favorite cookies, brownies, and more!
Flour
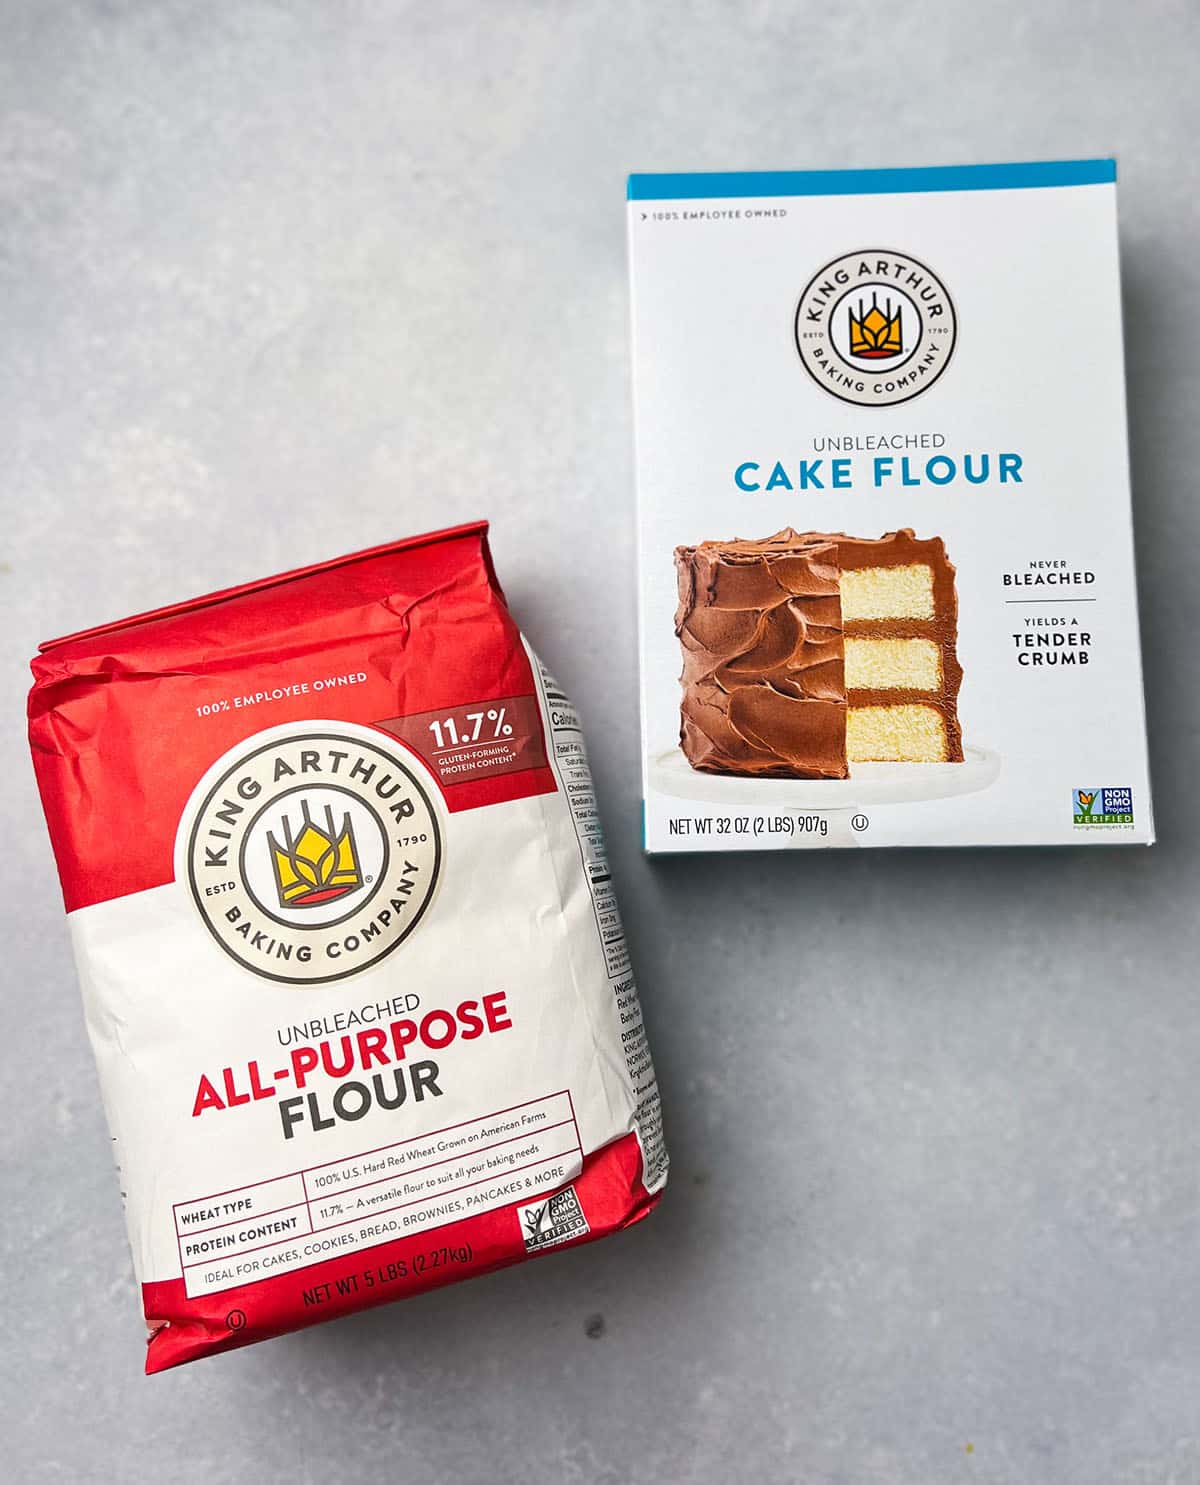
We could write an entire dissertation on the differences between each type of flour (could and did - check out our Everyday Artisan Bread course for a detailed look at how flour affects your baking!) But we have a lot of ground to cover in this article, so we're going to move through this section pretty quickly.
You have two real options when it comes to the style of flour you use in your cupcakes: Cake Flour and All Purpose Flour. The primary difference between these flours is how much protein they have (which affects how much gluten they have, which affects the ultimate structure and texture inside your cupcake).
In a nutshell: Cake flour typically gives you a slightly softer cupcake, with a slightly flatter, less domed top and a more uniform crumb. Cake flour has a low protein content, which means it develops less gluten in your cupcake batter (basically, it's just harder to overmix your cupcakes if you use cake flour).
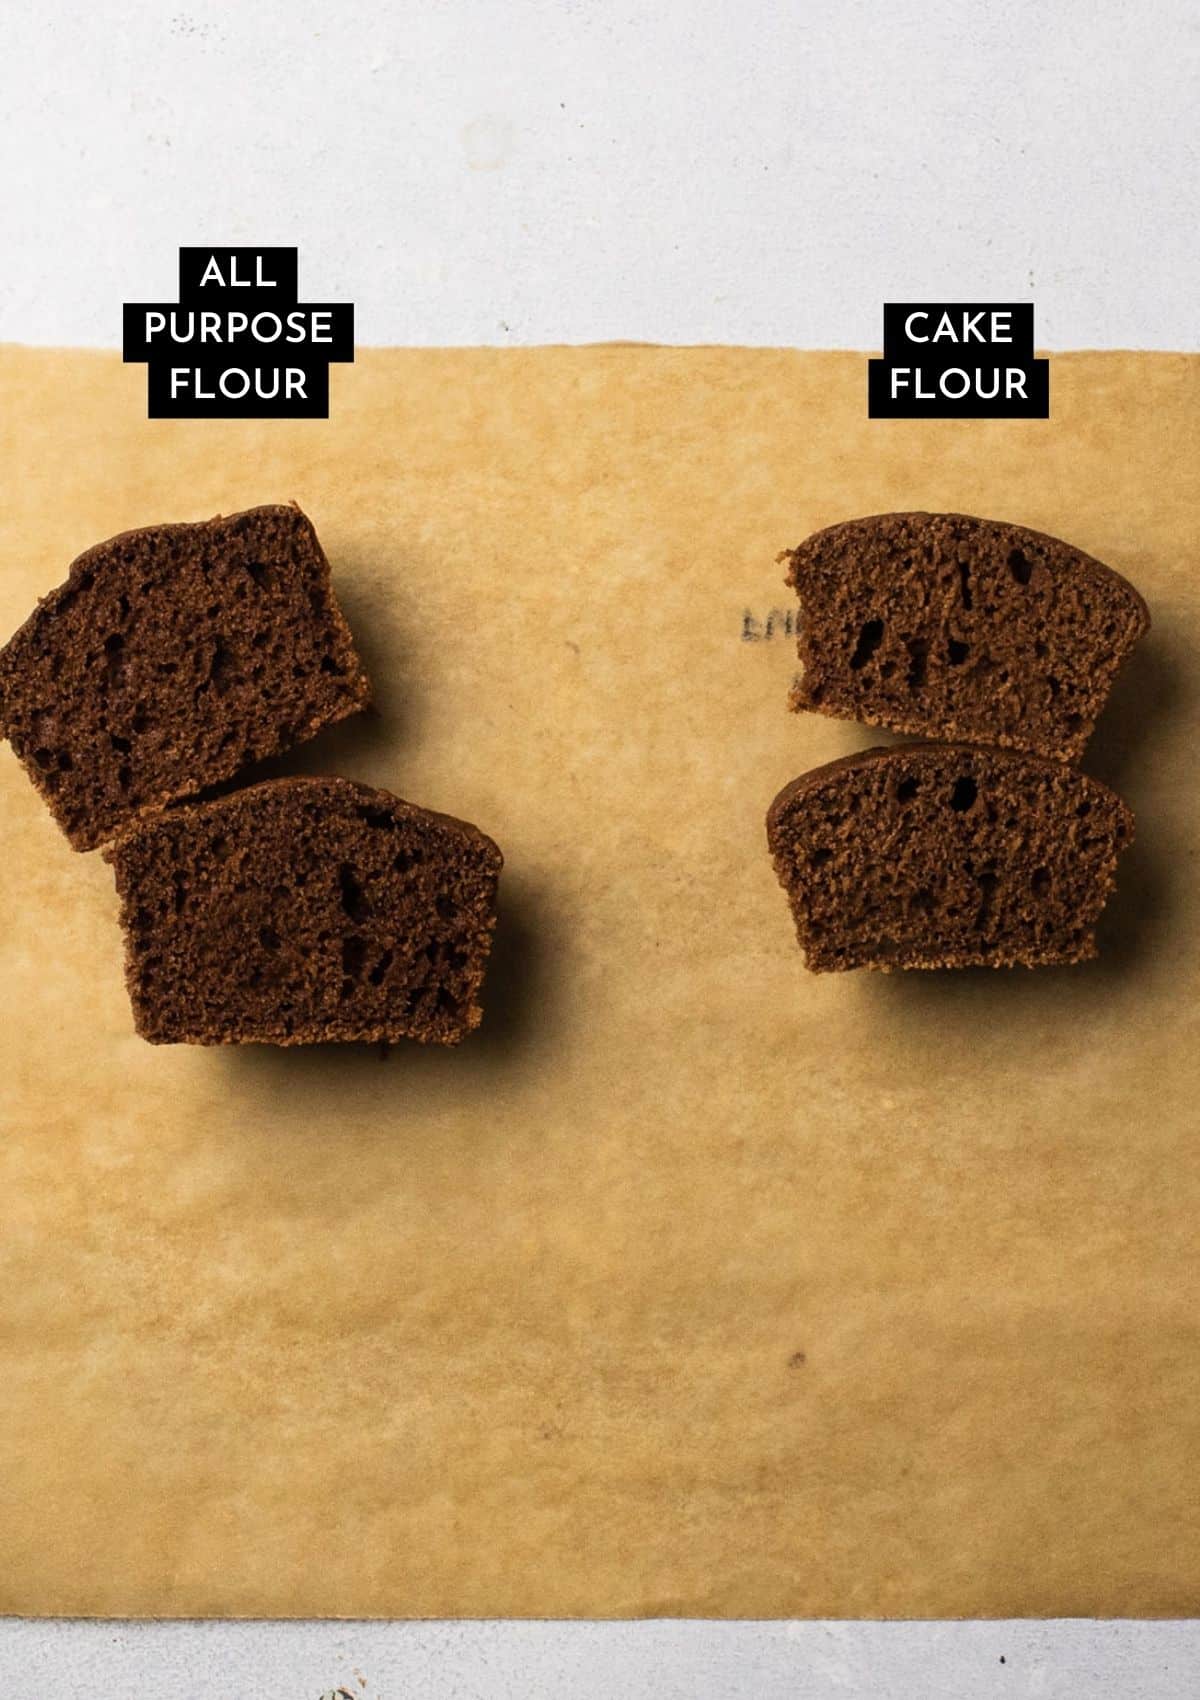
If you’re a frequent cupcake baker who wants the softest possible texture, stock some cake flour in your kitchen! But the difference in taste isn't huge, especially if you follow these other best practices. So if the idea of one more thing in your kitchen makes you squirm, just stick with regular all purpose flour!
Real life example: As a professional recipe tester, I honestly only use cake flour when I'm making yellow or vanilla cakes for a special occasion (like someone's wedding or a big birthday party). 90% of the time, I use All Purpose flour in my cakes!
No matter what flour you choose, we recommend King Arthur Flour. It's incredibly consistent from bag to bag and routinely outperforms other brands in our testing.
For a deep dive on all things flour, enroll in our Everyday Artisan Bread course! It goes into MUCH more detail about flour types, protein content, and our recommended brands.
Butter
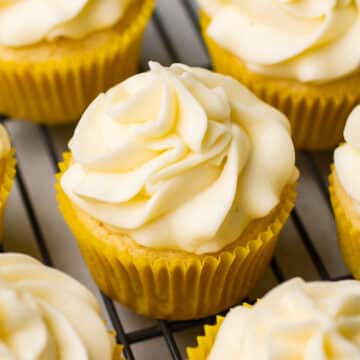
Good quality butter makes a fairly noticeable difference in cupcake recipes that call for room temperature butter to be creamed with sugar (like our Lemon Vanilla Cupcakes).
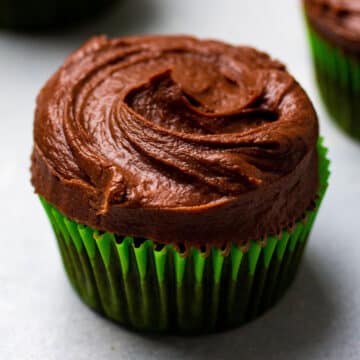
Cupcake recipes that use melted butter, though (like our Chocolate Stout Cupcakes) don't really seem to benefit from higher-quality butter in our testing - you can't really taste much of a difference there.
But butter makes a smaller difference than other ingredients: if you’re on a budget, prioritize high quality vanilla and high quality cocoa powder over a more expensive butter option.
If you'd like to stock high quality butter for your cupcake baking, we recommend Vermont Creamery Cultured Butter and Kerrygold Grass Fed Butter.
Should I use salted or unsalted butter in cupcakes?
It's really up to you! Different bakers have different opinions. In most of our cupcake recipes, we call for unsalted butter because we like having total control over the final salt content in a recipe. Some bakers love using salted butter because the salt helps the flavors pop a little more. Good cupcake recipes will specify what type of butter you should use, but we encourage you to try both and see if a favorite emerges!
Baking on a budget? Don't stress about splurging on high-end ingredients if it doesn't work with your budget! Do ingredients make a difference? Yes, absolutely. But so does everything else on this list! Follow the rest of the tips in this article, and your favorite cupcakes will still improve dramatically without having to spend a dime.
2. Bring ingredients to room temperature
We'll be honest: Taking the extra time to bring ingredients to room temperature before baking can be, well, annoying AF. But trust us when we tell you: This step is worth it.
Cold, straight-from-the-fridge ingredients (especially eggs and milk) won't mix into your batter as smoothly. For example: When a cold egg hits melted or softened butter, the butter starts to seize up again, which can completely change the intended texture of your cake.
Room temperature eggs are especially important when you're working with a creamed butter-and-sugar mixture: It's essential the butter remains soft to trap air in the batter in order to have a light, fluffy cake (we use this technique in our White Chocolate Cake Recipe!) Read more: Do eggs in baking really need to be at room temperature?
Basically, cold ingredients can lead to a grainy, clumpy batter. That's not great for the end product, of course: we don't want to discover a big chunk of unmixed egg or a pocket of flour when we bite into a cupcake. But also, when a cake batter looks clumpy, bakers will spend more time mixing the batter in an effort to work those clumps out (more time mixing = more gluten development = denser cupcake with uneven air pockets in it).
Different bakers have different opinions on what exactly it means to "bring ingredients to room temperature" (some bakers shoot for a very precise batter temperature and individually temp each ingredient, for example, while others simply let their cold ingredients sit out for a bit while they do other things).
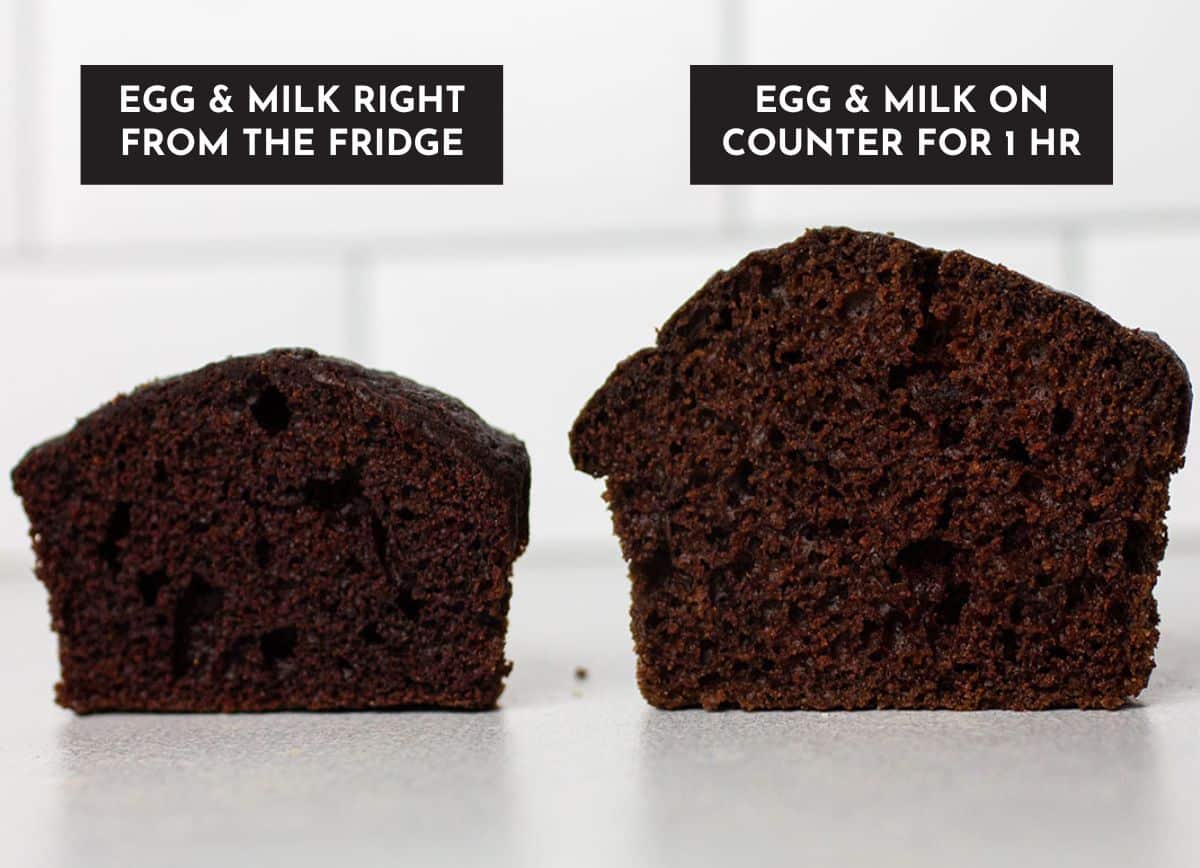
In our testing, we found the biggest benefit comes when cold ingredients - specifically, eggs and milk (or buttermilk) - are allowed to sit at room temperature on the counter for at least 1 hour before mixing into the batter. That 1 hour mark is where we observed the most dramatic difference in cupcake height, crumb, and texture compared to eggs and milk that came straight from the fridge.

Past the 1-hour mark, the difference isn't as stark. We also didn't find it beneficial to use super precise measurements here (for example, bringing milk to a specific temperature checked with a kitchen thermometer before mixing it into the batter).
In professional kitchens, we certainly pay that kind of detailed attention to temperature (when you're baking huge batches of everything, every variable needs to be as consistent as possible!) But for home bakers, that 1 hour on the counter will give you the best result with the smallest amount of effort.
Worth noting: Both of the cupcakes in these photos still tasted good! You can definitely tell a difference when they're side by side, but we were still perfectly happy snacking on the cupcakes made with cold ingredients.
What about room temperature butter?
We focused on eggs and milk when we were testing recipes for this section, because different cake recipes use butter differently! Some cakes - like our Chocolate Stout Cupcakes - use melted butter in the batter, which is easy to make and doesn't leave a ton of room for error.
Light, fluffy cakes will typically instruct you to use room temperature butter. Butter at room temperature should be easy to spread, but still hold its shape. It shouldn't be shiny or melty, and should actually feel fairly cool to the touch: if you press a finger into it, it should offer a tiny bit of resistance (as opposed to melting away or collapsing when you touch it). It can take several hours on the counter for a stick of butter to reach room temperature (about 65-70° F, depending on what baker you talk to). Read more: What Room Temperature Butter Really Means.
3. Use a kitchen scale
Here's the thing: Measuring ingredients by volume (with measuring cups) is notoriously unreliable. It's especially inconsistent when you're working with dry ingredients like flour (we actually ran a HUGE experiment to test this - you can read the full results in our Everyday Artisan Bread course or hear a summary in our Free Bread Bootcamp Webinar).
In a nutshell: Each person measures a cup of flour a little bit differently, which makes it very, very easy to accidentally use too much flour in a recipe and end up with dry, dense cake.
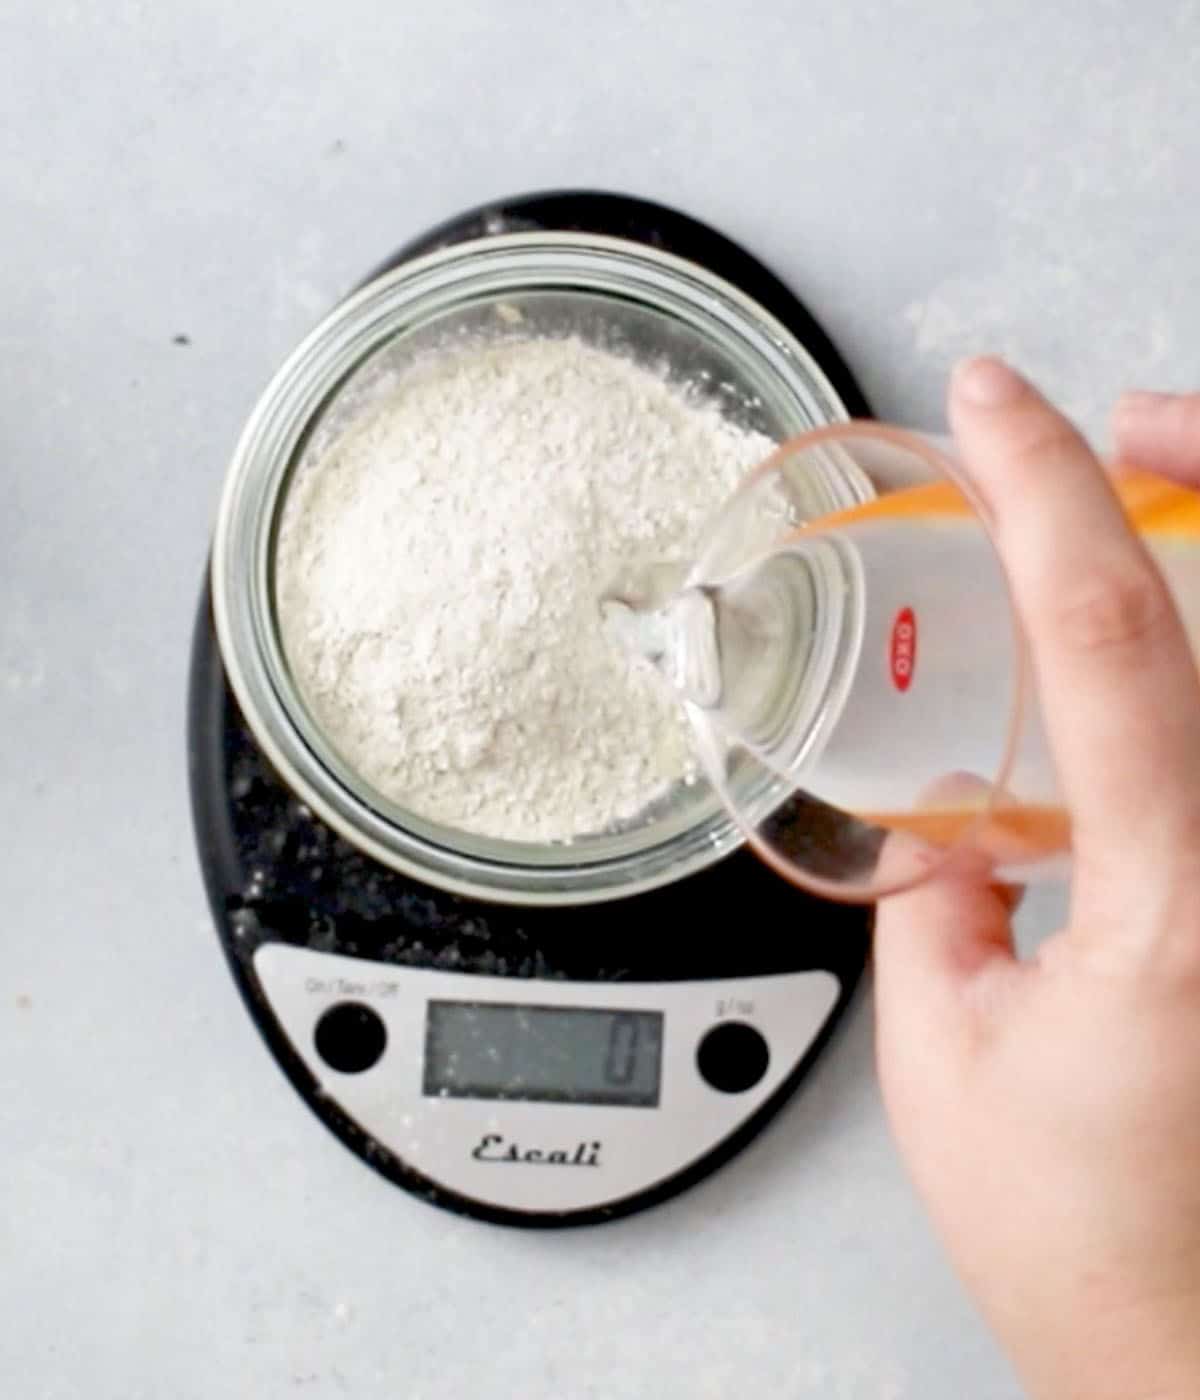
But when you use a kitchen scale to measure by weight (in grams), you get a perfect measurement every time.
When you're baking, look for cupcake recipes that are specifically written with (and tested with!) gram measurements (oh hey, there's a link to our cupcake recipe collection again *wink*). Measuring your ingredients by weight will give you much more consistent results for perfect cupcakes every time.
PS - If you don't have a kitchen scale, measure your flour with the scoop and level method for best results!
What kitchen scale should I use? We use (and love) the Escali Kitchen Scale. We've tested recipes with half-dozen or so of the most popular kitchen scales - this one is far and away our favorite. It's compact, easy to use and clean, and is the most reliable with small quantities.
4. Don't Overmix the Batter
This is a term that bakers and bloggers like to throw around a lot without a ton of context: "be sure not to overmix the batter!" is tacked onto the end of many a recipe without much other guidance. So what does it mean, exactly?
When we talk about "overmixing" cupcake batter, we're really talking about two main issues:
- Developing too much gluten. Flour contains proteins that form gluten, which is activated in part by mixing. Basically, the more you mix your batter, the more gluten develops - and more gluten means chewier cupcakes with bigger air pockets (in cakes and muffins, these air pockets are called "tunneling"). Gluten, of course, is a very important ingredient in homemade artisan bread: It's what makes our bread dough smooth and stretchy. But while that chewy texture is great for sourdough, it's not really what we're looking for in cupcakes - so we want to mix our cupcake batter as little as possible in order to develop as little gluten as possible.
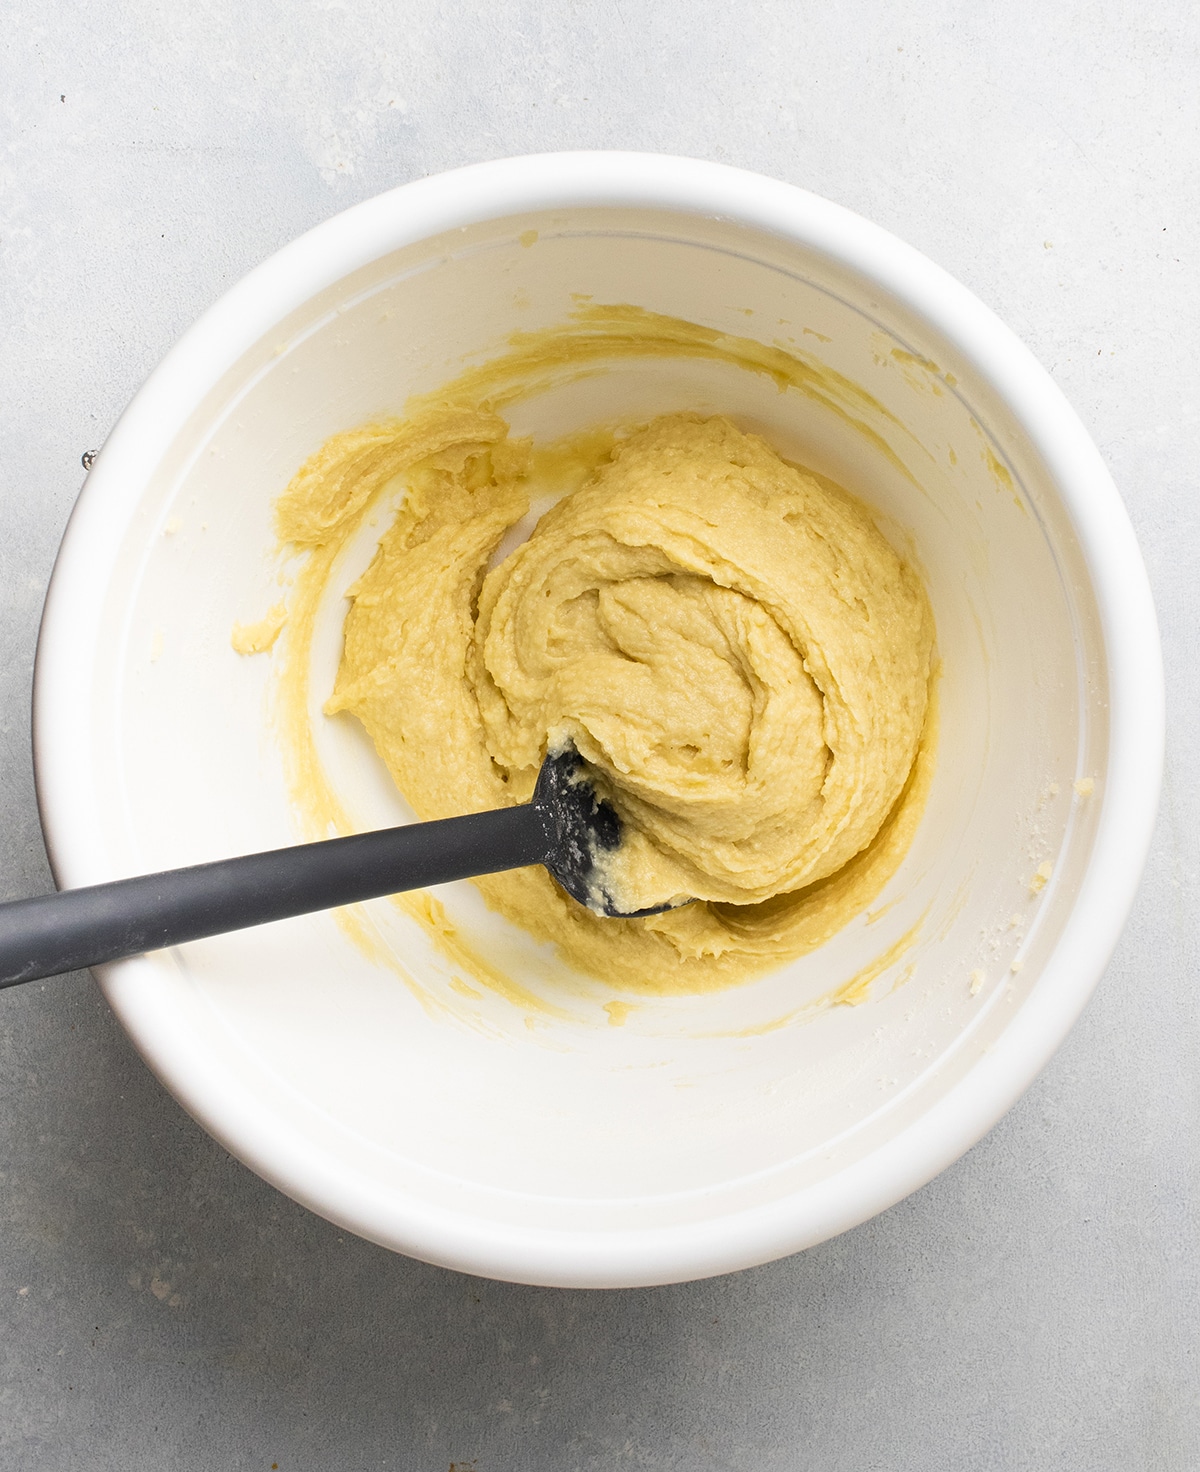
- Releasing air from the batter. Many cupcake recipes rely on an important first step of creaming the butter and sugar together to develop a light, fluffy dough. Whipping softened butter and sugar together incorporates air into our cupcake batter and gives our cake its soft, even structure. Once we build all those air bubbles into our batter, we want to be very careful not to crush them: Mixing too long or too vigorously can collapse these fragile air pockets, so it's important to stir gently, and as little as possible.
Why does too much gluten cause tunneling?
When we've developed too much gluten in our cupcake batter, the gluten strands create a kind of cage structure inside our cake: Picture a big net (our gluten networks) with a bunch of balloons inside (our air pockets). As the air pockets (balloons) expand in the oven, they float through the batter and kind of shift the net (the top of our cupcake) up along with them in a smooth, even movement. But if we develop too much gluten in our dough, that net is more like a metal jungle gym: And the air pockets have to work a lot harder to break through it. That means a ton of pressure builds up inside each air bubble, leading them to burst with a lot of force (as opposed to a gentle expansion). The result is long, hollow tunnels inside of your cake, and a cracked surface that forms when air erupts through it like a volcano.
What does overmixed cupcake batter look like?
We wanted to know what kind of effect overmixing really has on homemade cupcakes, so we tested it! We mixed one batch of small batch chocolate cupcake batter by hand until the ingredients were just combined, then put just half of it into cupcake liners as usual. We then used an electric mixer to mix the remaining batter for an additional one minute before baking all the cupcakes together. Here are the results:
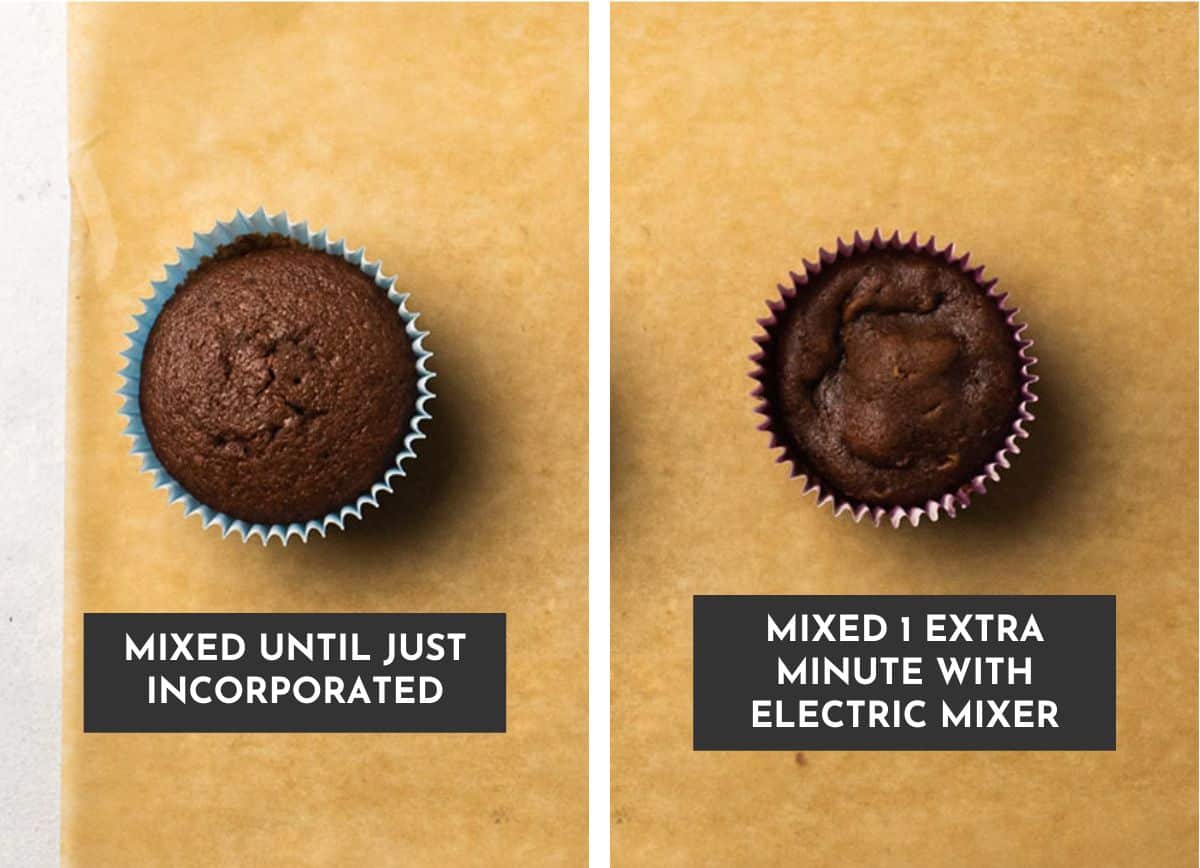
Right away, you can see an obvious difference in the surface texture of these two cupcakes. The cupcake on the left - baked normally - looks just about perfect. The cupcake on the right - which is the exact same batter, just mixed for an extra minute - looks dense and lumpy.
These differences persist when we cut the cupcakes open:
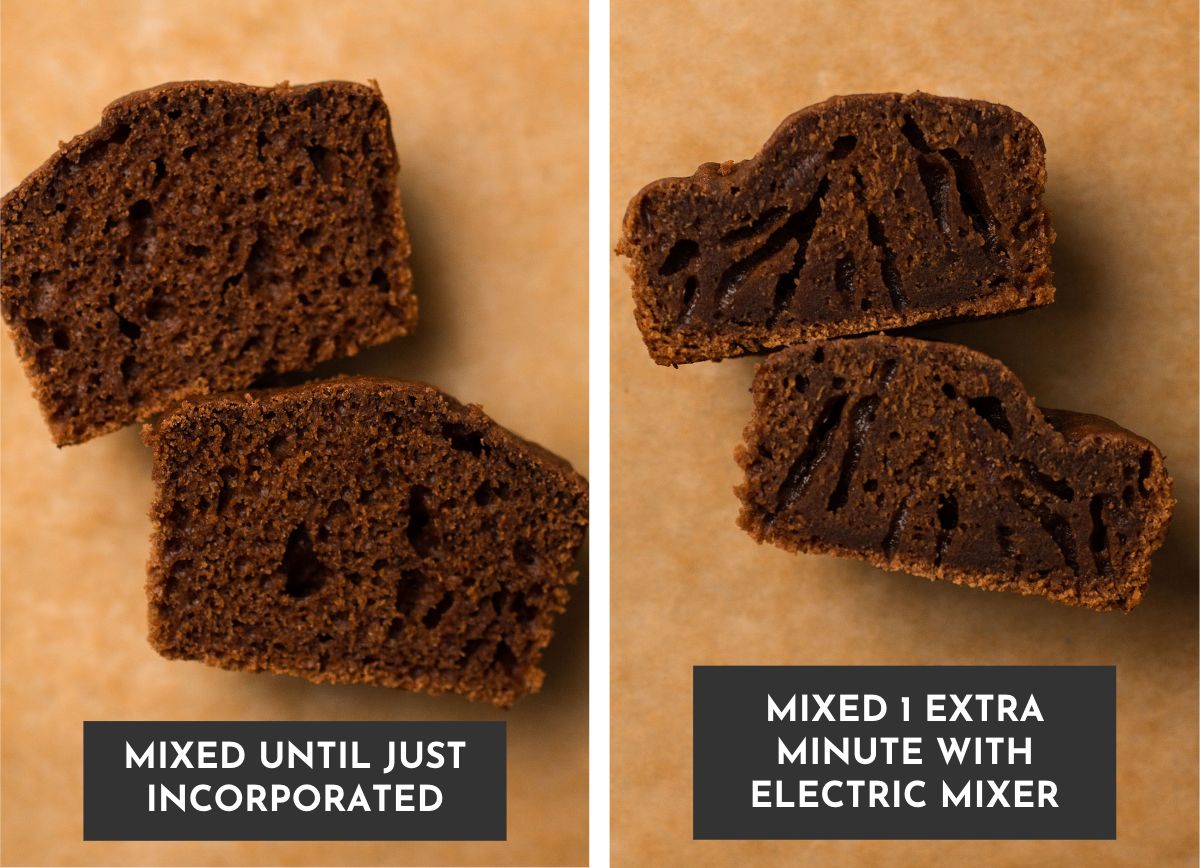
The cupcake that was mixed an extra minute with our electric beater is short and dense with a ton of tunneling. The cupcake that was mixed by hand until the ingredients were just incorporated looks, well, like a cupcake. (FWIW, the overmixed cupcake also didn't taste great - kind of like an undercooked, chewy torte.)
How to Avoid Overmixing Cake Batter
Here's the good news: If you're mixing cupcake batter by hand (with a whisk, spoon, or spatula) it's pretty difficult to overmix the batter to the point where you'll be able to see or taste a difference.
If you're using a stand mixer or hand beater, though, it's much easier to over mix batter. Don't let that scare you off of using your electric mixer, though - just keep a close eye on it and you'll be fine! You can use a fairly high speed to cream any butter and sugar together, but once you add the flour and other dry ingredients to your batter, be sure to beat it on a very low speed until ingredients are just combined.
The most important rule of using a stand mixer: Don't walk away while it's running! Leaving the mixer on while you're doing something else is a surefire path to over-mixed cupcake batter. It's just too easy to get distracted and forget to turn it off in time (we're speaking from experience on that one *facepalm*).
Pro Tip: We recommend making a cupcake recipe by hand a few times to get a sense of what the batter should look and feel like, so that when you do use a stand mixer it's easier to follow the batter's visual cues to avoid overmixing!
As a general rule of thumb, we recommend you mix your cupcake batter until no dry bits of flour remain, and then stop!
5. Check your oven temperature
It goes without saying that you should pre-heat your oven, but we'll say it anyway: pre-heat your oven!
If you put cupcake batter into a cold oven, it can mess with the baking process and result in lopsided or dense cupcakes. For best results, give your oven ample time to come to the correct temperature.

It's also important to double-check your oven temperature. We recommend investing in a good oven thermometer to get a feel for how accurate your oven is. They're small, and they have a little hook at the top so you can hang them from your oven rack and keep them out of your way.
Older ovens are especially finicky when it comes to temperature readings: We've had ovens be off by as much as 30 degrees in either direction! If you know your oven runs especially hot (or especially cold), you can adjust the temperature to make sure you're baking your cupcakes at the correct setting. An oven thermometer can take the guesswork out of mysteriously over- or undercooked cupcakes and ensure control over the baking process.
6. Don't open the oven door during baking
We know, we know: It's tempting to sneak a peek at your cupcakes. But we beg of you: Do not open the oven door while the cupcakes bake.
Opening and closing the oven door creates big temperature swings that affect how evenly your cupcakes bake, and even a gently closed oven door can shake and burst some of the fragile air bubbles in your batter (which leads to a denser cupcake with a weaker structure and more tunneling).
To test the impact of opening and closing the oven door during baking, we made two identical batches of chocolate cupcakes. The first batch was baked normally, and we didn't open the oven door until the baking time had elapsed. While the second batch of cupcakes baked, we opened and closed the oven door once every 3 minutes until the cupcakes were done.
Here's how they turned out:

You can see right away how uneven the open-and-closed-door cupcake is compared to our control cupcake. And you can see an even bigger difference once we cut them open:
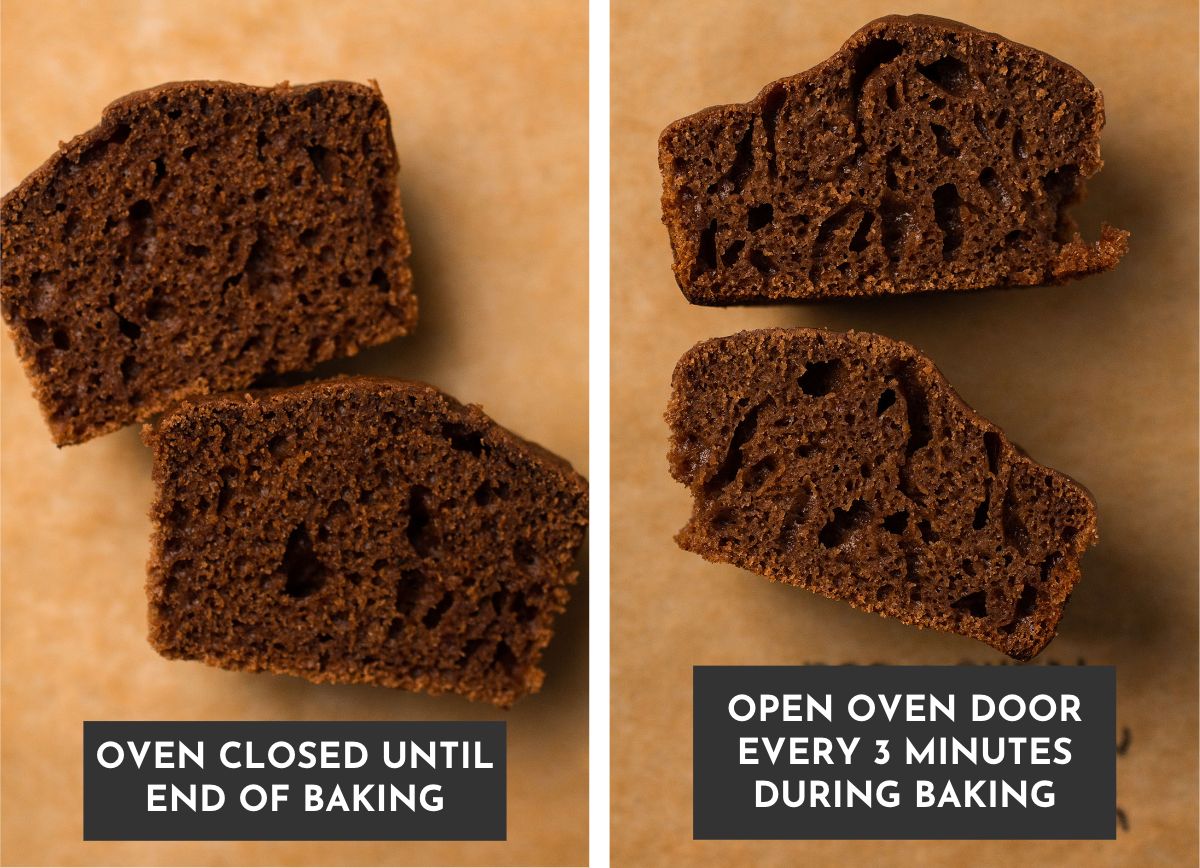
Similar to cupcakes made with overmixed batter, the open-and-closed cupcakes are shorter, denser, and exhibit a lot of tunneling (although it's worth noting that the open-and-closed cupcakes tasted significantly better than the overmixed ones).
When can I open the oven?
All that said, it's sometimes necessary to open your oven while your cupcakes bake: Whether you need to rotate the pan to adapt to an oven's hot spots, or insert a cake tester to see if the cupcakes are done baking.
Our general rule of thumb: Let your cupcakes bake for at least ⅔ of the recipe's specified bake time before you open the oven door. This gives the cupcakes' structure enough time to stabilize before you introduce a gust of cold air into the oven, so you can rotate a pan or check for doneness without compromising the final product.
7. Bake cupcakes in the center of your oven
When you're ready to bake, set cupcake pans on the center of a rack set in the very middle of your oven. This will ensure good airflow and help even out heat distribution, preventing overcooking on any one side of the cupcake.
If your oven cooks unevenly from front to back, rotate the cupcakes ⅔ of the way through cooking time. (Don't rotate any sooner, or the cupcakes may not have had time to set properly!)
If need to bake two pans of cupcakes at a time, place each pan side by side on the same rack. If your oven isn't wide enough for two cupcake pans at once, place two oven racks in the centermost positions of the oven and stagger the cupcake pans so that they aren't directly on top of each other. If one cupcake pan is directly on top of another, it will impede the oven air's ability to circulate, which can affect the total baking time and final texture of your cupcakes. Give each pan as much space as you can while still keeping each one as close to the center of the oven as possible.
8. Use a Scoop to Fill Cupcake Liners
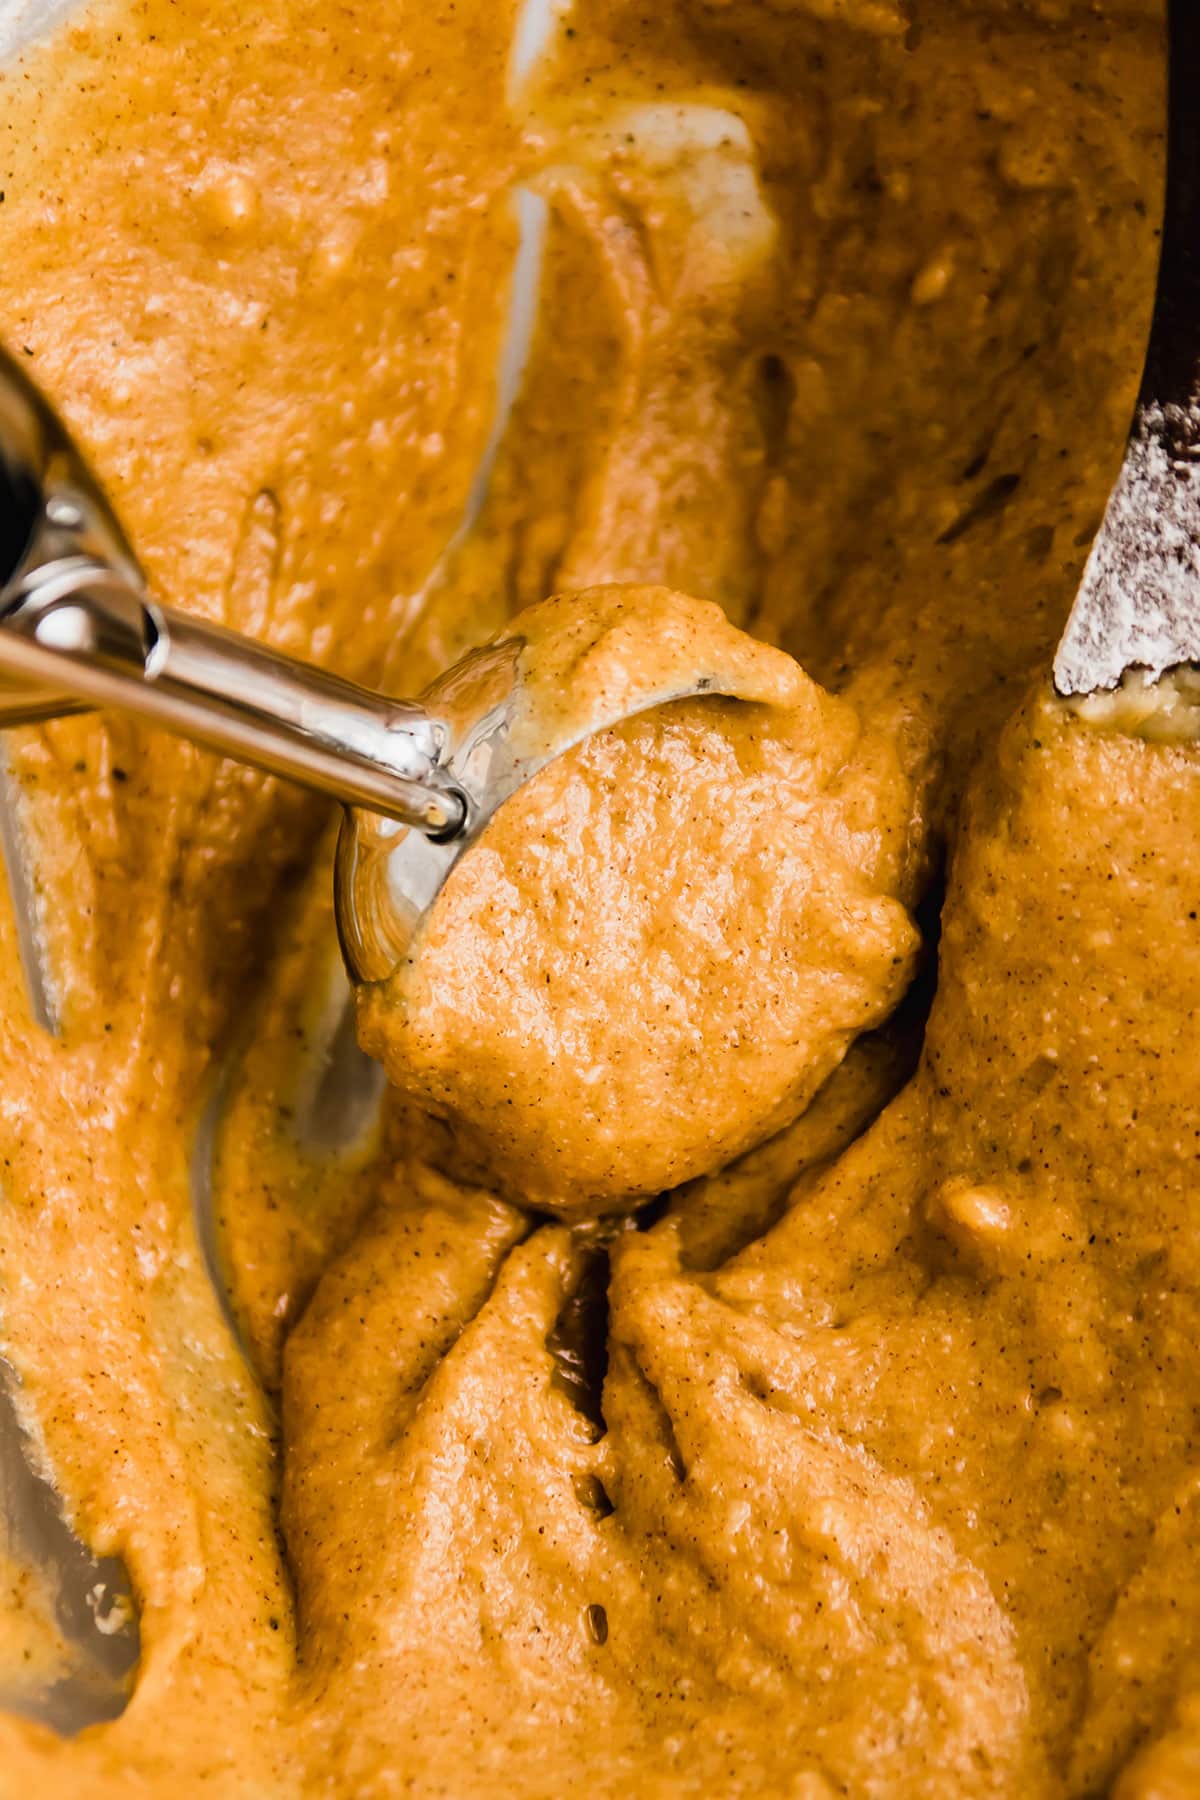
There's nothing worse than pulling a tray of cupcakes out of the oven and discovering that half of them are done while the rest are still raw inside. This usually happens when each liner has a different amount of batter in it: The cupcakes bake unevenly and, you're left with some that are perfect and some that are over- or under-cooked.
The easiest way to ensure your cupcakes bake evenly is to use the same amount of batter in each cupcake liner. We like using a cookie scoop for thicker, fluffier cupcake batters: a large scoop (3-4 Tablespoons) is great for standard-sized cupcakes and a small cookie scoop (1-1.5 Tablespoons) is perfect for mini cupcakes.
If you're making cupcakes with a very thin batter (like our coconut oil chocolate cupcakes) it's easier to pour the batter into your cupcake liners than to scoop it. We like to transfer the batter to a small measuring cup and pour it into the liners a bit at a time to keep the cupcakes as even as possible!
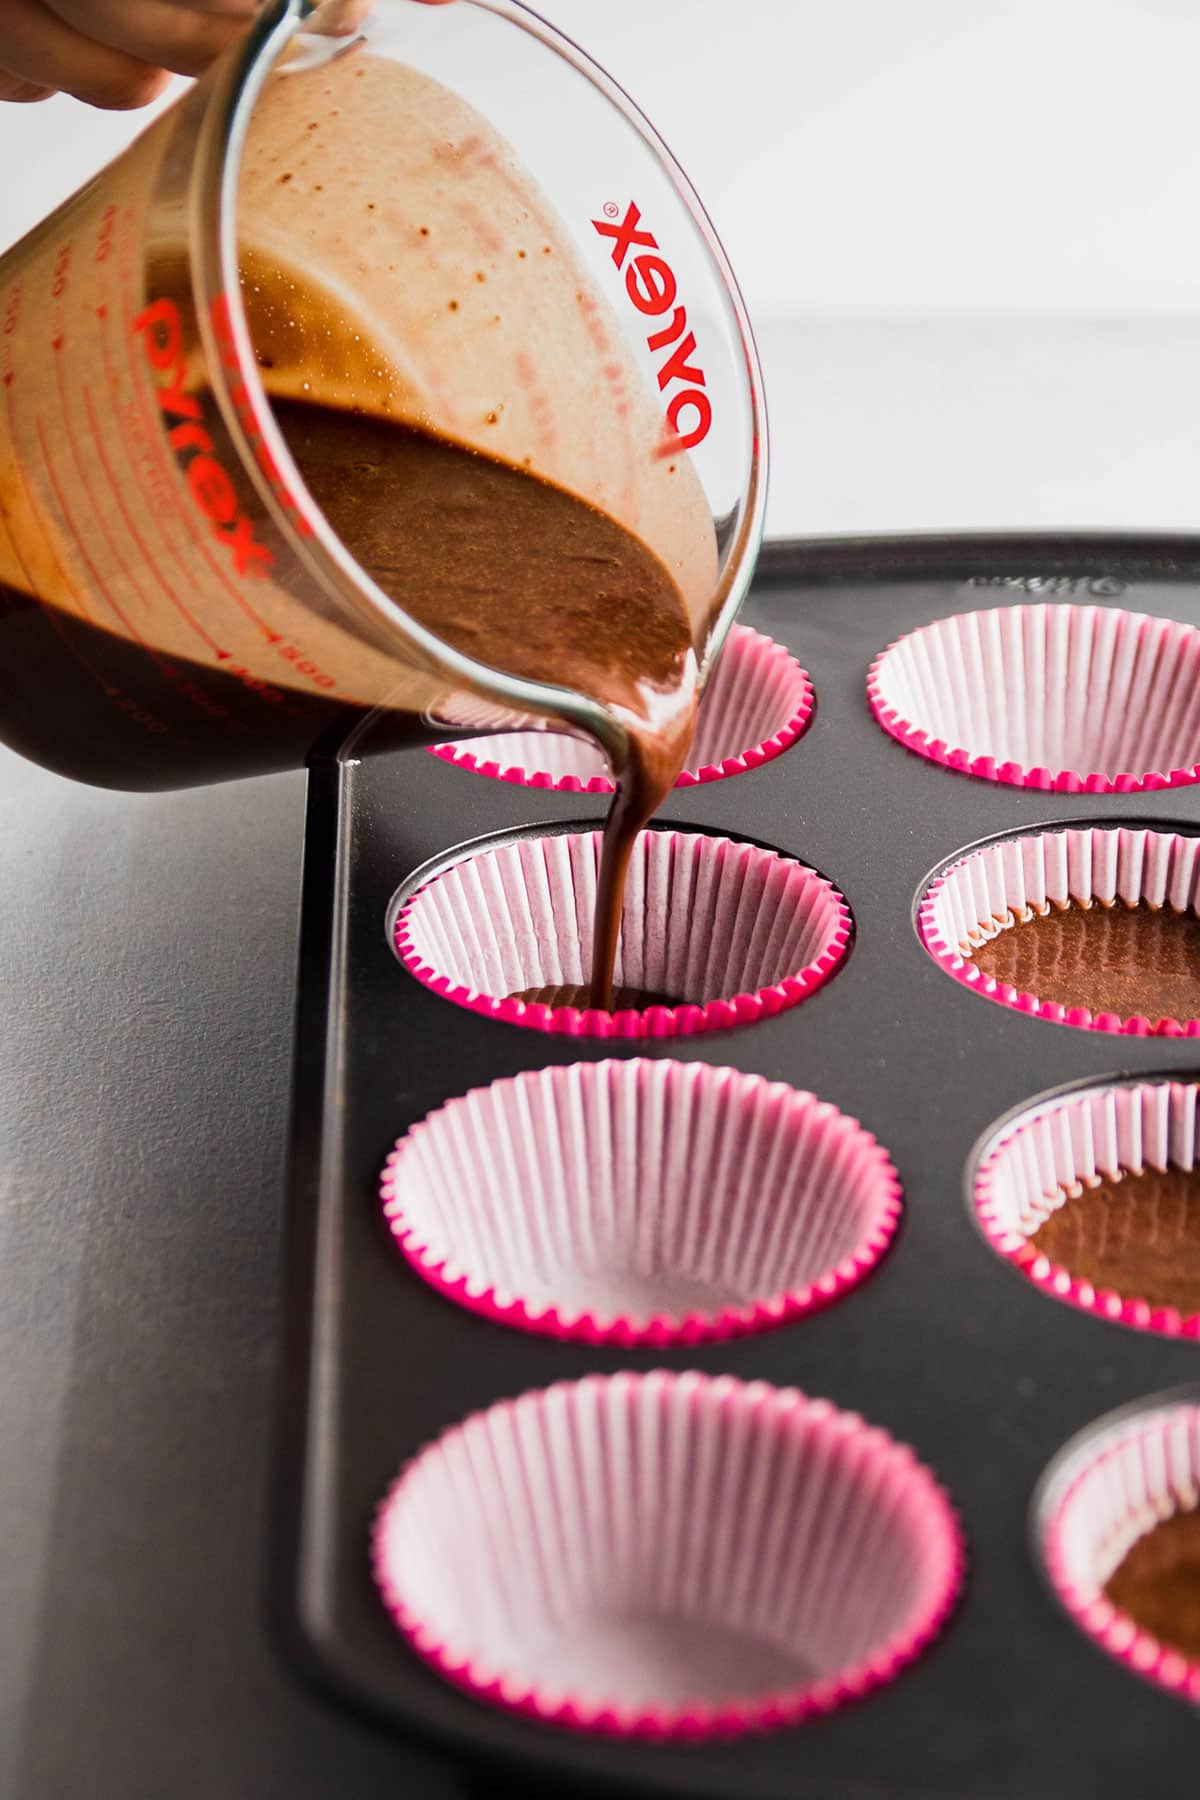
Note: Because a thin cupcake batter fills all the nooks and crannies of the cupcake liner, it's easy to visually gauge whether each liner is filled with the same amount of batter. Bend down so you're about eye level with the cupcake pan, and make sure the top of each cup of batter lines up (if not, use a small spoon to add or remove batter as needed until they're all at a fairly even level). This can take some practice, but you'll get the hang of it in no time!
How full should my cupcake liners be?
The recipe you're using should specify how full each cupcake liner needs to be; usually, we recommend filling cupcake liners about ⅔ of the way full for best results.
9. Move cupcakes to a wire rack to cool
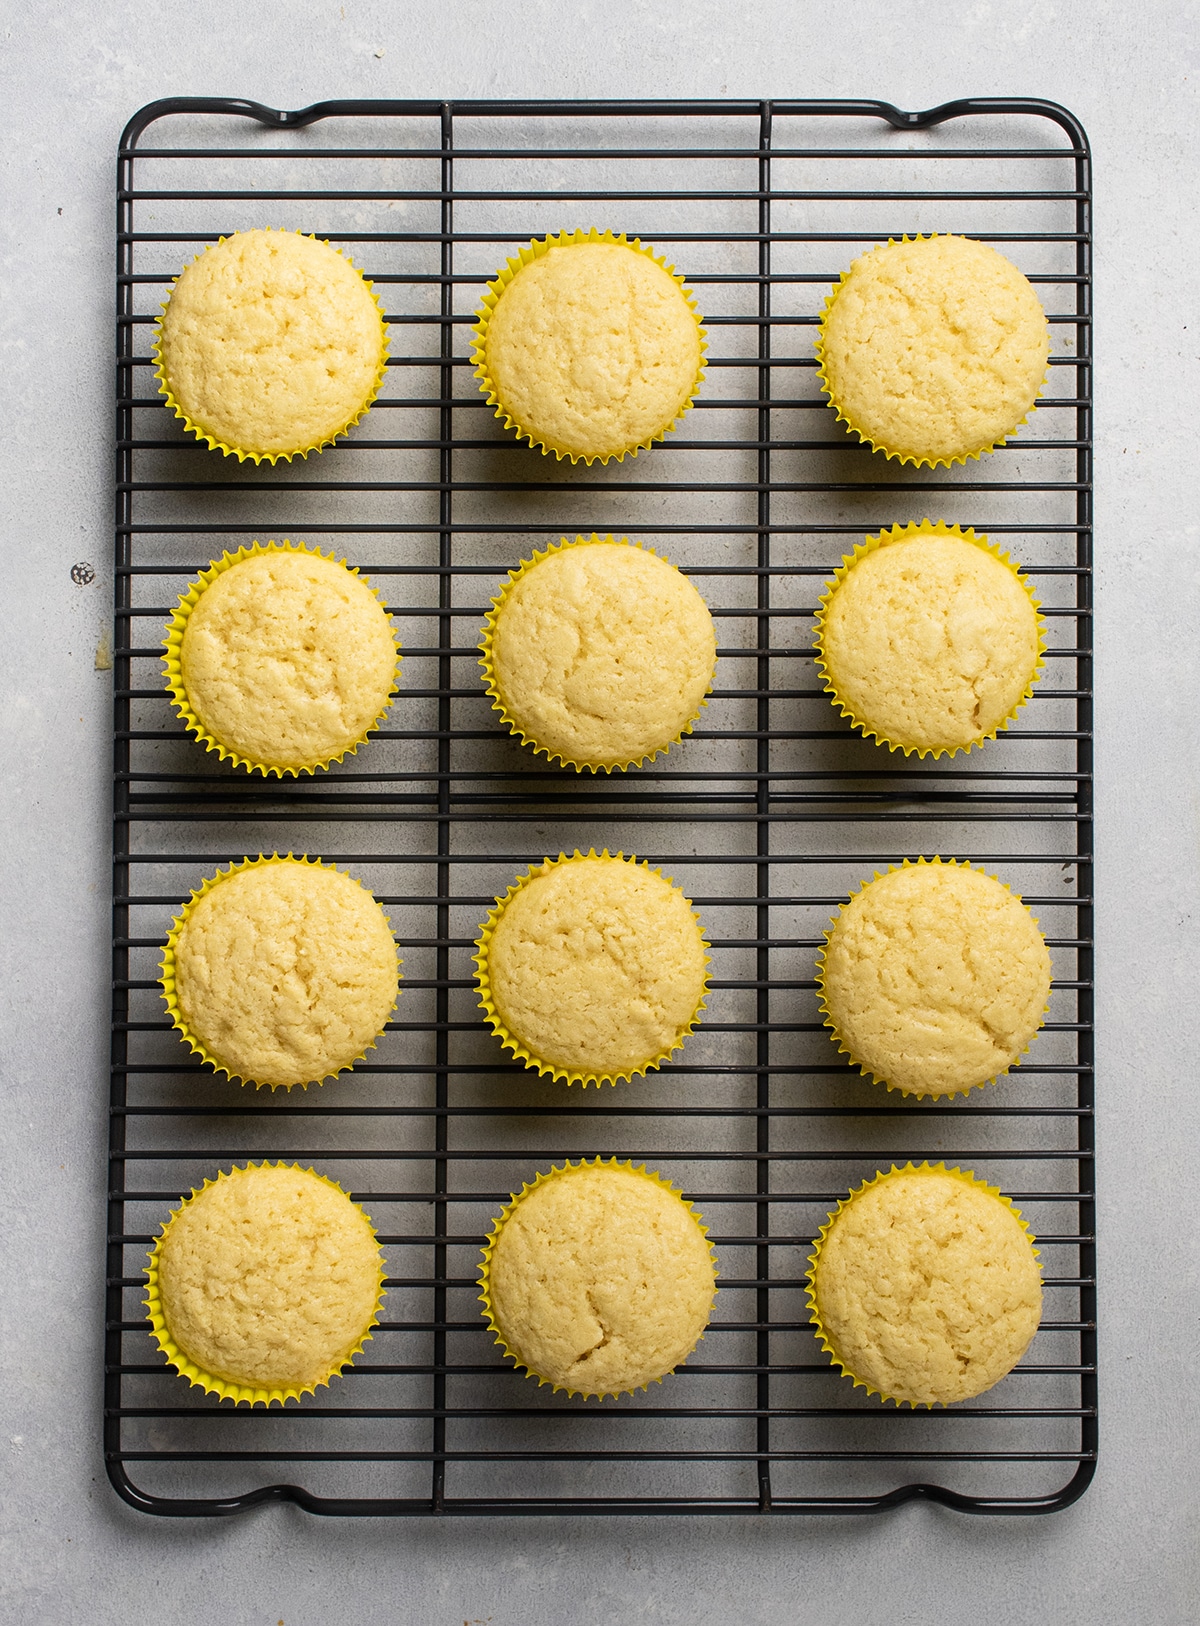
When your cupcakes are done baking, transfer them to a wire rack to cool as quickly as you can!
If you leave cooked cupcakes in a hot pan, the residual heat can continue the cooking process (which can overcook the cupcakes and ultimately dry them out). But the heat of the pan will also create steam around each cupcake once it leaves the oven, which causes the cupcake liners to peel away from the cake (this is one of the most common complaints we get about homemade cupcakes!)
To transfer hot cupcakes to a cooling rack, use a potholder to hold the hot pan in one hand and gently tip each cupcake onto the wire rack with your other hand (you can also use a butter knife to coax each cupcake out of the pan and onto the rack). It can take a bit of practice to get this movement down - go slowly and be careful not to burn yourself!
Let your cupcakes cool completely before frosting them: Even a tiny bit of residual heat from a cupcake can melt your frosting, so be sure to give your cupcakes at least an hour to cool on this wire rack before you move on to decorating!
10. The most important cupcake ingredient
We've packed a ton of information into this article - and each of these tips will help you refine the cupcake recipes you already love! But when it comes to great homemade cupcakes, remember the MOST important ingredient:
Practice.
When it comes to cooking and baking, there's no substitute for practice. Even the very best recipes (*casually drops a link to our cupcake recipe collection*) and tips will only take you so far. Plus, every kitchen is different! Every oven heats a little bit differently, different brands of ingredients can have their own quirks, and even the temperature and humidity in your kitchen can affect the outcome of your cupcakes.
Use this guide - and your favorite cupcake recipes! - as a starting point. But also: Take some time to refine your process. Try a few different ingredients until you find your favorite combos. And most importantly: Give yourself permission to make a few bad batches of cupcakes on the road to total cupcake world domination (and be nice to yourself when those bad batches happen! We've all been there).
This article is part of our Cooking 101 Series, and focuses primarily on baking cupcakes. For more cupcake tutorials, check out our posts on how to store cupcakes, our favorite cupcake decorating ideas, and the best piping tips for cupcakes.
Three rules for at-home cupcake experiments
A lot of the advice in this guide boils down to "try a few things and see what you like!" But as with any experiment, there are a few best practices to follow to make sure you're getting the results you need:
- Test with the same recipe every time. If you're trying to decide between a brand of cocoa powder, or a type of vanilla, make sure you're keeping the base recipe the same and changing only one variable at a time.
- Control as many variables as you can. Stay as consistent as possible when you test different cupcake variables! For example, if you're trying a new brand of flour, make sure you're measuring it the same way every time (we recommend using a kitchen scale) to get an accurate read on how it performs for you.
- Be patient. It takes time to hone your perfect cupcake recipe (at Life As A Strawberry, we test each cupcake recipe an average of FIFTEEN TIMES before it gets published!) Enjoy the process, try some new things, and be nice to yourself if a batch doesn't turn out the way you'd hoped. Our team is here to cheer you on the whole way!
Our Top Cupcake FAQs
You should let cupcakes cool at least 30 minutes (but preferably an hour or two) on a wire cooling rack on the counter, until they are no longer warm to the touch.
Transfer cupcakes to a wire rack as soon as they're out of the oven. If you've made a dozen cupcakes or less, you can carefully pop the entire wire rack into the fridge or freezer for 10-20 minutes to cool them more quickly. We don't recommend using the fridge or freezer to quickly cool large batches of cupcakes, as too much heat can lower the temperature inside the refrigerator (and if that temperature lowers too much, it can cause food safety issues).
This could have a bunch of different causes! Start by making sure you're measuring your ingredients by weight (with a kitchen scale) using a well-tested recipe that provides weight measurements (like ours do!) In our experience, 9/10 dense cupcakes are caused when a baker accidentally uses too much flour. Dense cupcakes can also occur when the batter is overmixed, when the oven door is opened too much during baking, when the oven temperature is off (we recommend using an oven thermometer to double-check oven temp for accuracy!) or when butter and sugar aren't creamed together properly.
If you prefer cupcakes with a flat top (instead of a tall, domed top), be sure to first follow all the best practices in this article! The shape of your cupcake will also largely depend on the recipe you're using. That said, there are a few tweaks you can make that will help most cupcake recipes achieve a flatter top: First, use cake flour instead of all purpose (it will develop less gluten and help the cupcake rise more evenly). Next, avoid overfilling your cupcake liners: If a recipe came out too domed on top for your liking, try reducing the amount of batter in each liner the next time you bake it. Finally, you may want to experiment with the oven temperature: In many cases, reducing the temperature by 25°-50° Fahrenheit can slow the baking process down enough for a cupcake to develop a smoother, flatter top (adjusting the bake temperature usually requires a bit of trials-and-error, though, so make sure you give yourself a few test batches to experiment with!)
When cupcakes have cooled completely, store them in an airtight container so they retain their moisture. We recommend using a large, fairly tall airtight storage bin. Most cupcakes will keep just fine on the counter for a few days (check the recipe you're using for any specific storage instructions!) but the texture is usually best if they're eaten within a day or two. After that, the cake will start to dry out a bit: If you want to keep cupcakes longer than a few days, we recommend freezing them. Cupcakes will keep in the freezer for 2-3 months. To defrost, place frozen cupcakes on the counter, uncovered, and let them come back to room temp for a few hours. See more storage tips in our post on how to freeze cupcakes.
This usually occurs when you overmix your cupcake batter (see tip #4 above!) and/or when you use ingredients straight from the fridge instead of letting them come to room temperature first (like eggs, milk, or butter). If you'd like less tunneling in your cupcakes, make sure to bring your eggs and milk to room temperature before making the batter (see tip #2 above), and mix your batter until everything is just combined.
In our experience, cupcakes sink in the middle for a few different reasons. First, if cupcakes are taken out of the oven before they're done baking, the cupcake will collapse under its own weight and slowly sink into its own gooey center (to check for doneness, bake cupcakes until a cake tester inserted into the center of a cupcake comes out clean!) Cupcakes can also sink in the middle when there is too much fat or liquid, or too little gluten development (this is sometimes an issue with a specific recipe, but more often it's due to improperly measured ingredients - be sure to use a kitchen scale!) A too-hot oven can also cause cupcakes to sink in the middle: They rise too quickly and collapse under their own weight because the center takes too long to set (use an oven thermometer to double-check your oven temperature and adjust if necessary!) Cupcakes can also sink when your baking soda or baking powder are expired, so double-check those best-by dates!
Some cupcake liners act like a sponge and soak up some fat (like butter) as the cupcakes bake (some recipes may also just have more fat in them than necessary, or the dry ingredients may have been measured incorrectly, or the butter may have been too soft - all of which can cause grease to form at the base of each cupcake!) Mostly, we've found that this issue is easy to solve by just switching up the brand of cupcake liner you use. Different brands of cupcake liners will behave differently: We use and recommend Wilton Cupcake liners, and they don't typically feel greasy. If your cupcake liners are a bit greasy and it's bugging you, you can put a teaspoon or two of uncooked rice (plain white rice is fine!) in each cupcake hole before you put the liners in - the rice will absorb some of the fat and keep the liners drier. Discard or compost the rice after baking. Greaseproof baking cups are also a great solution if your cupcake liners feel too greasy!
This is often an issue with the liners themselves (we recommend trying a few different brands until you find one you like - we love Wilton liners!) but we've noticed we also have issues with the liners sticking when we vary the kind of pan we use to bake cupcakes. A darker cupcake pan conducts more heat than a lighter metal pan, which can affect how quickly the sides of a cupcake cook (and lead to sticking). We find that liners stick less when we use a lighter-colored metal pan that's thick and conducts heat well (it shouldn't warp in the oven, and a good pan should be fairly heavy). If your oven runs hot, that can also contribute to the liners sticking to the cupcakes: Be sure to double-check your oven temperature with a thermometer and adjust as necessary! This is unfortunately a bit of a trial-and-error issue, and can depend a lot on the equipment you're using, but if you make the same recipe a few times with a few different variables (a different pan, different brand of liners, etc) you can usually zoom in on a simple fix! If sticking is an issue, you can also try using reusable silicone liners instead of paper liners (they peel right off and are dishwasher safe!)
Stick a toothpick or a cake tester into the center of the tallest cupcake. If it comes out clean, the cupcakes are done! If it comes out with a few crumbs stuck to it, give the cupcakes another minute or two, then test again. If the cake tester comes out looking like you dipped it in wet batter, the cupcakes need at least another 5 minutes.
Our team hasn't tested cupcake recipes with a convection oven, so we unfortunately aren't much help with this one! Anecdotally, we've heard industry friends recommend AGAINST using a convection oven for cakes and cupcakes, as the air movement can affect their rise and texture (but again, we haven't tested this ourselves so can't say for sure!) If you want to bake cakes in a convection oven, we recommend Googling some convection oven tips first - and just know that it may take a few tries to get the hang of it!
Our Favorite Cupcake Recipes
Ready to bake? Find your new favorite cupcake recipe in our cake & cupcake collection. Our cupcake (and cupcake frosting!) recipes are tested by multiple recipe developers to ensure they work for you - and each recipe includes step-by-step photos and tons of tips to help you along! A few of our favorites:

Still have a question? Leave a comment below - our team is happy to help!

Almas Azhar
Can we save raw batter in cup liners and freeze them.... later take them out.... bring it to room temperature then bake them.... and freeze batter for how long
Almas Azhar
Can I safe raw cupcakes batter in cupcakes liner.... and freeze them..... then take them out and bring them back to room temperature..... and bake them.... and for how long I can freeze cake batter
Rhonda @ Life As A Strawberry
We don't recommend freezing unbaked batter, as ice crystals can form and alter the texture of the final product. The type of batter can also impact how flavors and textures change after thawing and baking. Since mixing the batter usually takes less than 15 minutes, it's best to bake first, then freeze the cooled cupcakes - before frosting - for best results.