

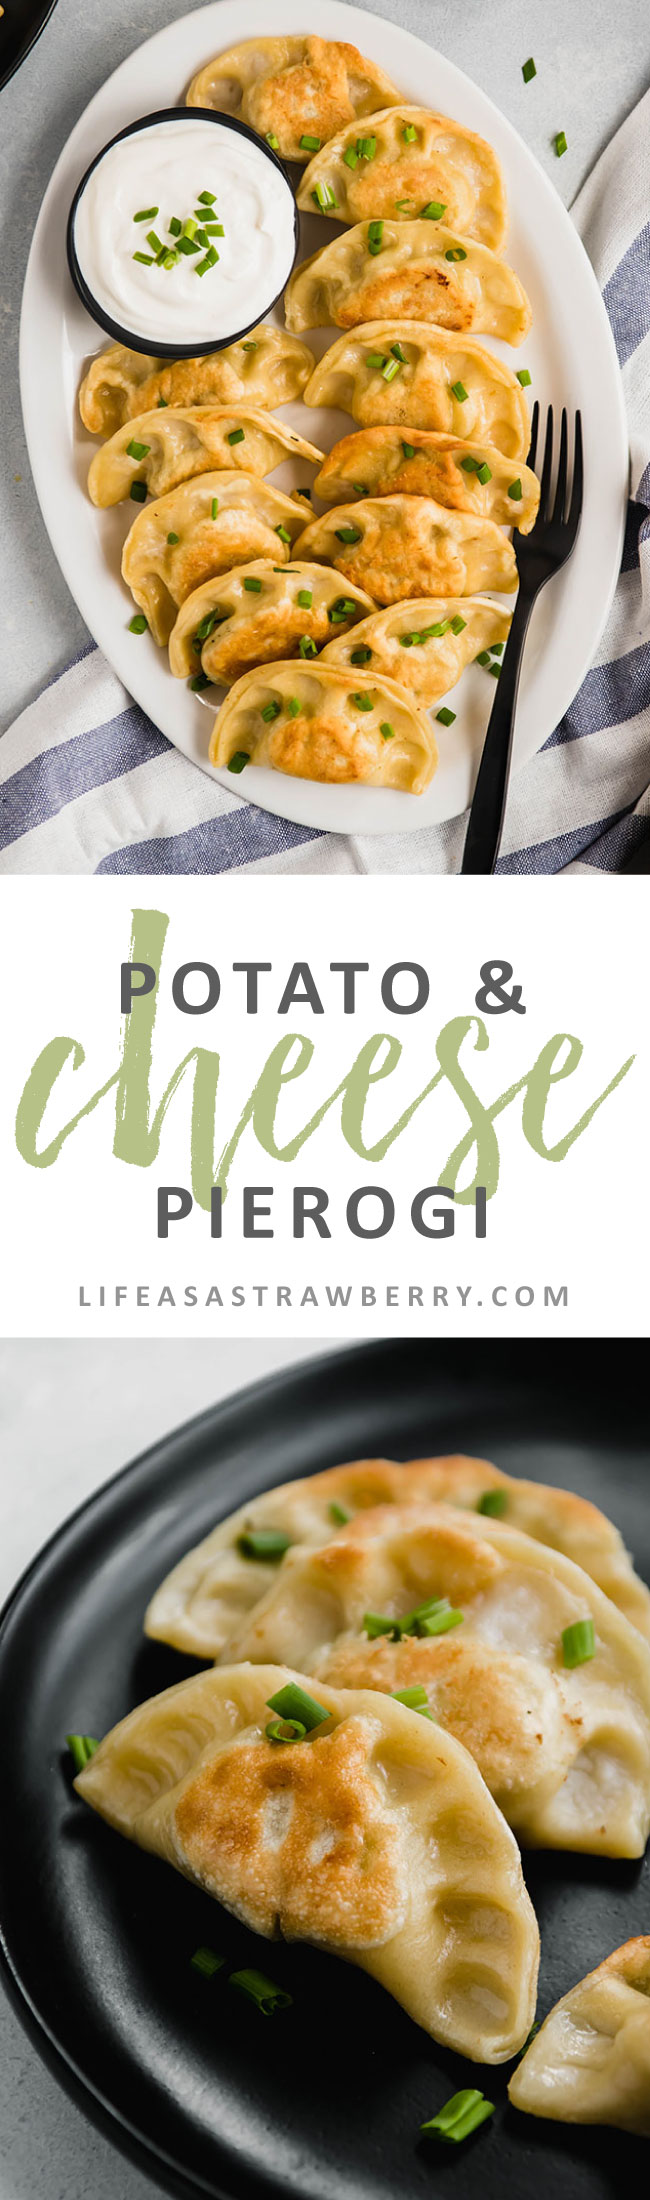
Our favorite homemade potato and cheese pierogi recipe is easy to make ahead and a perfect cozy side dish!

Let's talk pierogi!
These amazing Polish dumplings are surprisingly simple to make (YOU CAN DO IT! I PROMISE!) and a SERIOUSLY delicious side dish for any occasion. All you need is an easy potato cheese filling wrapped up in a soft and cozy pasta dough hug (and then pan-fried in some butter. obbbbbbviously).
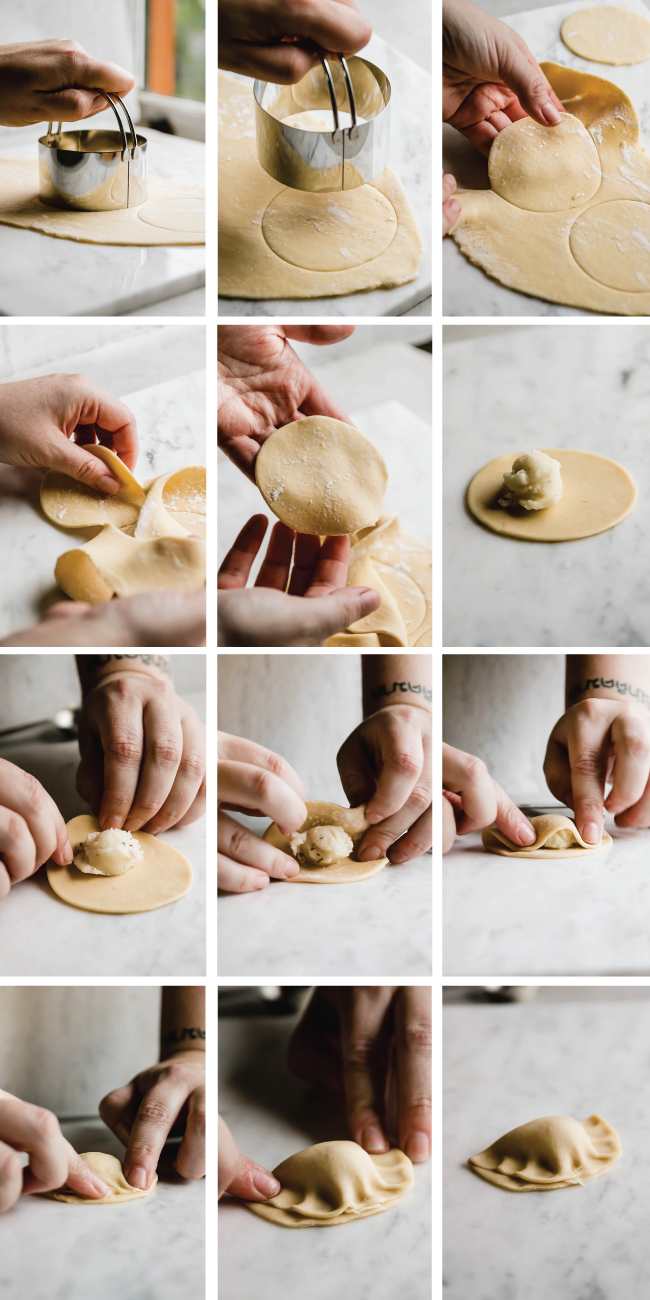
The trickiest part of making pierogi is getting the folding and forming of the dumplings just right - and even then, it really only takes a few pierogi to get the hang of it. Observe:
How to make pierogi:
Pierogi are a staple on our Thanksgiving table every year (shoutout to my part-Polish husband and his family for looping me in on this tradition) and are my single most-requested side dish when friends come over for dinner. I love serving them with a warm sour cream and chive sauce!
Pierogi making is definitely a bit of an undertaking, but please don't be scared by the number of steps! We're breaking it down for you in this recipe so that you can tackle one step at a time (and you can even make them over a few days for maximum easy-peasy-ness!)
This recipe makes about 50 pierogi, so you'll have enough to feed a crowd AND pop some in the freezer for the next few months. Let's do a quick rundown of homemade pierogi FAQ!
How to freeze pierogi:
One of the most common questions I get from friends and readers is can pierogi be frozen? The answer is YES - these pierogi freeze exceptionally well and will keep in the freezer for months.
To freeze pierogi, follow all of the steps to make the filling, roll out the dough, and form the dumplings. When you've formed your pierogi, lay them in a single layer on a lightly floured baking sheet (or a plate! or a cutting board!) and pop them in the freezer for a few hours. When pierogi have frozen, you can transfer them to an airtight container (I love using my Stasher Bag for this!) and store them in the freezer for 3-4 months.
When you're ready to cook them, just pop frozen pierogi directly into a pot of boiling water! Let them cook a minute or two more than you would for fresh pierogi, and then pan-fry and serve normally.
How to make pierogi dough:
When it comes to the dough, pierogi dough is essentially fresh pasta dough (although we add a big ol' dollop of sour cream to give it an extra flavor kick!)
When you initially mix the dough, it may feel a bit tough - but let it rest on the counter for 30 minutes or more and you'll be amazed at how much softer and more pliable it becomes! Pro tip: If you ever notice your dough bouncing back onto itself as you roll it, cover it and let it rest for 10 minutes or so.
If you'd like, you can make the dough a day or two ahead of time and store it - tightly wrapped - in the fridge. When you're ready to use it, let it come all the way back to room temperature on the counter. If the dough has dried out at all, you can knead in a few drops of water to loosen it up and help it soften a little.
To roll the pierogi dough, you can use a rolling pin (pinch of small pieces of dough and roll them into individual rounds, or roll a long sheet and cut rounds with a cookie cutter) but I actually prefer to use my pasta rollers.
Since I usually make pierogi for holidays (and am therefore especially short on time) a pasta roller is my pierogi-makin'-BFF. I currently use my KitchenAid pasta roller attachment (I LOVE IT LIKE WHOA) but before that, I used an old hand crank roller.
Roll out sheets of dough and use a cookie or biscuit cutter to cut out 2-3" dough circles, then fill, cook, and enjoy!

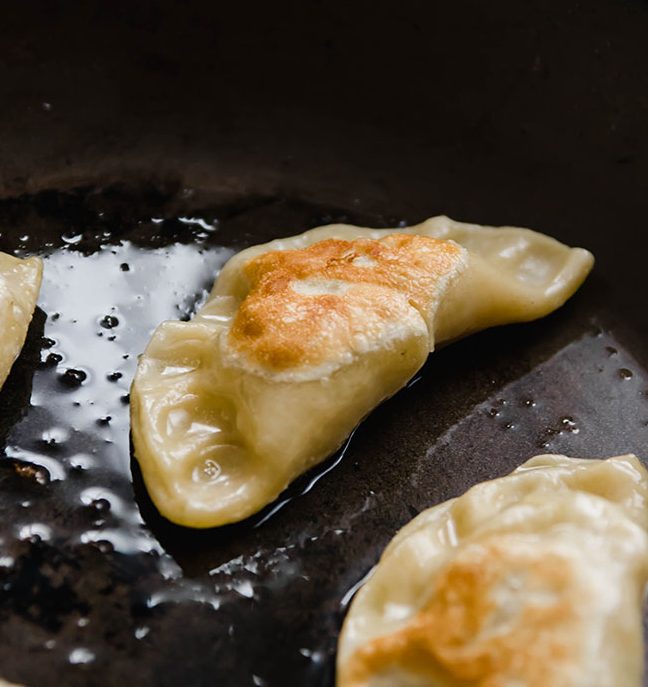
How to cook and fry pierogi:
Cooking pierogi is relatively simple: boil them until they're just about cooked through, and then transfer to a hot skillet with a bit of ghee or clarified butter and brown them up on both sides. It's important to work in batches as you cook your pierogi so that the dumplings have space to breathe and cook in both the boiling water and the frying pan.
Pro tip: I put my boiling water on the burner right next to my frying pan, and then use a spider/strainer spoon to transfer each batch of cooked pierogi from the water to the skillet (that way the water stays boiling and ready for the next batch of pierogi!)
I like to use ghee to fry my pierogi - it's cooked a little longer than clarified butter, which means it has a nice nutty flavor to it. It's also generally easier for me to find at the store (PS - learn more about the differences between types of butter here!) than clarified butter.
The real key here is that you want to fry your pierogi in butter with NO MILK SOLIDS. The milk solids in regular butter are what burn, smoke, and give things a generally funky taste when you fry in them too long. If you fry your pierogi in regular butter, you'll notice that the last batch or two will taste almost burnt - but if you fry in ghee or clarified butter, the last pieróg will taste just as good as the first one!
I've experimented with boiling and frying pierogi ahead of time, storing them in the fridge, and then popping them in a warm oven to heat up again when we're ready to eat. You can definitely do it this way if you're short on time, but I definitely prefer the texture of freshly pan-fried pierogi - so if you can, plan to cook them just before you eat!
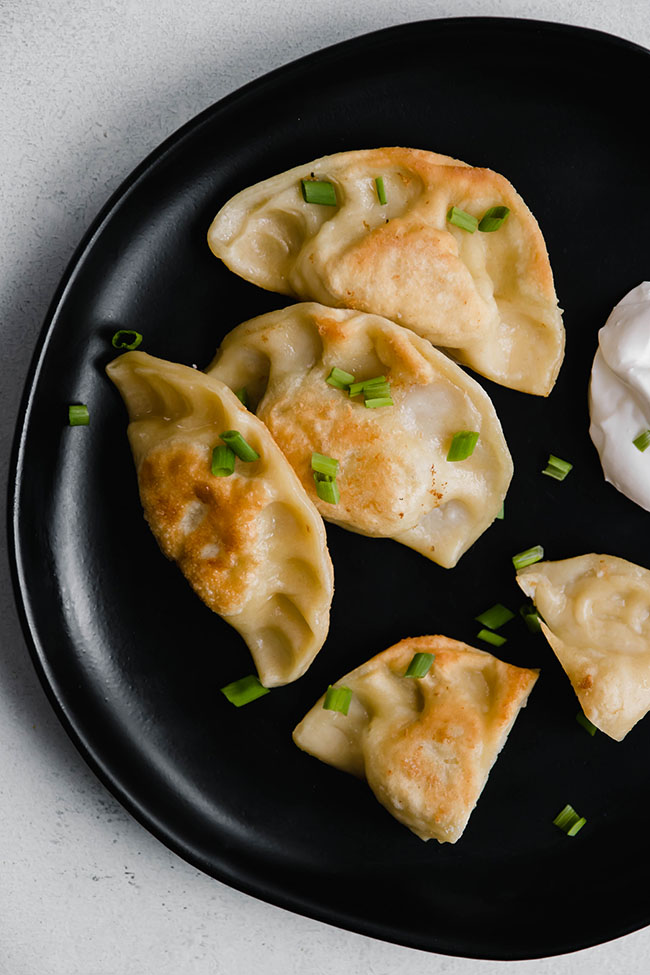
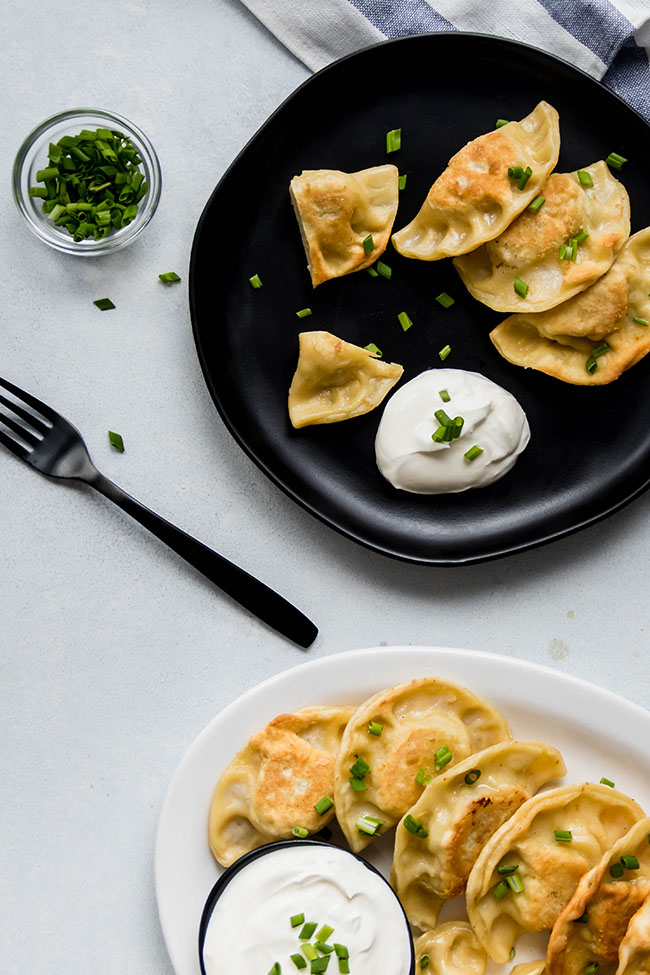
Serve your fresh pierogi with sour cream or plain Greek yogurt on the side, or whip up a batch of our sour cream and chive sauce!
📖 Recipe

Potato and Cheese Pierogi
- Prep Time: 1 hour
- Cook Time: 30 minutes
- Total Time: 1 hour 30 minutes
- Yield: Makes 50 1x
- Category: Side Dish
- Cuisine: Polish
- Diet: Vegetarian
Description
Our favorite potato and cheese pierogi recipe - perfect for entertaining and easy to make in advance!
Ingredients
FOR THE FILLING:
- 1 pound potatoes, quartered (red potatoes work well, but use whatever you have on hand!)
- 2 teaspoons kosher salt
- 2 Tablespoons unsalted butter
- 2 cloves garlic, minced
- ½ large yellow onion, diced
- salt and pepper to taste
- 1 teaspoon dried thyme
- ½ cup parmesan cheese, shredded
- ½ cup fontina cheese, shredded
FOR THE DOUGH:
- 540g (3 to 4 ½ cups) all-purpose flour, plus extra for dusting
- 3 eggs
- 1 tsp. kosher salt
- ½ cup sour cream
- ½ cup water (you may not need it all)
FOR COOKING & SERVING:
- 4 Tablespoons ghee or clarified butter, for frying
- 3 Tablespoons fresh chopped chives
- Sour cream or sour cream and chive sauce, for dipping (optional)
Instructions
MAKE THE FILLING:
- Add potatoes to a medium-sized pot. Cover with water, add 2 tsp. of salt, and bring to a boil. Cook for 20-30 minutes or until they can be easily pierced with a fork.
- Drain the potatoes in a colander. Return the pot to the stove.
- Add butter to pot and melt over medium-high heat.
- Add garlic and onion to pot. Sauté 3-4 minutes, stirring occasionally, until onion is translucent.
- Add salt, pepper, and dried thyme to pot and stir to combine.
- Return potatoes to the pot with the onion mixture and mash with a potato masher until potatoes are relatively smooth.
- Add fontina and parmesan cheeses to potato mixture. Stir until cheese is melted.
- Let your potato mixture cool for at least 30 minutes before you form the pierogi. You can also let them cool completely and store in an airtight container in the fridge for a few days until you're ready to make the pierogi (makes for less work later!)
MAKE THE DOUGH:
- In the bowl of a stand mixer fitted with a paddle attachment (or in a large bowl), mix flour, eggs, salt, and sour cream together.
- Add 1-2 Tablespoons of water at a time to your flour mixture, mixing dough (or kneading with your hands) in between each addition. Dough is done when it comes together and feels relatively smooth but not sticky.
- Turn dough out onto a lightly floured surface. Cover with a tea towel and let rest for 30 minutes. (If you're making the dough ahead of time, wrap it tightly and store in the fridge for 1-2 days. When you're ready to use it, let it come back to room temperature on the counter before you roll it out).
FORM THE PIEROGI:
- Set a small dish of room-temperature water next to your workstation.
- Roll dough with a rolling pin or pasta roller until it's about ⅛" thick (I roll to the "2" setting on my pasta roller).
- Cut dough into circles with a 2-3" cookie/biscuit cutter or an upside-down water glass.
- Put about ½ tsp. of filling in the center of each dough circle. Dip a finger or a pastry brush into your dish of water and run it along the edges of the dough - this will help form a tight seal.
- Fold the top of the dough circle over the filling and pinch the ends together with your fingertips to seal the pieróg. I like to start pinching the dough together in the center of the arch and work my way to the edges – this gives me more control over the edge and lets me make a scalloped (ish) finish. It takes some practice – take a look at the pictures in this post for some guidance, and don’t give up!
- Transfer formed pierogi to a lightly floured sheet pan or cutting board. Cook immediately or cover and store in the fridge for up to 24 hours. If you're making them more than a day ahead of time, place pierogi in a single layer on a floured baking sheet and freeze, then transfer to an airtight container for up to 4 months (more tips on this in the body of this post above!)
COOK THE PIEROGI:
- Bring a large pot of water to a boil and add a Tablespoon or so of kosher salt.
- Add 5-6 pierogi to the boiling water and cook for 4-5 minutes until cooked through. You'll know the pierogi are done when you give them a stir and they float to the top.
- While the pierogi boil, heat a Tablespoon of ghee in a large nonstick skillet over medium-high heat.
- When boiled pierogi are ready, use a slotted/spider spoon to transfer pierogi to hot skillet. Fry for about 2 minutes per side until lightly browned, then transfer to a plate or serving dish.
- Repeat steps 2-4 with remaining pierogi.
- Garnish cooked pierogi with fresh chopped chives and serve immediately with sour cream, sauerkraut, or a quick sour cream chive sauce.
Notes
This recipe and its photos were recently updated to streamline the instructions and add additional notes.
I have a TON of tips to make these pierogi taste amazing - please read through the entire blog post above for the bulk of the recipe notes!
Use ghee or clarified butter to fry your pierogi - if you use regular butter, the solids can start to burn by the last batch of pierogi (resulting in a funky taste).
If your pierogi dough is too sticky, knead in a little more flour. Too dry? Knead in a few drops of water. Dough should resemble smooth pasta dough. For best results, use a kitchen scale set to grams to measure your flour for this dough, as flour measured by volume (in cups) can vary quite a bit!
The potato filling here will be much drier than traditional mashed potatoes.
I generally leave the skins on my potatoes in this recipe, but you can definitely peel them if you like! For some general tips on mashed potatoes, check out Mashed Potatoes 101.
If you don't have any sour cream, leave it out of the pierogi dough and use an extra egg or an extra splash of water instead.
I like the mix of parmesan and fontina cheeses in this pierogi filling, but use whatever you have on hand! The filling is also great with white cheddar, brie, asiago, gouda, manchego - you name it. You can even add sour cream to the filling if you like!
Serve pierogi with sour cream, sauerkraut, and/or caramelized onions, or drizzle with sour cream and chive sauce.
Strict vegetarians should look for cheeses made without rennet.
Adapted from My Gourmet Connection
Nutrition
- Serving Size: 5 pierogi
- Calories: 399
- Sugar: 1.2 g
- Sodium: 768.4 mg
- Fat: 16.1 g
- Carbohydrates: 50.5 g
- Protein: 12.5 g
- Cholesterol: 86.9 mg


Elenchass
Absolutely love it! I keep making it all over again and everyone is crazy about it. My fav pierogi recipe 🥰😍
Team Life As A Strawberry
YIPPEE! We're so glad you love it!
Shelly
SUCH A GREAT RECIPE! I have made these multiple times already and they freeze great!
Jim
These are delicious. If you carefully measure your flour they turn out perfect.
Mei
I was dying to try these. but no matter what I do, the dough is a sticky, gluey mess. Followed the directions to a T twice. I'm not a novice baker. Neither adding or flour or water is helping. I wonder what I'm doing wrong...?
Liz
Oh my gosh! Me, too!
Sharyn Frisbie
What thickness do you roll out the dough. I have a dough roller (hand cranked) and rolling pin equipment to allow me to roll dough out to any thickness, What do you do? Can't wait to try these.
Christopher
Thank you for the recipe! I love these things! They're easy to make and I love the flavor!! Great Job!!
Jessie
Thank you so much!
Kathy
I have tried many dough recipes (including my mom's! ). This one has been the best. I think the flour to egg ratio, along with the sour cream makes it work so well. So glad my search is over! Thanks!
Jessie
I'm so happy you liked it! Thanks for letting me know how it turned out!
Alex Mudryk
Hi Jessie,
I just want to say thank you so much for this. My mother made these for me when growing up and has since passed away and I did not have the recipe and my children also remember them. I thought I would not be able to have them again let alone make them. But last weekend I made them and it was just like my moms. They will never be the same but was close enough for keeping the family happy. So thank you so much.
Jessie
Hi Alex, thank you so much for your comment! I'm so sorry for your loss, and I'm honored that this recipe could help you recapture such a special childhood dish 🙂 Thank you for letting me know how the pierogis turned out!
natashagreen
if yi live near Pittsburgh, PA......go any friday early to St. Mary's church in Abridge, PA. for the best pierogi in the world
Chris
Or the Ukrainian Orthodox church in McKee's Rocks.
Denise
Do you leave skins on potatoes?..it looks like you did in pic.....
Jessie
I do leave the skins on! Mostly, I'm just too lazy to peel the potatoes (hah), but if you prefer to skip the skins you can absolutely peel the potatoes before cooking. I really don't mind the skins though - you can't even taste them in the finished pierogis 🙂
Jamie
I talked about this post on my blog - just fyi
Jessie
Thanks, Jamie!
Megan
Could you possibly post how to freeze these? I like to make ahead meals, and this sounds delicious!
Jessie
Thanks, Megan! To freeze, I lay pierogis out in a single layer on a baking sheet lined with wax paper, then put the whole baking sheet in the freezer. When the pierogis are frozen, I remove them from the baking sheet and put them in a big Ziploc bag, then put the bag back in the freezer until I'm ready to use them. You can put the frozen pierogis right into the boiling water when you're ready to prepare them - if you let them come back to room temperature before boiling, they end up sticking together which is no fun. Hope that helps! I tend to make a huge batch of these around the holidays and keep them in the freezer so we can eat them all year round 🙂
David Bialik
I just ate strawberry-cheese pierogis fresh from Poland. Holy smokes they were amazingly good! Kraut and mushroom pierogis are waiting in the fridge still. I must find recipies!
Jessie
Those sound amazing! I'll definitely put them on my must-try list!
Laura
David, those strawberry and cheese pierogis sound amazing. Getting ready to make some can't wait to try them.
dorothy church
I would like to try the pierogies--sauerkraut & cheese pierogaries