

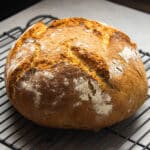
This crusty whole wheat bread is one of our most-requested recipes ever. Instead of kneading, you'll gently fold the dough over on itself a few times as it rises: This creates an elastic, easy-to-shape dough and a taller loaf (with minimal effort!) Ready in just three hours, this recipe is baked in a Dutch oven for a crispy crust with a soft interior.


Whole wheat brings rich, complex flavor to this loaf of homemade bread.
Because whole wheat flour contains ALL the pieces of a wheat berry, it has more texture (and absorbs more water) than all purpose flour. This key difference is the reason some whole wheat baked goods feel dense or heavy, but don't worry: We'll walk you through a simple technique - called a stretch and fold - that develops gluten and strengthens the dough in order to keep this whole wheat bread soft and light.
Use fresh, high-quality whole wheat flour here! It should smell nutty and slightly sweet, but not dusty.
PS: If you're new to bread-making, we recommend starting with our beginner-friendly no-knead bread recipe. Once you're comfortable with the basic techniques and equipment, move on to this whole wheat bread recipe!
Find in-depth (and ad-free!) baking resources in our Everyday Artisan Bread course. And don't forget: The most important ingredient in homemade bread is practice.
Baking Timeline
This recipe takes about 3 hours start-to-finish. Here's a quick overview:
- Mix the dough: 15 minutes
- Three sets of stretch and folds: 45 minutes
- First rise: 45 minutes*
- Shape the loaf: 10 minutes
- Final rise: 30 minutes*
- Bake: 40 minutes*
*Inactive time
Ingredients overview
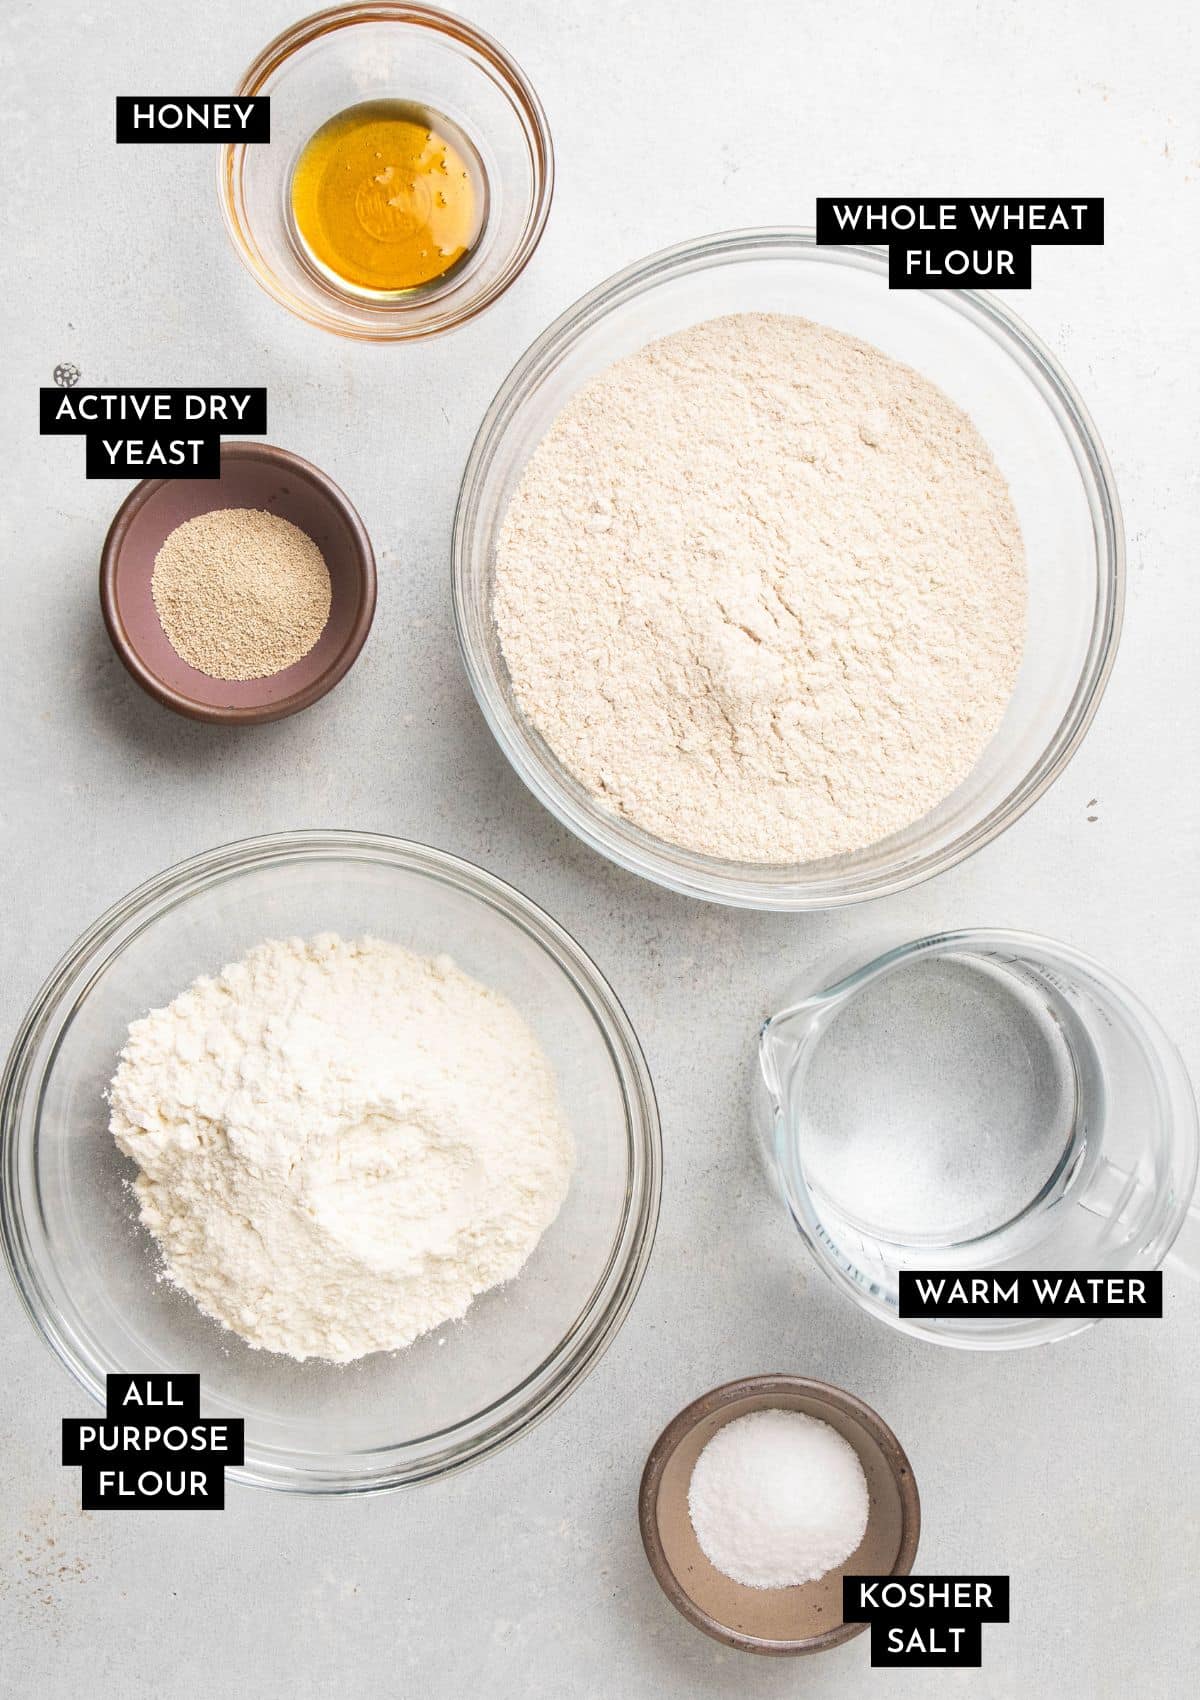
Find a full ingredients list with exact quantities in the recipe card below.
- All Purpose Flour keeps this dough ultra-forgiving by guarding against some common issues new bakers face with 100% whole wheat recipes. In our testing, adding a bit of AP flour yielded the best texture on a quick timeline across several brands of whole wheat flour. Find tips and advanced techniques for 100% whole wheat bread in the FAQs below.
- Honey helps jumpstart our yeast. Swap it for granulated sugar if you like.
- Warm water. Use water that's “warm to the touch,” about 95° to 110° Fahrenheit.
Whole Wheat Flour
All purpose flour is milled from only the centermost piece of a wheat berry - called the endosperm - but whole wheat flour uses the entire wheat berry. This creates a fairly heavy, absorbent flour with lots of texture and variation.
Because wheat flours are milled with a range of wheat varieties and processing methods, results can vary by brand. We test our recipes with - and highly recommend - King Arthur flours. They're incredibly consistent from bag to bag, and continually yield the best results in our recipe testing.
Use fresh whole wheat flour: It should smell slightly sweet and nutty, but not musty or stale. (If your flour smells dusty, that's how the bread will taste!)
→ Learn more about baking with whole wheat flour in our Everyday Artisan Bread course!
Use a kitchen scale
Measuring ingredients like flour by volume (with a measuring cup) is notoriously unreliable: Because everyone fills a cup of flour a little differently, it's easy to accidentally use too much and end up with dry, dense bread.
But when you use a kitchen scale to measure by weight (in grams), you get a perfect measurement every time. So if you have a scale, please use it! (No scale? Measure ingredients like flour with the scoop and level method!)
Instructions
Mix the dough
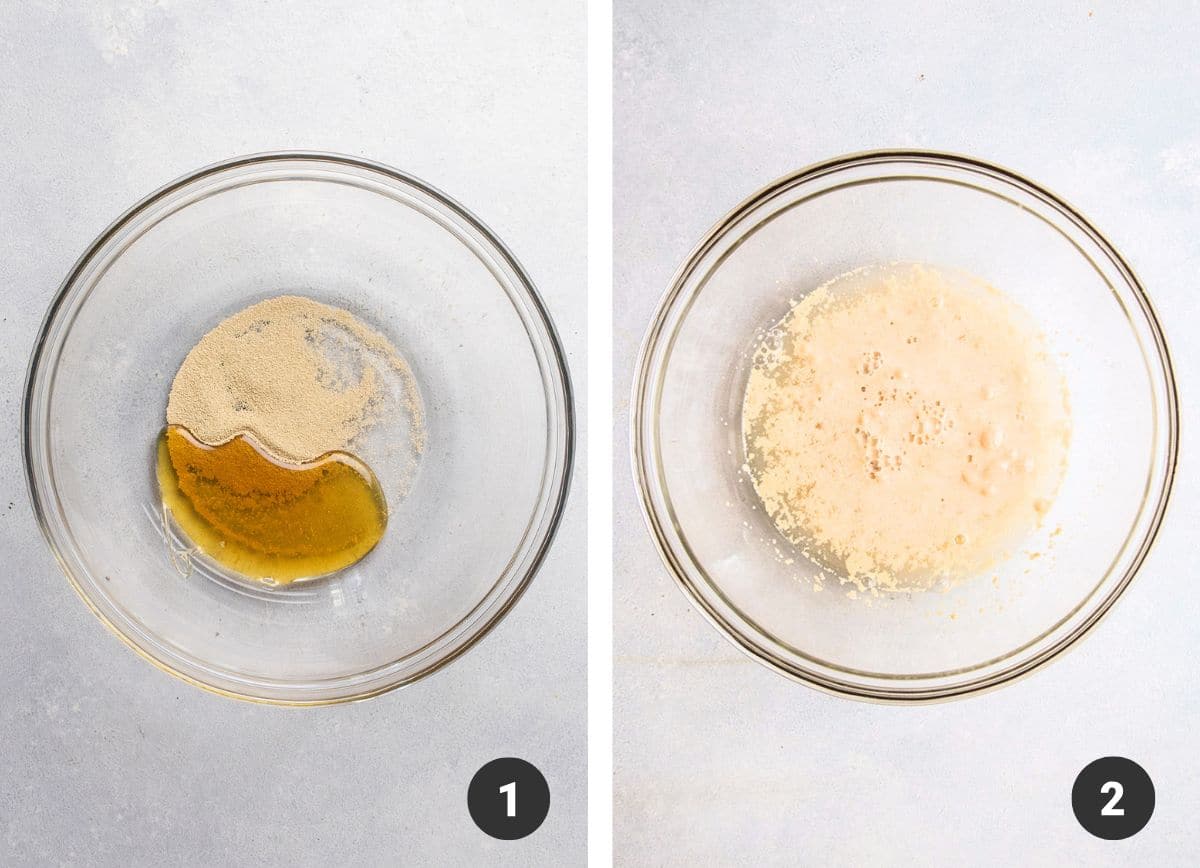
Proof active dry yeast in warm water with a bit of honey until it's foamy.
Equipment note: We prefer mixing bread dough by hand with a sturdy spoon or spatula; you can also use a stand mixer fitted with the dough hook attachment.
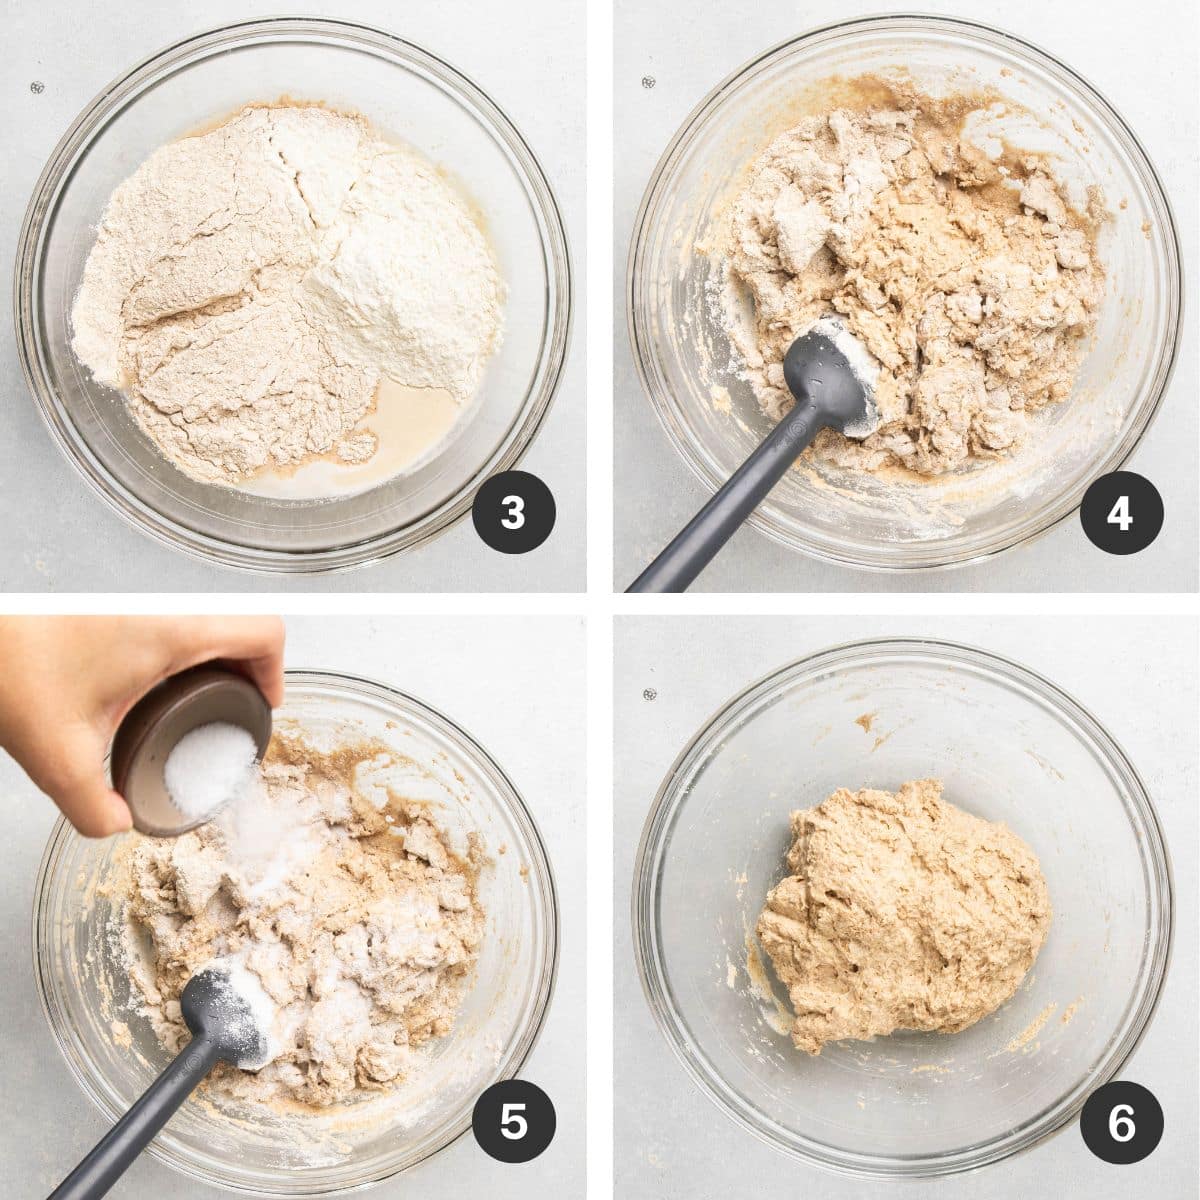
Add whole wheat and all purpose flours. Stir until halfway combined, then sprinkle kosher salt across the surface of the dough. Continue stirring until the dough is uniform and no dry flour remains.
Once mixed, cover the dough with a clean tea towel. Let it rest at room temperature for 15 minutes before moving on to the next step: Stretch and folds!
You'll have a shaggy, sticky dough right after mixing. It won't form a tight, elastic ball or pull away from the sides of a mixing bowl: That's ok! Our goal is just to make sure all of the flour is saturated with water.
3 Sets of "stretch and folds"
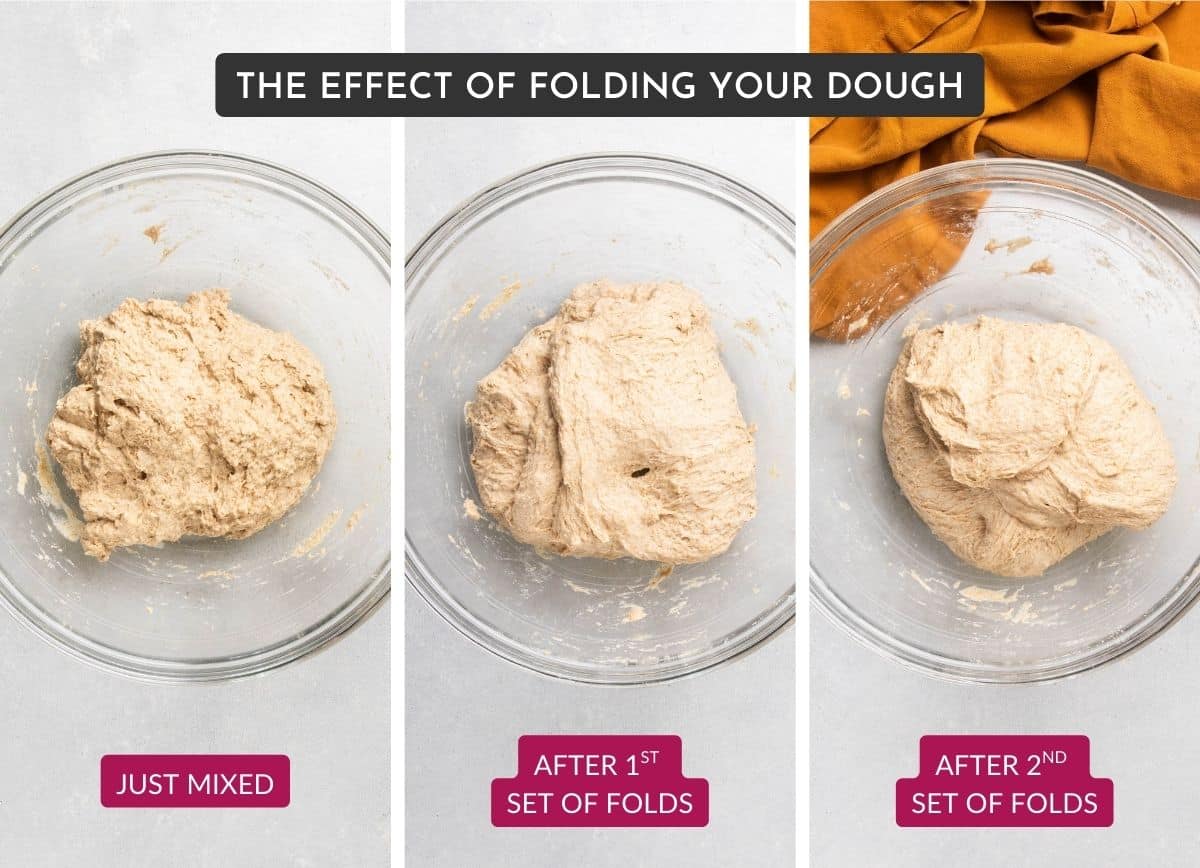
After the initial 15-minute rest, it's time to perform our first set of stretch and folds! This simple technique promotes strong gluten development in the dough, which makes it stronger and creates a taller loaf of bread with more developed flavor.
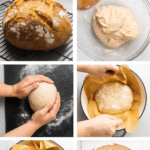
First set of stretch and folds
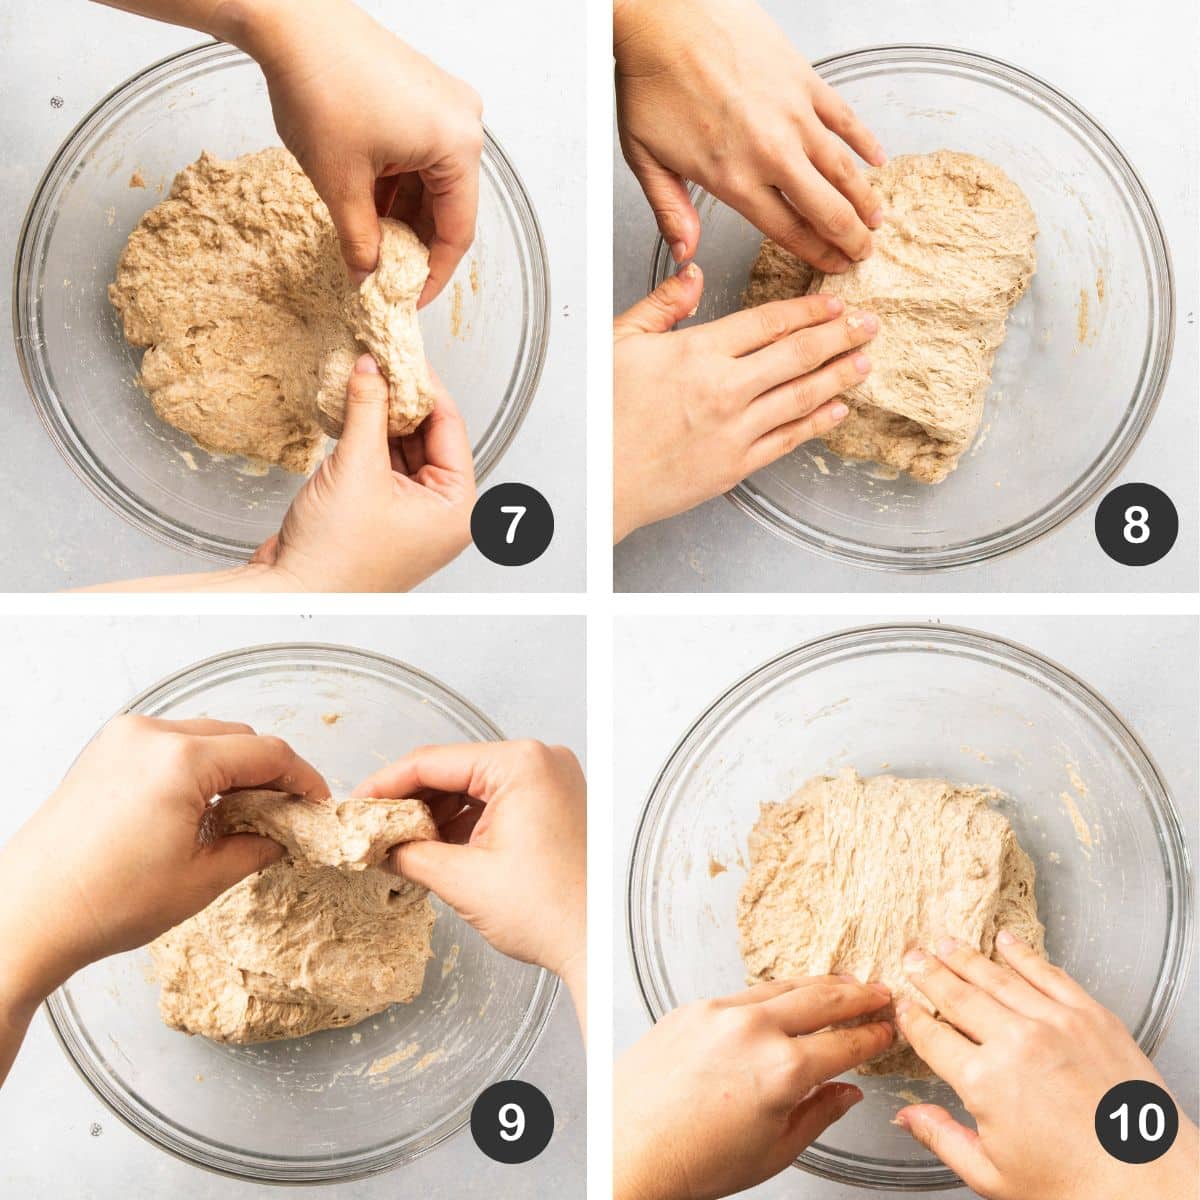
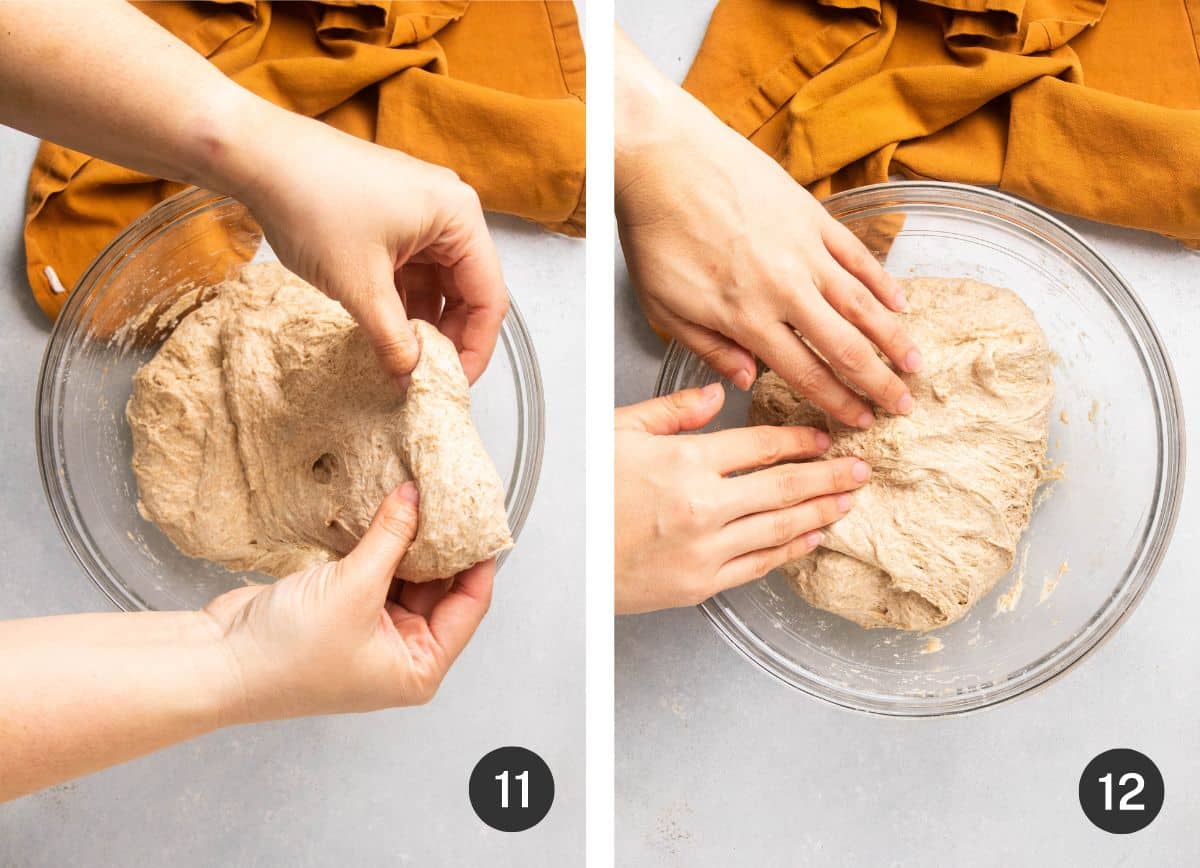
To perform a set of stretch and folds, run your hands under a bit of cold water (this prevents the dough from sticking) and slide your hands under the dough. It should feel loose and a little sticky.
Gently pull one side of the dough straight up about six inches, then fold it over and towards its center (like folding an envelope). Repeat this process on each side of the dough (run your hands under some more cold water if it starts feeling too sticky!)
With each fold, you'll feel the dough tighten and resist the movement a little bit more. It will also look smoother as you go! Re-cover the dough with a clean tea towel and let it rest another 15 minutes. (You'll repeat this process twice more, for a total of three sets of stretch and folds!)
Why stretch-and-folds?
Because whole wheat flour includes the tough outer layers of a wheat berry, it contains lots of coarse pieces with sharp edges. Those edges can cut through developing gluten strands as you mix the dough, weakening the structure and causing a dense, heavy loaf.
But as the dough rests, those sharp pieces absorb water and begin to soften. Stretch and folds then reorganize and strengthen the developing gluten networks - creating a noticeably smoother, more elastic dough:
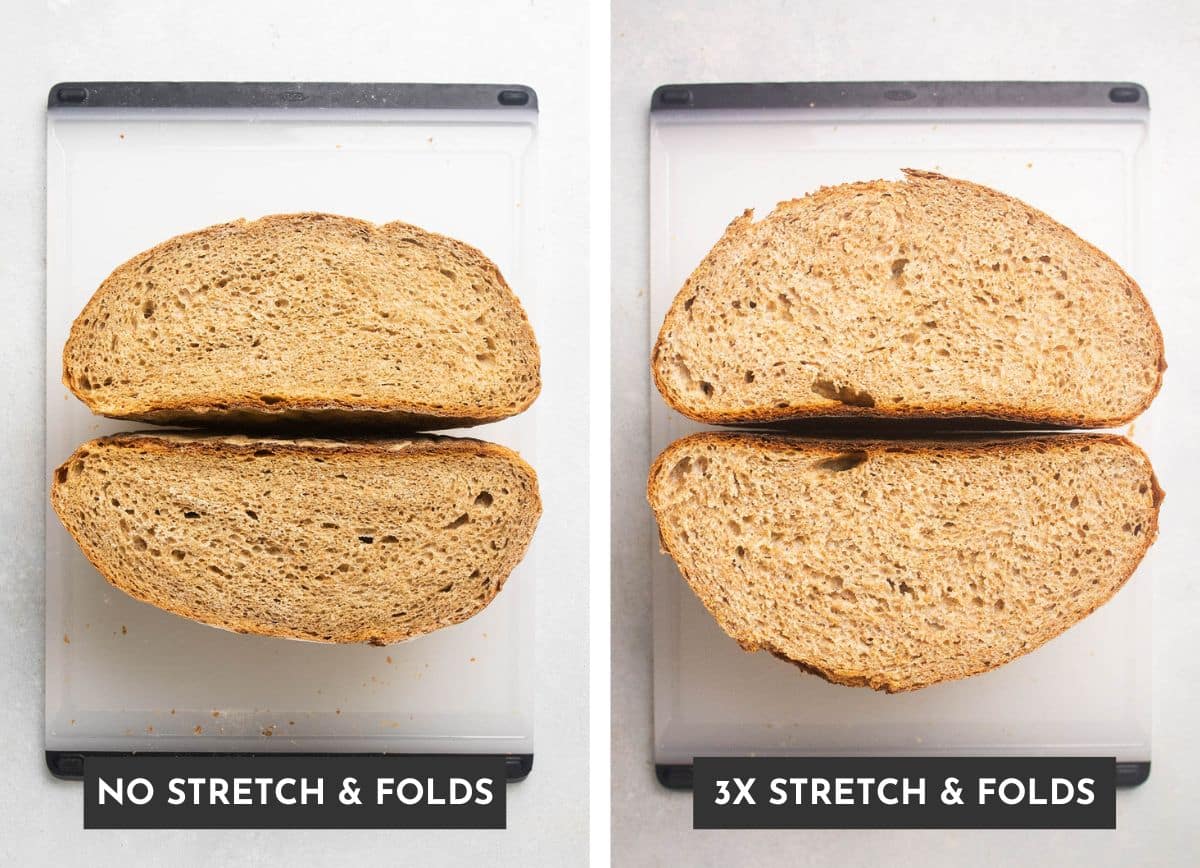
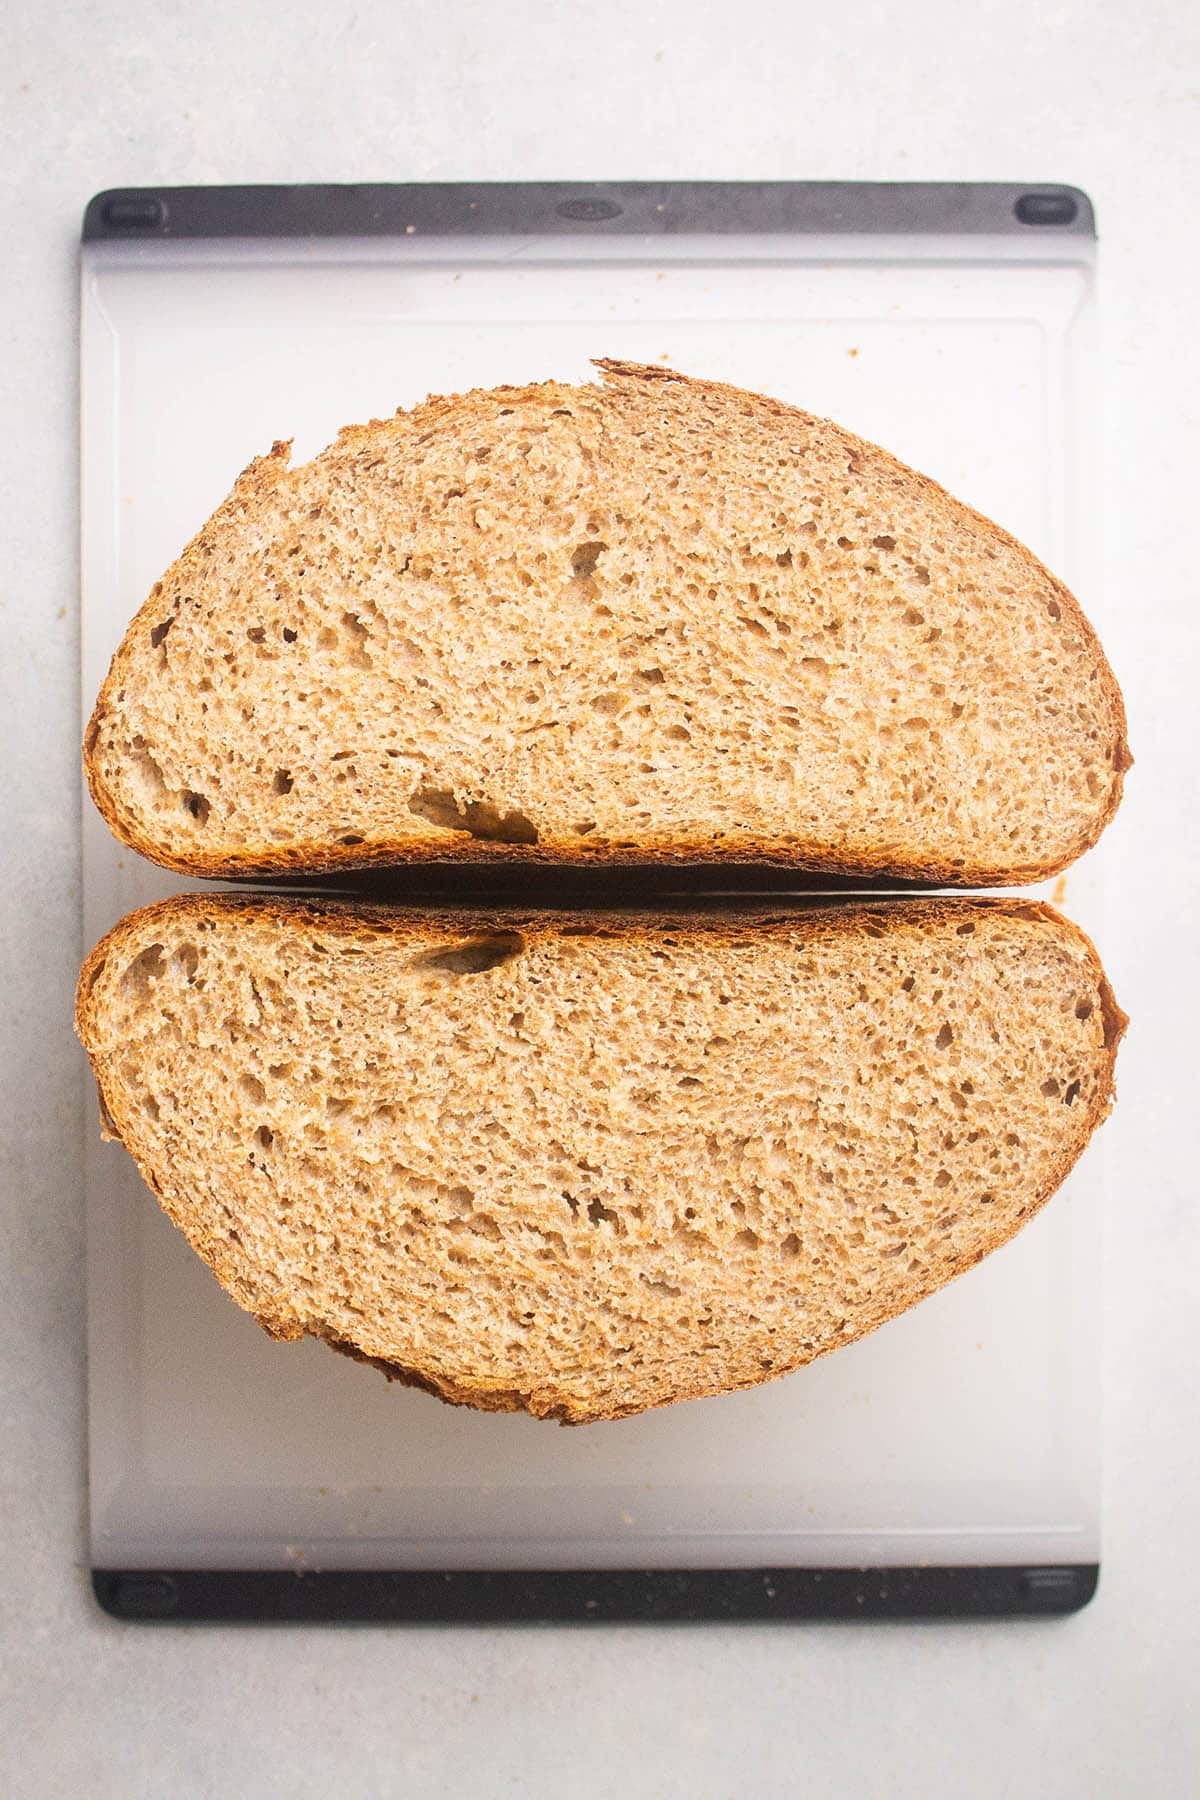
Strong gluten development creates a stretchy dough that's fairly easy to shape. It also gives you a taller loaf with a more even crumb:
Second set of stretch and folds
After the second 15-minute rest, perform a second set of stretch and folds. Cover the dough and let it rest for another 15 minutes.
Third set of stretch and folds
Perform a third and final set of stretch and folds. The dough should feel noticeably smoother and more elastic: This means the gluten networks are developing nicely!
Let the dough rise
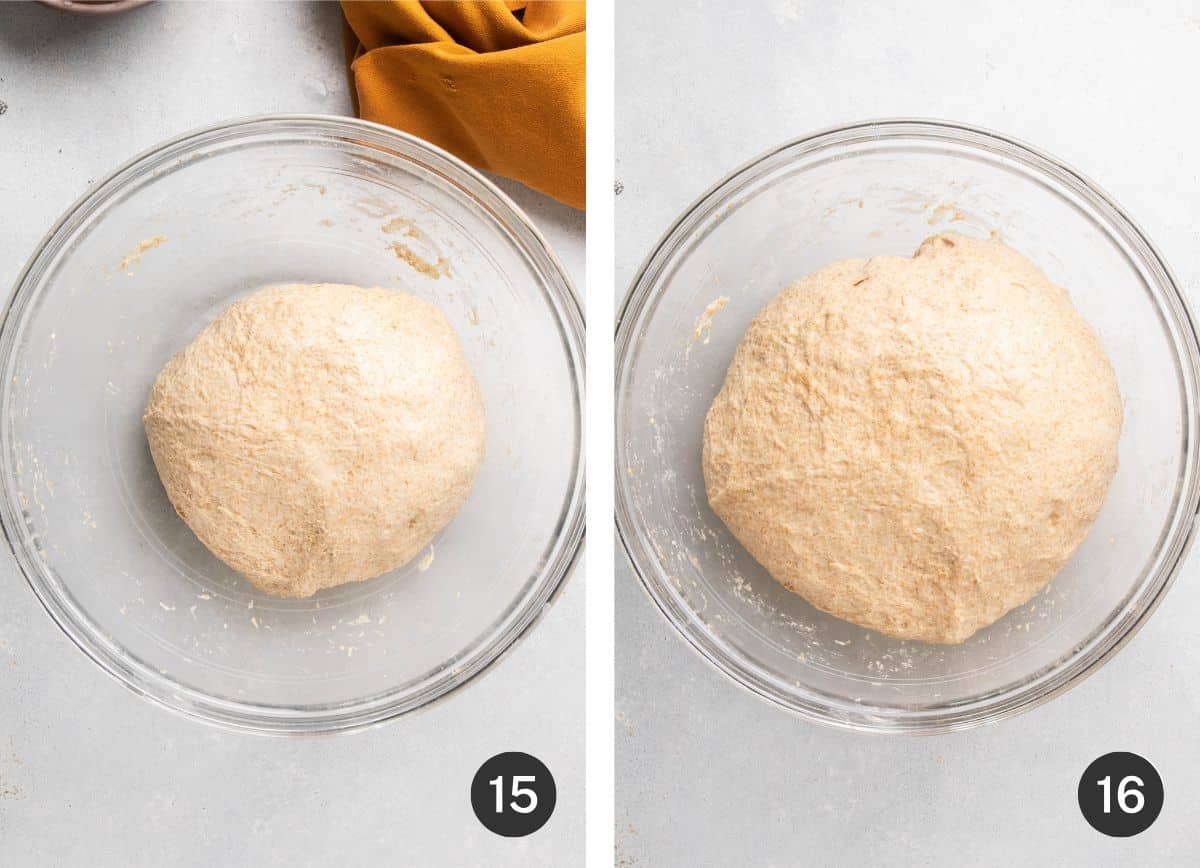
Once you've completed your third and final set of stretch and folds, it's time to let the dough rise undisturbed. Cover the dough with a clean tea towel and let it rise in a warm place for about 45 minutes.
Pro Tip: The dough may not fully double in size - that's ok! We're just looking for some noticeable movement.
Shape the dough
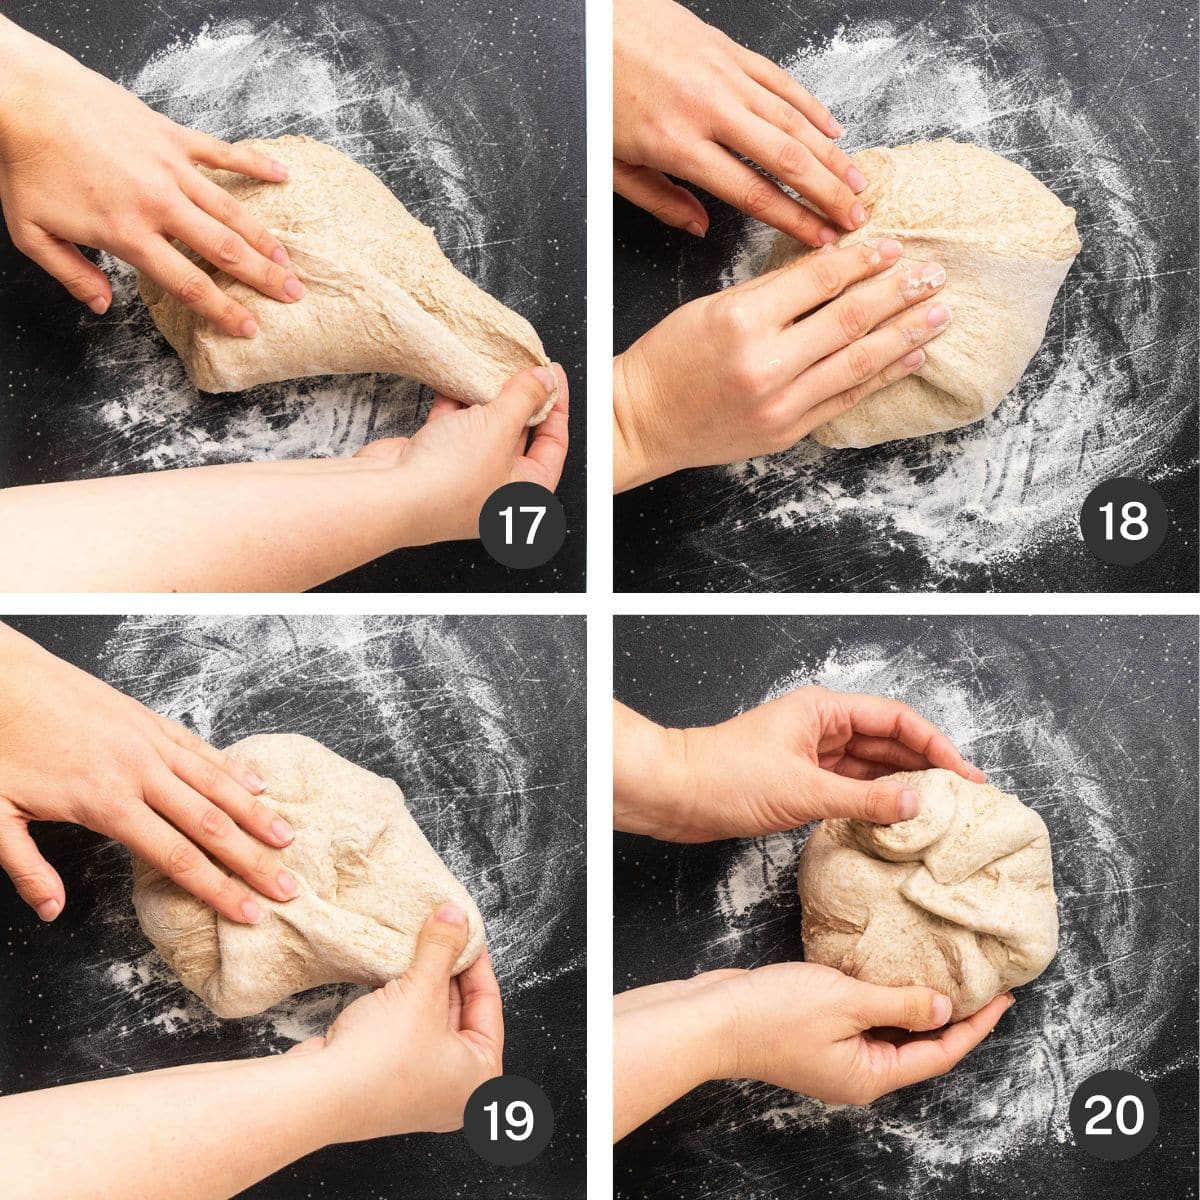
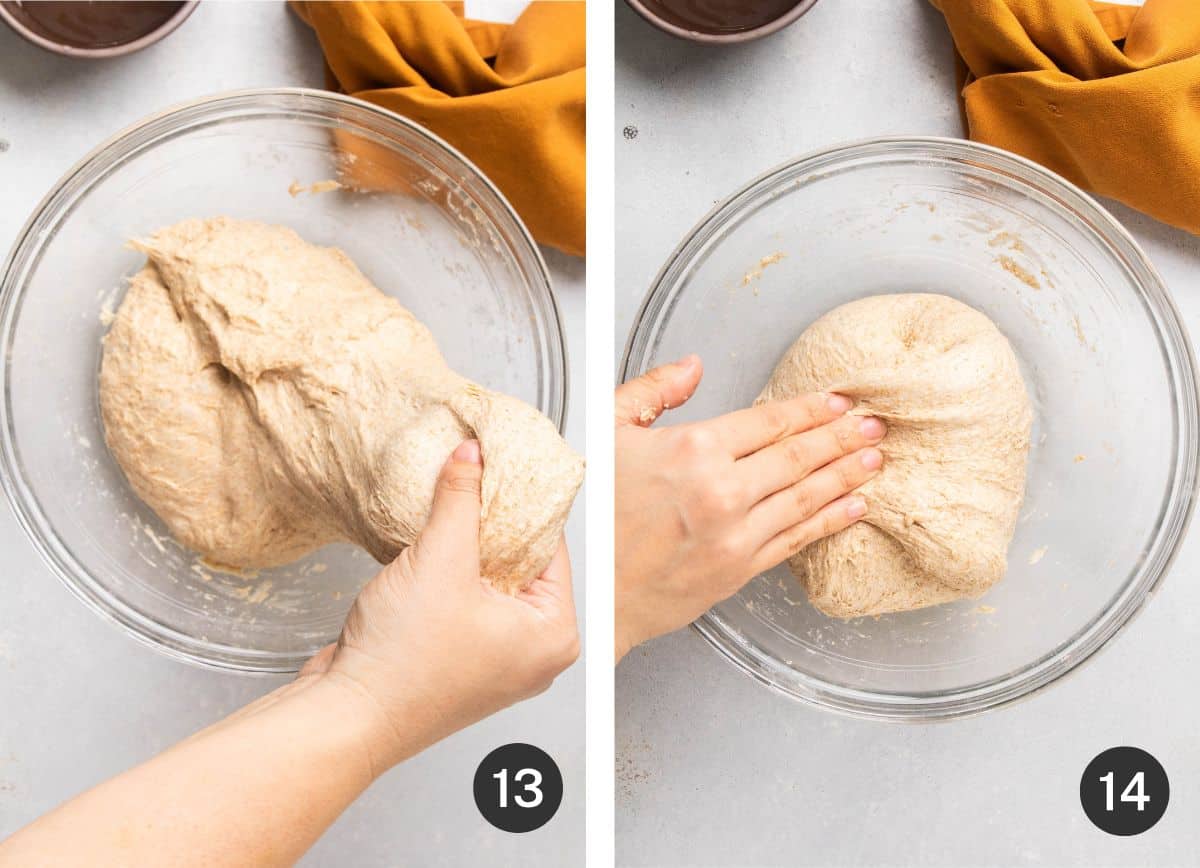
Tip dough onto a lightly floured cutting board. Gently fold the dough into shape by pulling each side in towards the center (think of it like folding an envelope!)
Continue folding the dough - pulling one edge at a time in towards the center - until it begins to tighten and resist your folds.
Shaping bread dough can take some practice! It will feel easier and more intuitive the more you do it. See a video tutorial in our asiago bread recipe.
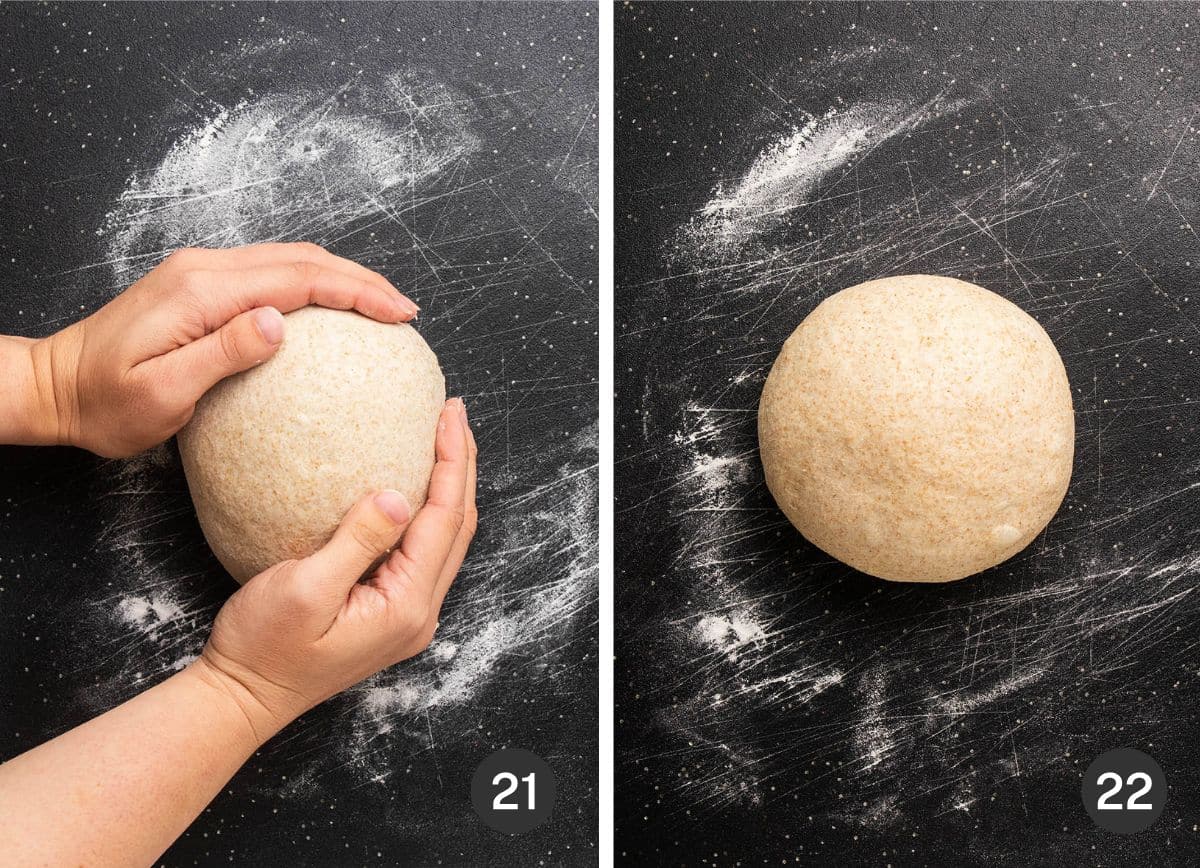
Flip the loaf over and gently pull it towards yourself, letting the underside drag slightly along the cutting board. This tightens up the seams you created and helps the loaf hold its shape!
Final Rise
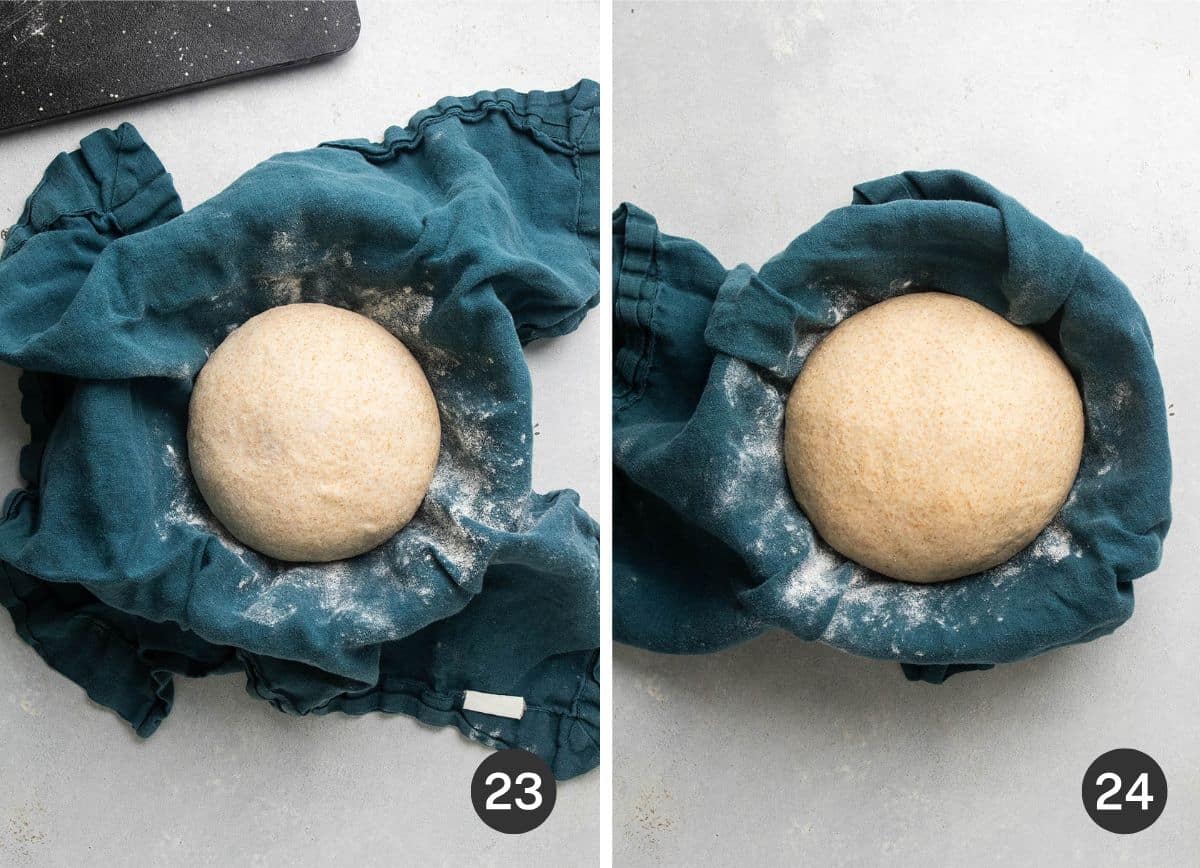
Line a proofing basket or a small mixing bowl with a linen napkin; lightly dust with flour. Place your shaped dough seam-side down into the proofing basket, then cover and rest for 30 minutes.
Preheat your oven and Dutch oven while the bread does its final rise!
Bake
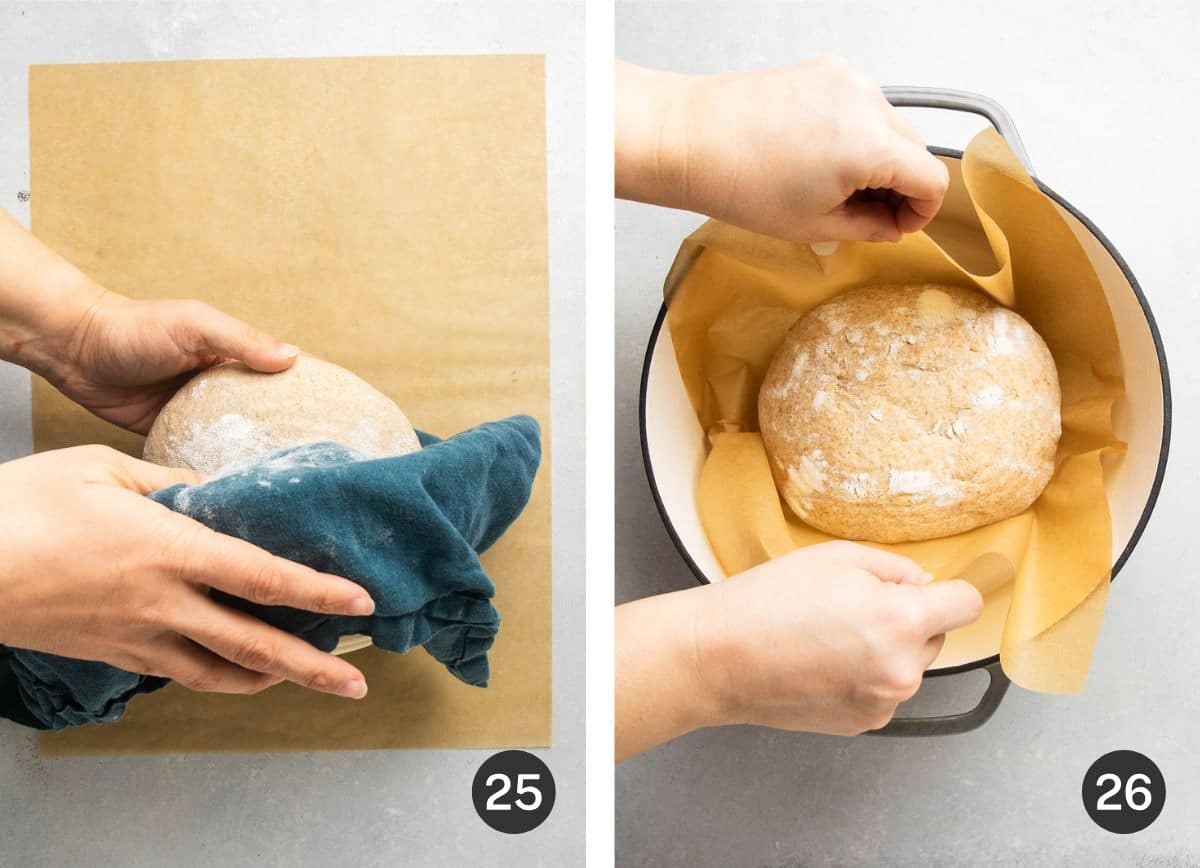
Turn your loaf out onto a piece of parchment paper (this makes it easier to lift the bread in and out of a hot Dutch oven!) Make sure the seam-side faces up: The seams let steam escape as the bread bakes, creating beautiful cracks on top of the loaf.
Carefully lift the parchment into a preheated Dutch oven; place the lid on top and transfer the pot to your preheated oven. Bake for 30 minutes, then remove the lid:
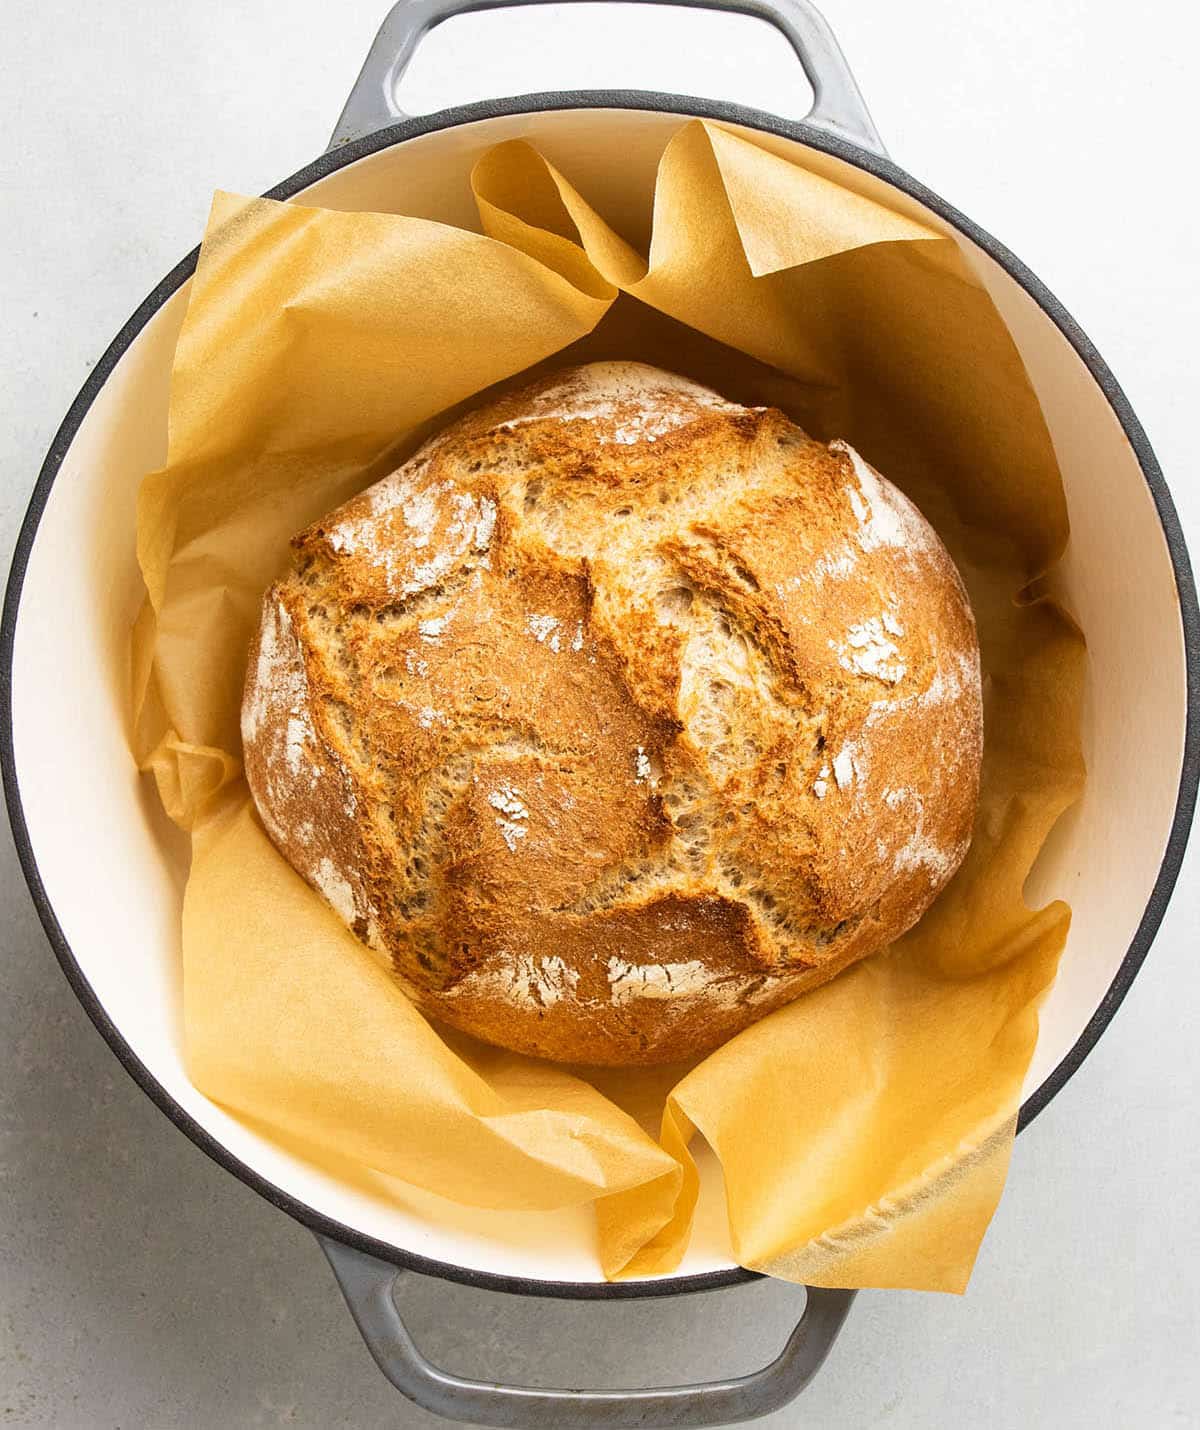
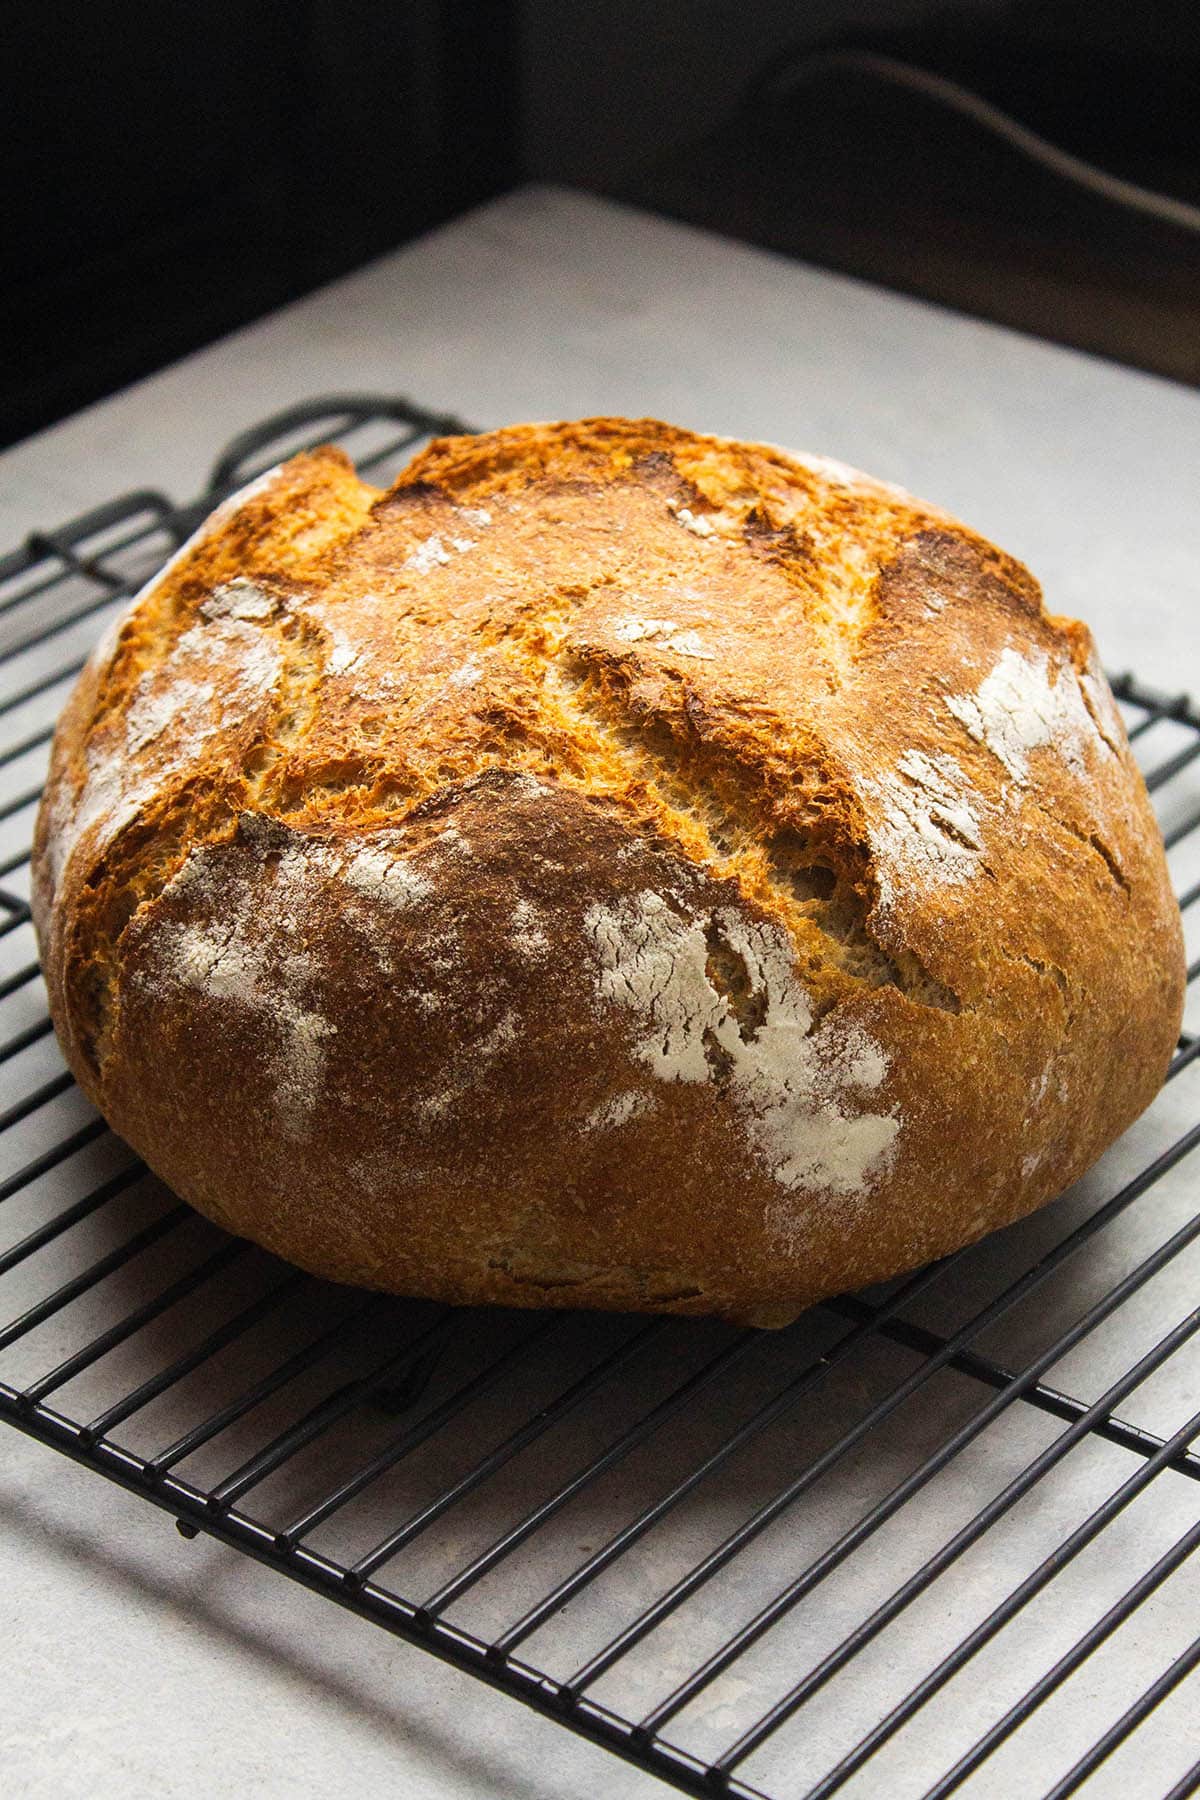
Return the pot to the oven (without the lid) and bake another 5-10 minutes, until the crust is a deep golden brown. Carefully remove the bread to a wire cooling rack, and let it cool for at least half an hour (preferably a full hour) before slicing!
No Dutch oven? Try one of our recipe tester-approved methods to bake bread without a Dutch oven!
Storage
Store sliced bread in an airtight container on the counter for 3-4 days, or freeze for up to 6 months.
This bread freezes very well, especially if it's already sliced: Defrost it for a few hours on the counter when you're ready to use it, or pop frozen slices directly into a toaster or hot oven.
FAQs
Whole wheat flour brands can vary quite a bit; we include a touch of all purpose flour in all of our whole wheat recipes to ensure you get a consistent result regardless of the whole wheat flour brand you use.
You can absolutely use 100% whole wheat flour in this recipe, but just know that the brand of whole wheat flour you choose will have a big impact on the final result. We test all of our recipes with - and highly recommend - King Arthur Flours. They are high quality, have great flavor, and are remarkably consistent from bag to bag. We have also successfully tested this recipe with whole wheat flours from Wegmans, Bob's Red Mill, Kroger, and Fred Meyer.
King Arthur Regular Whole Wheat flour or Organic Whole Wheat Flour will yield the best results here. Both are milled from hard red wheat and deliver rich, complex flavor without feeling dusty or stale. Both of these flours also work well in a 100% whole wheat version of this homemade whole wheat bread.
If you're using another brand of whole wheat flour, we recommend making this recipe as written the first time, and increasing the amount of whole wheat flour slowly once you're comfortable with the dough and the process. It's also important to use freshly purchased flour that smells nutty and slightly sweet, rather than dusty.
We have NOT tested this recipe with locally milled whole wheat flours, rye or spelt flour, King Arthur's Golden Wheat flour (which is milled from a hard white spring wheat, as opposed to a hard red wheat), or any whole wheat pastry flour. Whole wheat flours can vary quite a bit: If you use a different brand, it may require small adjustments.
Learn more about whole wheat flour (and get exclusive, ad-free recipes!) in Everyday Artisan Bread course.
We love mixing this dough by hand in a large bowl, but you can certainly use an electric mixer (like a KitchenAid stand mixer) fitted with the dough hook if you prefer!
Just keep an eye on it as the mixer runs: Stand mixers can often trap pockets of flour on the very bottom of the bowl, which makes the mixing process take a lot longer.
If your mixer feels like it's not really making progress, turn it off, remove the bowl, and flip the dough over a few times by hand to help it get back on track!
This no knead whole wheat bread recipe calls for "warm water" when proofing your yeast, but what exactly does that mean?
A good rule of thumb is that water should be “warm to the touch.”
Too-hot water (typically 130-140° Fahrenheit and above) will kill your yeast, but use too-cold water and your yeast will take too long to activate.
We usually aim for a water temperature of 95° to 110° Fahrenheit. You should be able to comfortably hold your hand under water running at about 100 degrees – it should feel quite warm, but not hot. Use a digital thermometer for a precise measurement if you like!
Yes. After finishing your final set of stretch and folds, cover the dough with an airtight lid or a piece of plastic wrap and transfer to the fridge overnight (ideally 6-10 hours).
The next day, let the dough come back to room temperature for a few hours on the counter. Shape and bake normally.
You'll have a slightly taller, more compact loaf with a more developed flavor: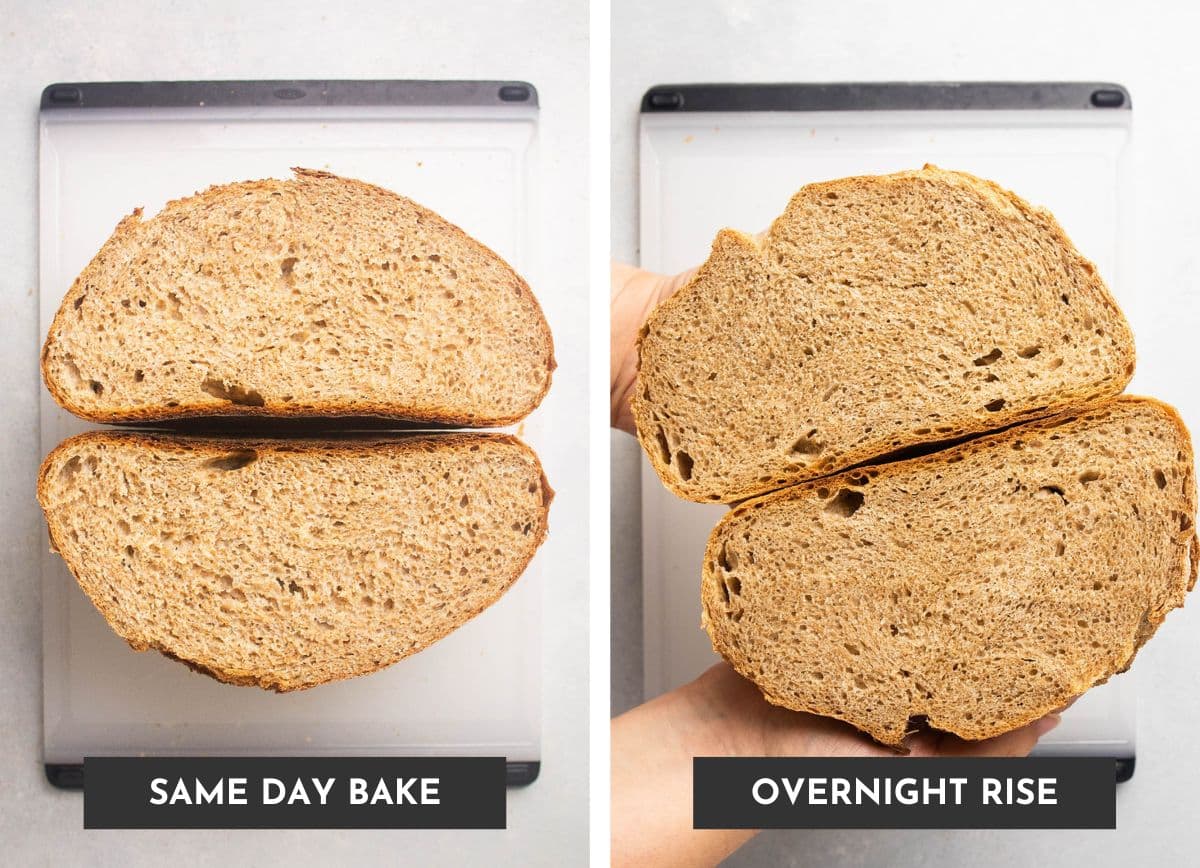
See even more detailed FAQs about bread baking in our Easy Crusty French Bread post, or enroll in our Everyday Artisan Bread course for step-by-step training lessons that take you through every technique, buzzword, and more!
📖 Recipe
Whole Wheat Crusty Bread
- Prep Time: 30 minutes
- Total Rise Time: 1 hour 30 minutes
- Cook Time: 40 minutes
- Total Time: 3 hours
- Yield: 1 loaf 1x
- Category: Bread
- Cuisine: American
Description
This easy, crusty whole wheat bread is baked in a Dutch oven for a crispy crust and soft interior. Instead of kneading, you'll gently fold the dough over on itself - a technique called stretch and folds - as it rises. This creates an elastic, easy-to-shape dough and a taller loaf with minimal effort!
Ingredients
- 9 grams active dry yeast (2 ¼ teaspoons)
- 12 grams honey (1 Tablespoon)
- 320 grams warm water, about 100° Fahrenheit (1 ⅓ cup)
- 120 grams All Purpose Flour (about 1 cup when measured correctly by scooping and leveling), plus extra for dusting
- 295 grams Whole Wheat Flour (about 2 ¼ cups)
- 12 grams kosher salt (3 teaspoons)
Instructions
Proof the Yeast
- Mix yeast, honey, and warm water in a large mixing bowl. Let it sit for 5-10 minutes, until yeast is foamy.
Mix the dough
- Add all purpose flour and whole wheat flour to the yeast mixture. Use a wooden spoon or sturdy spatula to stir dough about halfway, then sprinkle kosher salt across the surface of the dough. Continue stirring until no dry flour remains.
- Cover dough with a clean tea towel and let rest at room temperature for 15 minutes.
Three sets of stretch and folds
- Run your hands under a bit of cold water to prevent the dough from sticking. Gently slide your hands under the dough, stretch one side up towards you, then fold it in towards the center - kind of like folding an envelope. Repeat this process on each side of the dough, until you've done 4-6 of these stretch and folds. The dough may feel loose and sticky here - that’s ok! Just run your hands under a little more cold water if it’s sticking too much. You'll notice the dough get smoother and feel a bit tighter the more you fold it.
- Re-cover the dough with a tea towel and let rise another 15 minutes, then perform another set of stretch and folds. Repeat this process one more time for a total of 3 sets of stretch and folds.
- After your third set of stretch and folds, cover the dough and let it rise undisturbed for 45 minutes, until it's not quite doubled in size.
Shape the dough & final rise
- Preheat the oven. Place an empty dutch oven (with the lid on) in your oven and heat to 460° Fahrenheit.
- Lightly flour a large cutting board.
- Gently tip the dough out of the bowl and onto the cutting board. Don't punch the dough down - you want to preserve all those air bubbles!
- Shape the loaf. Pull each edge of the dough in towards the center (like folding an envelope) a few times, until you feel the dough tighten up and start to resist your folds. Flip the dough over and gently pull it towards yourself to tighten it into a nice round loaf.
- Flour a proofing basket or a small mixing bowl; place your loaf into it seam-side down. Cover with a tea towel and let rise another 30 minutes while the oven heats up.
Bake
- Gently tip your bread dough onto a piece of parchment paper. Make sure the seam-side is facing up this time - that will create the beautiful cracks across the surface of your finished loaf.
- Use oven mitts to carefully remove the hot dutch oven from the oven and set the lid aside. Use the edges of the parchment paper to carefully lower your loaf into the hot dutch oven, use oven mitts to return the dutch oven lid to the pot, then slide the whole thing back into the your hot oven.
- Cook bread for 30 minutes.
- After 30 minutes, use an oven mitt to remove the lid from your dutch oven. The bread should be crusty and lightly browned.
- Return the dutch oven to the oven and cook, uncovered, for 5-10 minutes more, until the bread has deepened in color. Carefully remove bread to a cooling rack, and let cool at least 30-60 minutes before slicing.
Notes
If you're new to bread baking, we recommend starting with our no knead crusty bread recipe before moving on to whole wheat. We introduce a new technique - stretch and folds - in this recipe; we highly recommend reading the FULL post above before you start baking for best results. You'll find step by step photos and lots of important tips to help you along!
Please use a kitchen scale! Measuring flour by volume (with cups) is notoriously unreliable – for best results, use a scale to measure by weight with the gram measurements provided! We use and recommend Escali kitchen scales. If you don’t have a kitchen scale, measure ingredients (especially flour, which is the most finicky) with the scoop and level method for best results.
Equipment. We used a 6-quart Dutch oven in these photos; we have also tested this recipe with 4- and 5.5- qt. Dutch ovens. As always, please consult the care instructions on your individual equipment.
Whole wheat flours can vary by brand. We test all our recipes with - and highly recommend - King Arthur Flours for bread baking. This recipe works best with fresh, high quality wheat flour: It should smell nutty and slightly sweet straight out of the bag, but not musty.
Nutrition
- Serving Size: 1/10 loaf (about 1 thick slice, or 2 thin slices)
- Calories: 151
- Sugar: 1.1 g
- Sodium: 467.6 mg
- Fat: 0.9 g
- Saturated Fat: 0.2 g
- Carbohydrates: 31.7 g
- Protein: 5.5 g
- Cholesterol: 0 mg


Comments
No Comments