

This small batch crusty bread recipe has a thin, crispy crust and a soft interior. Ready in just 3 hours (with no kneading required). The perfect size for two or three people!

We've taught thousands of people to bake their first loaf of bread with our best Easy Crusty French Bread recipe. And while we love digging into that giant loaf, we know that sometimes you just don't need that much bread!
Enter: This small batch crusty bread recipe.
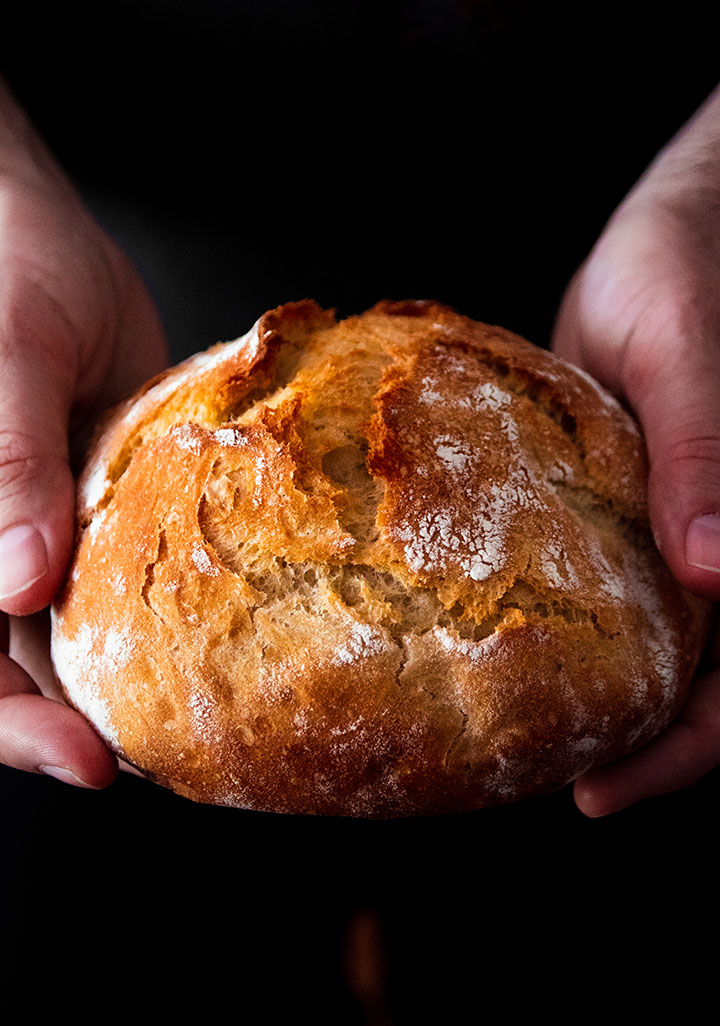
(Also: How FREAKING CUTE is this lil' mini baby loaf?! I'm in love).
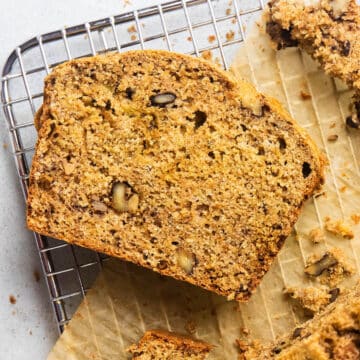
This is a scaled-down version of our classic no knead artisan bread, and it's perfect for just a few people! It makes a small loaf that fits easily in the palm of your hand - typically about 6 inches in diameter.
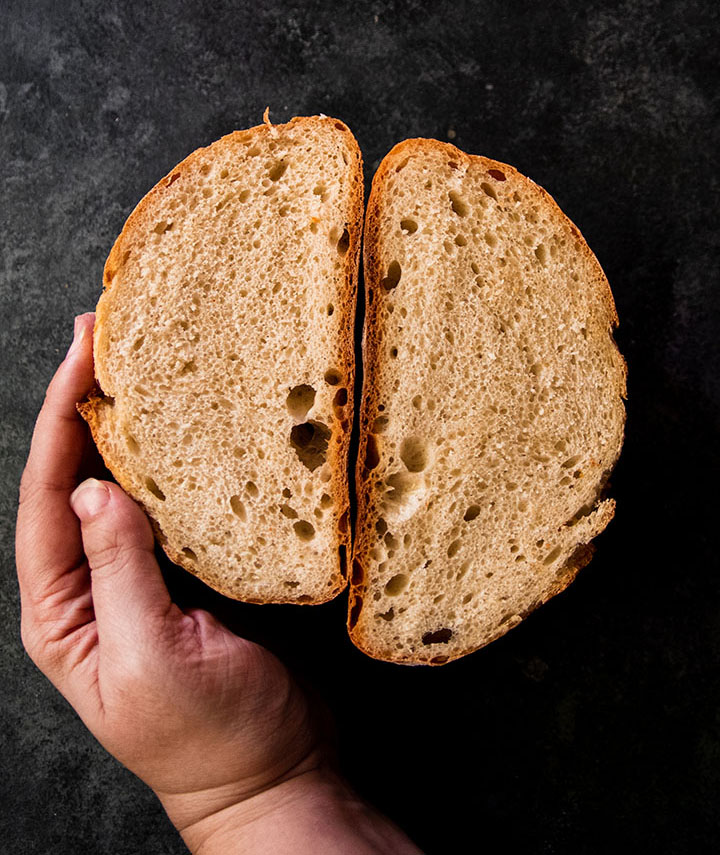
I make this small batch loaf with soup or stew for two people; if we're making sandwiches or crostini, it will serve 4. I usually get about 10 half-inch slices of bread with this recipe.
PS - If you've made our original recipe before, you'll notice a few small differences here: we tweaked some things to keep this loaf of bread extra simple, and we adjusted the cook time to account for a smaller size.
How to make this small batch no knead bread
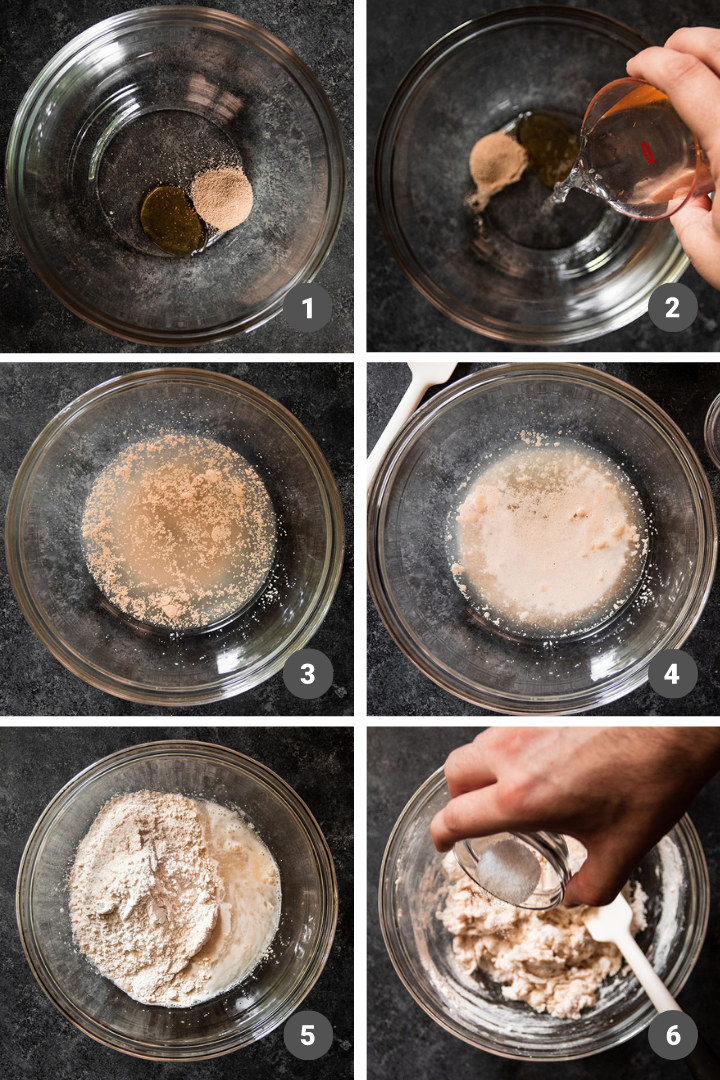
Mix the dough (10 minutes)
Mix active dry yeast and a bit of honey with warm water, then let that mixture sit for a few minutes until the yeast activates and foams. Next, mix in the flour and salt. Stir everything together until no dry flour remains and you have a nice, shaggy dough.
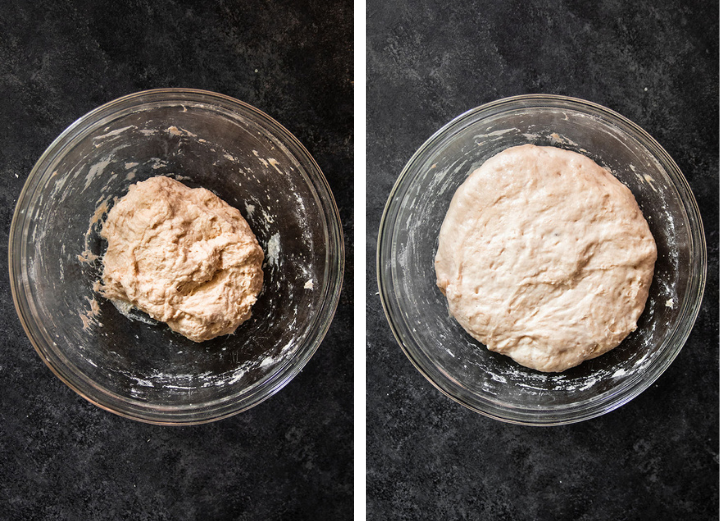
Let it rise (1 hour)
Cover the dough with a clean towel and let it rise for about an hour until it's doubled in size.
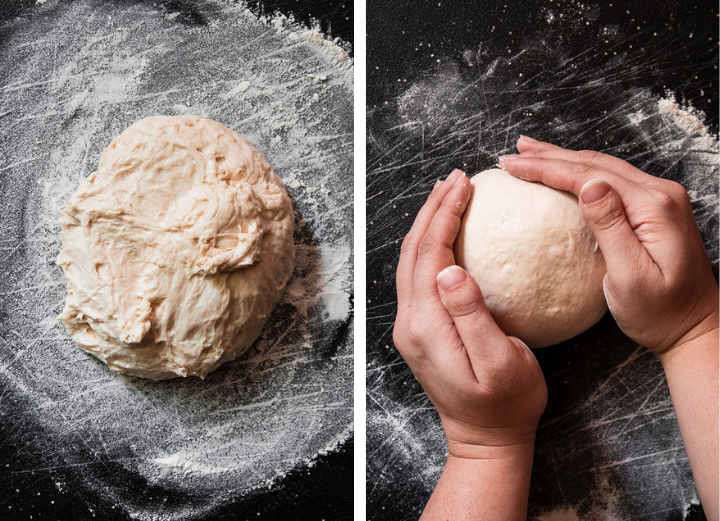
Shape your loaf & final rise (30 minutes)
Shape the dough into a boule (see the video below for how to do this!) and let it rise another 30 minutes or so in a small mixing bowl or proofing basket while you heat the oven.
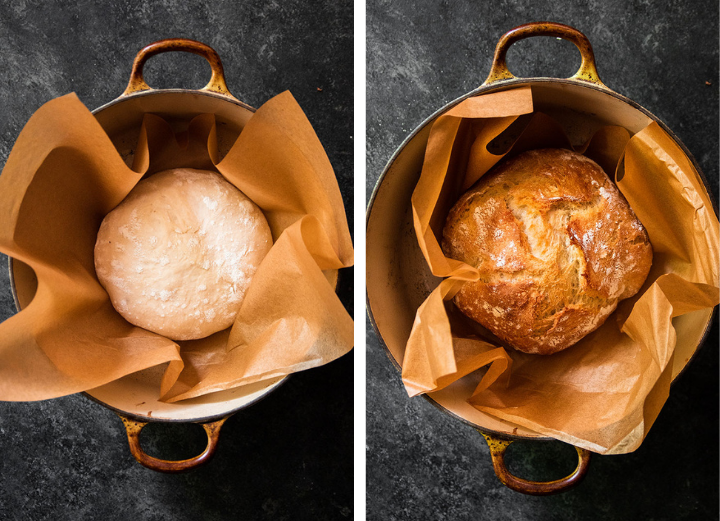
Bake! (30 minutes)
Bake your loaf in a hot Dutch oven (or use one of our other methods!) for 22 minutes with the lid on, then remove the lid and bake another 5-10 minutes to give the crust some more color.
A few tips for successful loaves
- Use a kitchen scale if you have one! Measuring by weight (with a scale) is much more accurate than measuring by volume (with cups). If you have a kitchen scale, please use it! (No kitchen scale? Measure your flour with the scoop and level method for best results!)
- Great bread takes patience and persistence. When you're first learning how to make crusty French bread at home, it might not look exactly like these pictures. THAT'S OKAY! The more you practice, the better your bread will get. Stick with it!
- Use high-quality flour. Trust us: The type of flour you use matters. A LOT. We recommend baking with King Arthur Flour or Bob's Red Mill flour for best results - these flours are the most consistent, and they both have a high protein content (which gives you a stronger, more elastic, less sticky dough!)
- Read through our baking tips in this post or join our Everyday Artisan Bread course for extra help and support!
Small Batch Bread FAQs
Yes! We love using a Dutch oven to create a crispy, crackly crust on our bread, but it's definitely not the only way to bake great bread at home. Check out our post about how to bake bread without a Dutch oven.
Yes! We call for All Purpose Flour in this recipe because most people tend to have it on hand, but you can swap bread flour for some or all of the AP flour here. Bread flour will make your dough a little bit smoother and more elastic, and may give you a slightly taller loaf.
You can replace up to 50% of the All Purpose flour in this recipe with whole wheat flour if you like. We don't recommend using more than 50% whole wheat flour here as it can change the texture of the loaf and result in a denser crumb.
Use water that is "warm to the touch" - you should be able to comfortably hold your hand in it! We typically aim for water between 95° and 110° F.
We recommend mixing this dough by hand in a mixing bowl! Because it's such a small amount of dough, we've found that a stand mixer doesn't work quite as well here. You spend so much time scraping down the sides of the mixer bowl and repositioning the dough that you might as well just mix by hand!
See even more detailed FAQs about bread baking in our Easy Crusty French Bread post, or enroll in our Everyday Artisan Bread course for step-by-step training lessons that take you through every technique, buzzword, and more!
🎥 Step by Step Video
Bonus Video: How to shape a loaf of bread
This video is an excerpt from our Everyday Artisan Bread online course. It demonstrates how to shape a loaf of bread into a round boule. The dough in this video makes a large loaf, but the technique is the same for this small batch recipe!
📖 Recipe
Small Batch Crusty Bread
- Prep Time: 15 minutes
- Inactive Time: 1 hour 30 minutes
- Cook Time: 30 minutes
- Total Time: 2 hours 15 minutes
- Yield: 1 small loaf (2-4 servings) 1x
- Category: Bread
- Cuisine: American
- Diet: Vegetarian
Description
This easy small batch crusty bread is perfect as a quick side dish for two or three people!
Ingredients
- 1 teaspoon active dry yeast (4 grams)
- 1 teaspoon honey (6 grams)
- ⅔ cups warm water (150 grams)
- 1 teaspoon kosher salt (4 grams)
- 1 to 1 ⅔ cups All-Purpose Flour (200 grams), plus extra for dusting (see recipe notes)
Instructions
MIX THE DOUGH AND FIRST RISE (1 HOUR)
- Combine yeast, honey, and warm water in a large mixing bowl.
- Let the yeast proof for about 5 minutes, until the mixture looks nice and foamy.
- Add flour to bowl. Mix with a sturdy spatula until the dough starts to come together, then add salt and mix well, until no dry flour remains. Dough should be slightly loose, shaggy, and a bit sticky!
- Cover bowl with a clean towel. Let rise 1 hour or until doubled in size.
SHAPE THE DOUGH & FINAL RISE (30 MINUTES)
- When dough has risen, lightly flour a large cutting board.
- Tip dough out onto the board. Don’t punch the dough down - handle it gently to preserve all those air bubbles! If the dough is sticking to the bowl, run your hand under cold water (to prevent sticking) and gently pull the dough onto the cutting board.
- Shape your dough into a round loaf by gently pulling each edge into the center like you’re folding an envelope. Fold the dough in towards the center several times, until the dough stiffens and begins to resist your folds. When that happens, flip the dough over and gently pull it towards you, across the cutting board, so that the loaf tightens a bit.
- Dust a small mixing bowl with flour (I like to line my bowl with a linen napkin to help distribute the flour more evenly) and place your loaf into the bowl seam-side down. Cover with a clean towel and let rise for another 30 minutes while you heat the oven.
HEAT THE OVEN
- While bread proofs, place an empty dutch oven (with the lid on) in your oven and heat to 460° F.
BAKE! (30 MINUTES)
- When the oven is hot, tip your loaf - seam side UP this time - onto a piece of parchment paper.
- Use oven mitts to pull out the hot Dutch oven and remove the lid. Use the parchment paper to carefully lift your loaf into the pot, then use your oven mitts to return the Dutch oven lid and then slide the pot back into your hot oven.
- Cook bread for 22 minutes.
- After 22 minutes, carefully remove the lid from your dutch oven. The bread should be crusty and lightly browned. Continue baking, uncovered, for another 5-10 minutes to deepen the color.
- Transfer bread to a cooling rack and let cool at least 30 minutes (and ideally a few hours) before slicing. Enjoy!
Notes
Equipment. We have tested this recipe in Le Creuset, Staub, Marquette Castings, and Challenger Breadware Dutch ovens. Be sure your Dutch oven is safe at high temperatures, and as always, please check the care instructions on your own equipment before baking.
Ingredients. For best results, use a high-quality flour for this recipe: We recommend King Arthur Flour and Bob's Red Mill flour. This recipe was developed with Diamond Crystal Kosher Salt, which is colloquially known as the "least salty salt." If you need to use table salt or another fine salt and you are measuring by volume with a teaspoon, reduce the amount of salt by ¼ teaspoon (if you're measuring by weight, don't worry about what brand of salt you're using - just follow the gram measurements!) If you don't have honey, use sugar in its place.
Please use a kitchen scale! Measuring flour with cups is notoriously unreliable, so please use a kitchen scale and follow our gram measurements if you can! If you don't have a scale, measure your flour with the scoop-and-level method to be as accurate as possible. (We have a whole write-up about this flour measuring conundrum in our online course!)
This is a slightly sticky dough - it won't pull into a smooth ball as you mix it, and it will be a bit sticky and shaggy. Don't worry - it will smooth out as it rises! If the dough is sticking too much while you're shaping it, add another dusting of flour.
Do I need a proofing basket? If you've made our Easy Crusty French Bread before, you know that we love using a proofing basket to help the bread hold its shape during its final rise! With this small loaf, a 9-inch proofing basket is often too big, so we prefer using a small mixing bowl (about 6 inches across) to help this loaf hold its shape more effectively.
Love this recipe? Check out our Roasted Garlic and Rosemary Bread or our Easy Asiago Bread next! And if you're ready to level up your bread game (and get our best recipes without the ads!) check out our Everyday Artisan Bread course.
Nutrition
- Serving Size:
- Calories: 191
- Sugar: 1.6 g
- Sodium: 313.2 mg
- Fat: 0.6 g
- Carbohydrates: 40 g
- Protein: 5.6 g
- Cholesterol: 0 mg


Paula Glowish
My parchment paper recommends temps to 420, not sure how to go to 460 without burning!
Rhonda @ Life As A Strawberry
We always recommend siding with your product recommendations and would recommend contacting them regarding the temperature. Our parchment is rated to 450°F and it works great. You can bake without parchment, just be SUPER careful when you are putting the bread into and removing it from the Dutch oven as it is very easy to burn yourself.
Corinne
what's the minimum of size I could use for this recipe? I have 1.5 qt size. I do have a larger one
Rhonda @ Life As A Strawberry
We haven't tested this in a 1.5qt Dutch oven, but it might work depending on the dimensions of the pan. Make sure the boule fits easily in the Dutch oven - you want space between the top of the boule and the lid for the bread to rise during baking.
Emiley
This is my first French bread. It’s sooo easy and turned out wonderful! I can’t stop looking at it. It’s fluffy and soft to eat w a nice thin crunchy outside. I want to triple the recipe to make 3 loaves at a time! Do you think you could bake them at the same time too? In 3 different Dutch ovens?
Rhonda @ Life As A Strawberry
So glad you love this recipe! If use the 2x or 3x recipe multiplier, double everything except the yeast in this recipe for best results**. If your oven is large enough for 3 Dutch ovens, it should work just fine to bake them all at once.
NOTE: **the converter in the recipe card below may tell you to double the yeast as well, but you really don't need to. We just can't figure out how to turn the converter off *facepalm*
wyona
I made this to use on my chicutarie board ,it was so easy and my husband ans I loved it. This recipe is definitely a keeper.
Thank you so much
Rhonda @ Life As A Strawberry
Wahoo! So glad you loved it!
kelsey
my favorite bread recipe!
Rhonda @ Life As A Strawberry
Mine too!
Alicia
Absolutely my new go to bread recipe! If I do the 2x or 3x recipe version, are the cook times the same. 22 min lid on, 10 min lid off?
Rhonda @ Life As A Strawberry
So glad you love this recipe! If use the 2x or 3x verions, double everything except the yeast in this recipe for best results*. After the first rise, divide the dough and form two (or three) loaves (our preference) or form one large loaf. If you bake a large loaf, you will likely need to extend the bake time and it may not cook quite as evenly - just keep an eye on it and use your best judgment! (*the converter in the recipe card below may tell you to double the yeast as well, but you really don't need to. We just can't figure out how to turn the converter off *facepalm*)
NOTE: I do a 30 min lid on bake and then 5-10 min lid off bake. Every oven is different, if your 22 min lid on/10 min lid off bake is perfect for your loaf, stick with that for a single loaf and adjust for a larger loaf.
MLL
I have made this recipe several times exactly as written and it's a keeper! I keep coming back to it because I love the small size, it's the perfect amount for my small household. I like that is quick to make too and it turns out great every time. The video included is very helpful too, since I am not an experienced bread make. I felt like my dough looked like the video and it gave me confidence that I was doing it correctly. So do not fear, anyone can do this one, I promise!
Rhonda @ Life As A Strawberry
We're so glad the you're finding the video useful and are loving this recipe! We love the size and agree with you - it's so easy to make!
Deanna Padilla
Great recipe! I usually make sourdough boules, but I needed a quick loaf to go with a soup for dinner. This little loaf was perfect! Lovely crumb and thin crust. I’ll make this often.
Rhonda @ Life As A Strawberry
So glad you loved it!
Morgan Linder
The bread is good but the website is a pain to navigate! What is the done temp of the bread? And do the 3 sizes of loaves really cook in the same amount of time?
Thank you
Rhonda @ Life As A Strawberry
Glad you liked the loaf of bread! I'm not sure what 3 sizes you're referring to, this recipe is for a small loaf of crusty bread. We don't take the temp of the bread, if you're following the recipe as written it is done in 30 minutes, and you deepen the crusty color with an additional 5-10 minutes. If you don't want to read all of the notes and see the step-by-step photos in the post, you can select the JUMP TO RECIPE button at the top of the post.
Patti
I’ve made larger loaves of Dutch oven artisan bread and looking forward to trying this one. Do you know if this recipe can be adapted to use gluten free flour? Thank you for the help and recipe.
Rhonda @ Life As A Strawberry
We haven't tested this with gluten free flour.
Lisa H.
LOBES this and will definitely be making it again and again. I weighed all ingredients, followed directions to a tee and it couldn’t have turned out better, wish I could post a picture of it! Thank you so much for an awesome recipe, perfect for 1 person with leftovers or for 2 people.
Rhonda @ Life As A Strawberry
So glad you loved it!
Aidan Trulove
Just had my first taste of the loaf and it is perfect! I will say that for mine, I think I added a touch too much water, so I compensated with a bit of extra flour, and it ended up working just fine. Also, I will add that if you have a fan oven, you may want to bake for a little less time.
The recipe is fantastic, and, as someone who is a very amateur baker, any issues that came up were easily solvable! What a lovely beginner recipe, I can't wait to make it again!
Rhonda @ Life As A Strawberry
So glad you loved it! Yes, if using a fan in your oven (like a convection oven) you may need to adjust the baking time.
Ramona
Good recipe, but you must grease or oil the final rising bowl. Just dusting it with flour means that the dough will not tip out easily. I had to use my hands, which deflated the dough entirely. Very disappointing.
Rhonda @ Life As A Strawberry
If you have trouble with it sticking in your bowl with just flour, not seeing your set up, I'd guess the flour is not sticking to the sides of the bowl and as the dough rises there is nothing there to keep it from sticking. Likewise, there are probably areas on the boule that don't have a light flour coating that come into contact with the bowl.
While you can use some oil in the bowl, that leaves you with potentially oily bread. Instead, try dusting a clean linen cloth (napkin or tea towel) with flour and placing it in the bowl before you place your lightly floured boule in for the final rise. I lift the entire towel out of the bowl and roll the boule onto my parchment before placing in my Dutch oven.
Katy
What size Dutch oven did you use for the mini artisan bread?
Rhonda @ Life As A Strawberry
You can use almost any size (not the tiny mini ones!) but we frequently recommend a 4 quart Dutch oven.
Stuti Sharma
I finally got my first successful loaf of bread with this recipe. I've made about six loaves since! Very easy and foolproof! Would doubling the ingredients work for a larger loaf (since I am making so many of them)?
Rhonda @ Life As A Strawberry
Yeah - so glad it worked, and 6 loaves - way to go!
Doubling definitely works. There is a section in the post about this exact topic. In general, double all the ingredients in this recipe except the yeast best results. After the first rise, divide the dough in half and form two loaves (our preference) or form one large loaf. If you bake a large loaf, you will likely need to extend the bake time and it may not cook quite as evenly - just keep an eye on it and use your best judgment!
Stuti Sharma
Thank you so much for the reply! So I have a small oven and can only bake one loaf at a time, is it okay to let the second dough rise for 30 minutes more (while the first loaf bakes)? Or would you put the second dough in the fridge? I am a complete beginner if you couldn't tell. Thank you for your recipe and help!
Rhonda @ Life As A Strawberry
So glad you love the bread and kudos to you for taking the leap into bread baking! Letting a 2nd loaf rise on the counter for an extra 30 minutes runs the risk of the dough falling (or collapsing) in the oven. However, there are a few options for a 2nd loaf.
• You can put it in the refrigerator for about 20 minutes during the first rise, then remove it and let it finish doubling on the counter before shaping and 2nd rise.
• You could also mix the first loaf, wait 30 minutes, mix the 2nd loaf. This puts the timing of the 2nd loaf 30 minutes behind the 1st loaf.
Let us know what you do and how it works for you. Happy baking!
Patty
Easy and delicious. Honey added a subtle sweetness. Video was very helpful.
Team Life As A Strawberry
We're SO happy to hear you enjoyed this recipe!
Linda Sheehan
Hi Jessie…I was following another recipe to your website & saw the recipe for the small batch crusty bread. It’s so perfect for one person & I don’t have to wait all night for the rising. Yay!!!! One happy lady here! Thank you!
Team Life As A Strawberry
WAHOO! We're so happy to hear this was the perfect loaf for you!